Preface
Goal: Simple conditional cell coloring using Python Macro.
After merging a bunch of raw data, combined as single sheet. You might want to make your sheet visually attractive, by coloring each row differently based on the value of each row.
Why Coloring?
Because I can.
What color?
The Puppy Case.
Imagine a case, you have three cameras that could identify dogs, by gender and age, and also with the confidence score.
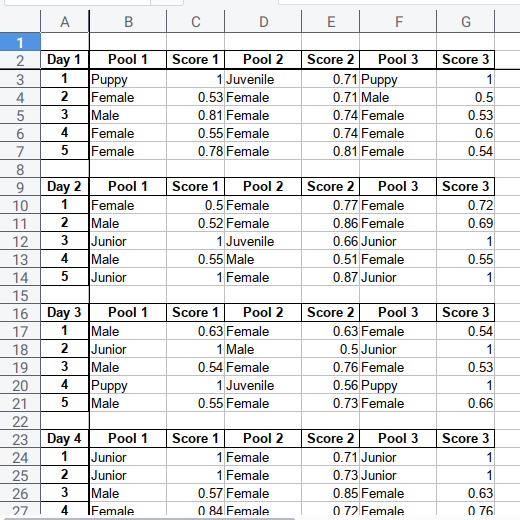
You can color, not just by the result. But also the gradient based on the confidence score.
The figure above is a simplification of real data.
Example Data
You can download here
Why Automation?
Time savings.
Clear.
We should invest on thinking, rather than doing tedious repetitive task.
0: Reference
My personal gratitude to the owner of this tutolibro site.
We are going to grow our knowledge, beyond the article above with real life example.
Material From Tutolibre
Consider write the code in article above with a ifew modification. Do not worry about the length of the code below. I am going to use different approach later.
# coding: utf-8
from __future__ import unicode_literals

def p00_get_cell_type_test():
  # get the doc from the scripting context
  desktop      = XSCRIPTCONTEXT.getDesktop()
  model        = desktop.getCurrentComponent()
  active_sheet = model.CurrentController.ActiveSheet
Then we can get the cell value properly
  # get the range of addresses from selection
  oSelection   = model.getCurrentSelection()
  oArea        = oSelection.getRangeAddress()

  # get the first cell
  firstRow     = oArea.StartRow
  firstCol     = oArea.StartColumn
  selectedCell = active_sheet. \
    getCellByPosition(firstCol,firstRow)
  cellType     = selectedCell.Type.value
  cellValue    = selectedCell.Value
And finally print in console
# display in next cell
print("Cell (%d,%d) Type: %s" \
% (firstCol, firstRow, cellType))
active_sheet.getCellByPosition(
firstCol+1, firstRow
).String = "Cell Type:" + cellType
# display in next of next cell
print("Cell (%d,%d) Type: %s" \
% (firstCol, firstRow, cellValue))
active_sheet.getCellByPosition(
firstCol+2, firstRow
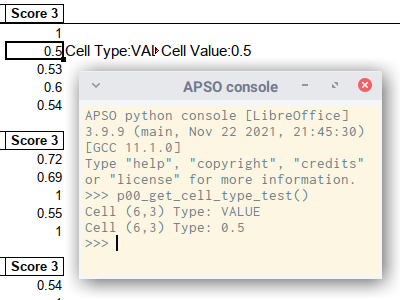
).String = "Cell Value:" + str(cellValue)Console Result
The result of the sheets will be as below:
You should read the original article, for better explanation.
1: Getting The Sheet
We need to get the right sheet to work with.
The Long Version
For any desire to activate sheet, you can examine code below:
def p01_activate_sheet_test():
  desktop    = XSCRIPTCONTEXT.getDesktop()
  model      = desktop.getCurrentComponent()
  sheets     = model.getSheets()
  sheet      = sheets.getByName("Combined")
  controller = model.getCurrentController()
  controller.setActiveSheet(sheet)
You can try this code with a worksheet with many sheet tab, and see how the focus change to your chosen sheet.
The Short Version
However there is a shorter way to select sheet.
def p02_show_value_test():
  # get the document from the scripting context
  document   = XSCRIPTCONTEXT.getDocument()
  sheet      = document.Sheets["Combined"]
However, you still need this long code to activate the sheet focus.
  XSCRIPTCONTEXT  \
    .getDesktop() \
    .getCurrentComponent()  \
    .getCurrentController() \
    .setActiveSheet(sheet)
Reading
For official guidance, you can read the OpenOffice version:
2: Showing Value
Very Similar to the first code,
but this time with hardcoded cell address.
Consider use B3 and C3,
we will display the output in console.
def p02_show_value_test():
# ...
b3 = sheet['B3']
print("Cell B3: Type = %s, String = %s" \
% (b3.Type.value, b3.String))
c3 = sheet['C3']
print("Cell C3: Type = %s, Value = %.2f" \
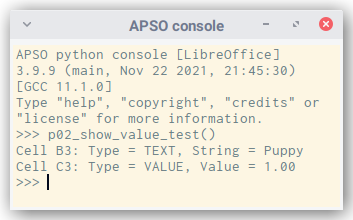
% (c3.Type.value, c3.Value ))Console Result
The result of the python macro code above will be as below:
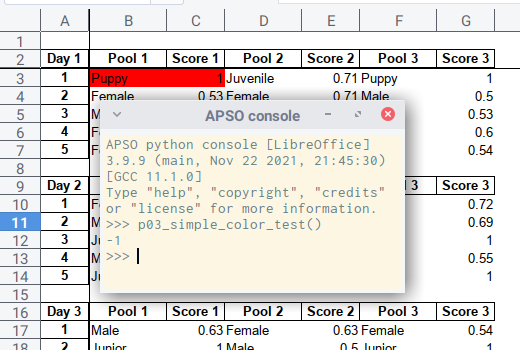
3: Cell Coloring
We can just fill the cell color with only few line.
def p03_simple_color_test():
  document   = XSCRIPTCONTEXT.getDocument()
  sheet      = document.Sheets["Combined"]

  b3c3 = sheet.getCellRangeByName('B3:C3')

  bgcolor = b3c3.CellBackColor
  print(bgcolor)
  b3c3.CellBackColor = 0xFF0000
The result of the python macro code above will be as below:
Color Library
Since we deal with gradient of color, we should prepare the color. There are a few option, ranging from open color, to google material color.
Percentage Reasoning
My choice comes to Material color, because it has scale range from 100 to 900. with additional 50 that we can use. Perfect for percentage scale from zero to a hundred percent.
Since I do not need all material color.
I only write three colors here: blue, lime and green.
blueScale = {
  0: 0xE3F2FD, 1: 0xBBDEFB, 2: 0x90CAF9,
  3: 0x64B5F6, 4: 0x42A5F5, 5: 0x2196F3,
  6: 0x1E88E5, 7: 0x1976D2, 8: 0x1565C0,
  9: 0x0D47A1
}

limeScale = {
  0: 0xF9FBE7, 1: 0xF0F4C3, 2: 0xE6EE9C,
  3: 0xDCE775, 4: 0xD4E157, 5: 0xCDDC39,
  6: 0xC0CA33, 7: 0xAFB42B, 8: 0x9E9D24,
  9: 0x827717
}

greenScale = {
  0: 0xE8F5E9, 1: 0xC8E6C9, 2: 0xA5D6A7,
  3: 0x81C784, 4: 0x66BB6A, 5: 0x4CAF50,
  6: 0x43A047, 7: 0x388E3C, 8: 0x2E7D32,
  9: 0x1B5E20
}
4: Conditional Coloring
Preparing The Color Scale
First, we need to import math library.
import mathThe code is simply multiply the probabilty by ten. Then round to floor integer.
colScale = math.floor(prob*10)Now we have the right color scale.
Initialization Part
def p04_conditional_color_test():
  # get the document from the scripting context
  document   = XSCRIPTCONTEXT.getDocument()
  sheet      = document.Sheets["Combined"]

  b3c3 = sheet.getCellRangeByName('B3:C3')
  b3   = sheet['B3']
  c3   = sheet['C3']

  pred = b3.String
  prob = c3.Value
  colScale = math.floor(prob*10)
  print(colScale)

  # ... conditional formatting below
The colorscale for Puppy will be shown in console as below:
10Wait, we don’t have a ten scale right? Don’t worry, the conditional for puppy, will take care of it.
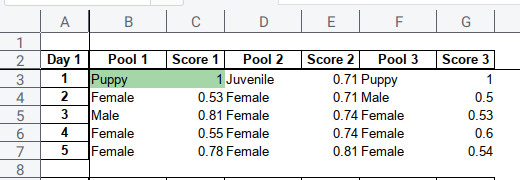
Conditional Part
Consider go further, with the conditional part. We can hardcoded any possibility that we need.
def p04_conditional_color_test():
  # ... initialization code

  if pred=='Female':
    b3c3.CellBackColor = blueScale[colScale]
  elif pred=='Male':
    b3c3.CellBackColor = limeScale[colScale]
  elif pred=='Junior':
    b3c3.CellBackColor = greenScale[4]
  elif pred=='Juvenile':
    b3c3.CellBackColor = greenScale[3]
  elif pred=='Puppy':
    b3c3.CellBackColor = greenScale[2]
The result of the python macro code above will be as below:
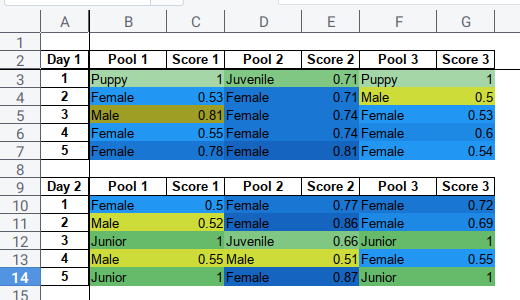
5: Multi Row Conditional Coloring
We can adopt the approach above for broaden utilization.
Main Function
The main function, should handle
-
Multiple row: such as
range(1, 60) -
Multiple column: such as
B:C,D:EandF:G.
def color_all():
  document   = XSCRIPTCONTEXT.getDocument()
  sheet      = document.Sheets["Combined"]

  rows = range(1, 60)
  for row in rows:
    _color_me(sheet, row, 'B', 'C')
    _color_me(sheet, row, 'D', 'E')
    _color_me(sheet, row, 'F', 'G')
Generic Cell Function
And the cell function should be generic enough, to handle any cell address.
def _color_me(sheet, row, name_pred, name_prob):
  column_pred = sheet["%s%d" % (name_pred, row)]
  column_prob = sheet["%s%d" % (name_prob, row)]
  column_both = sheet["%s%d:%s%d" \
    % (name_pred, row,name_prob, row)]

  pred = column_pred.String
  prob = column_prob.Value

  if not (type(prob) == int or type(prob) == float): return
  colScale = math.floor(prob*10)

  # ... conditional formatting below
This is basically the same as previous code, but generic.
Conditional Part
The conditional part can also be generic.
def _color_me(sheet, row, name_pred, name_prob):
# ... initialization code
if pred=='Female':
colorPick = blueScale[colScale]
elif pred=='Male':
colorPick = limeScale[colScale]
elif pred=='Junior':
colorPick = greenScale[4]
elif pred=='Juvenile':
colorPick = greenScale[3]
elif pred=='Puppy':
colorPick = greenScale[2]
else: return
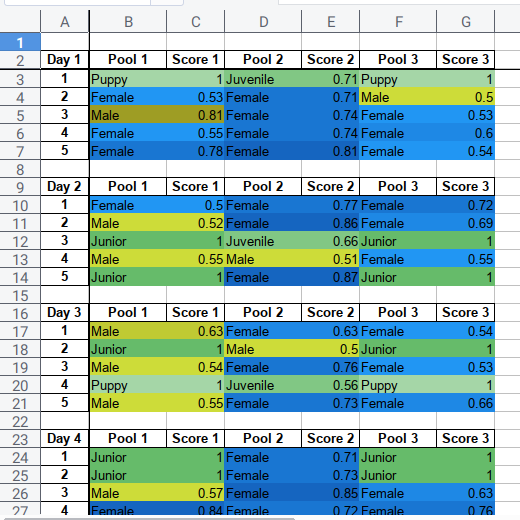
column_both.CellBackColor = colorPickdef color_all():Result in Sheet
The result of the python macro code above will be as below:
What is Next 🤔?
We are going to discuss custom pivot table in the next article.
Consider continue reading [ LibreOffice - Custom Pivot - Part One ].