Preface
Goal: Monitor excel file changes and show the result in browser using websocket.
This is a multiparts article.
7: Asynchronous Request Task
Coroutine
We have already sent data. Now we can also receive data. But how to do it concurrently, without blocking each other?
We need this create_task method.
Official Documentation
Class: Init
Additional connections property,
initialized as empty set.
class Xl2WebExample:
  def __init__(self, filepath, filename, site, port):
    # save initial parameter
    self.filepath = filepath
    self.filename = filename
    self.site = site
    self.port = port

    # websocket broadcast collection
    self.connections = set()
![Python: Broadcast: Init][13b-py-init]
Create Task
Python Source Code
Class Skeleton
More asynchronous method
In order to run both sender and receiver concurrently,
we require to utilize create_task.
This means we need to add method,
to be called by this create_task method.
#### Class: Init

Additional `connections` property,
initialized as empty set.

<div class="highlight"><pre style="color:#f8f8f2;background-color:#272822;-moz-tab-size:4;-o-tab-size:4;tab-size:4"><code class="language-python" data-lang="python"><span style="color:#66d9ef">class</span> <span style="color:#a6e22e">Xl2WebExample</span>:
  <span style="color:#66d9ef">def</span> __init__(self, filepath, filename, site, port):
    <span style="color:#75715e"># save initial parameter</span>
    self<span style="color:#f92672">.</span>filepath <span style="color:#f92672">=</span> filepath
    self<span style="color:#f92672">.</span>filename <span style="color:#f92672">=</span> filename
    self<span style="color:#f92672">.</span>site <span style="color:#f92672">=</span> site
    self<span style="color:#f92672">.</span>port <span style="color:#f92672">=</span> port

    <span style="color:#75715e"># websocket broadcast collection</span>
    self<span style="color:#f92672">.</span>connections <span style="color:#f92672">=</span> set()</code></pre></div>

![Python: Broadcast: Init][13b-py-init]
class Xl2WebExample:
  def __init__(self, filepath, filename, site, port):
  def pack_data(self, fullname):
  def dump_data(self, data):

  async def send_data(self, fullname):
  async def monitor_localfile(self):
  async def monitor_webclient(self):

  async def handler(self, websocket, path):
  async def main(self):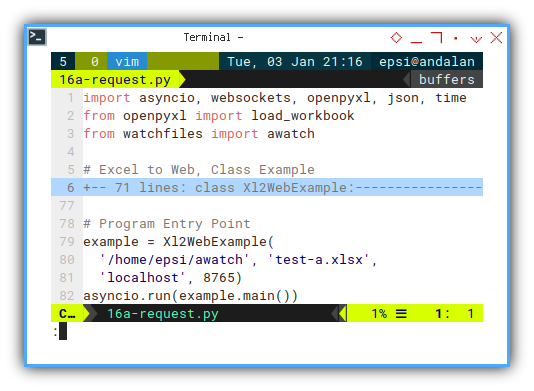
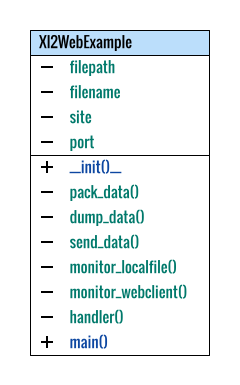
We can write class diagram as below:
+-----------------------+
| Xl2WebExample         |
+-----------------------+
| - filepath            |
| - filename            |
| - site                |
| - port                |
+-----------------------+
| + __init()__          |
| - pack_data()         |
| - dump_data()         |
| - send_data()         |
| - monitor_localfile() |
| - monitor_webclient() |
| - handler()           |
| + main()              |
+-----------------------+
Class: Websocket Handler
The task, sender and receiver, will called in handler as below.
  async def handler(self, websocket, path):
    self.websocket = websocket

    task_localfile = asyncio.create_task(
      self.monitor_localfile())

    task_webclient = asyncio.create_task(
      self.monitor_webclient())
#### Class: Init

Additional `connections` property,
initialized as empty set.

<div class="highlight"><pre style="color:#f8f8f2;background-color:#272822;-moz-tab-size:4;-o-tab-size:4;tab-size:4"><code class="language-python" data-lang="python"><span style="color:#66d9ef">class</span> <span style="color:#a6e22e">Xl2WebExample</span>:
  <span style="color:#66d9ef">def</span> __init__(self, filepath, filename, site, port):
    <span style="color:#75715e"># save initial parameter</span>
    self<span style="color:#f92672">.</span>filepath <span style="color:#f92672">=</span> filepath
    self<span style="color:#f92672">.</span>filename <span style="color:#f92672">=</span> filename
    self<span style="color:#f92672">.</span>site <span style="color:#f92672">=</span> site
    self<span style="color:#f92672">.</span>port <span style="color:#f92672">=</span> port

    <span style="color:#75715e"># websocket broadcast collection</span>
    self<span style="color:#f92672">.</span>connections <span style="color:#f92672">=</span> set()</code></pre></div>

![Python: Broadcast: Init][13b-py-init]
    # run these two coroutines concurrently
    await(task_localfile)
    await(task_webclient)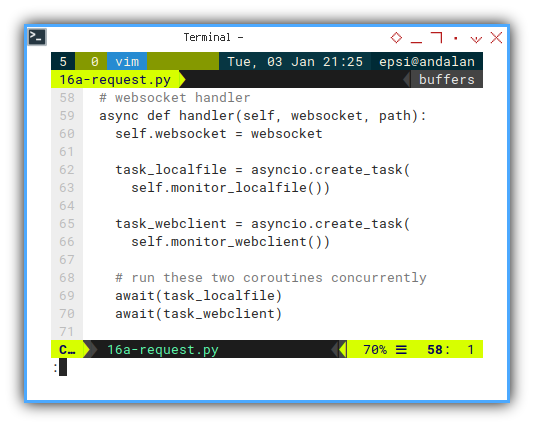
IOAsync: Create Task
Now all we have to do is to refactor, the sender and receiver method.
  async def send_data(self, fullname):
    event_data = self.pack_data(fullname)
    self.dump_data(event_data)
    await self.websocket.send(
      json.dumps(event_data))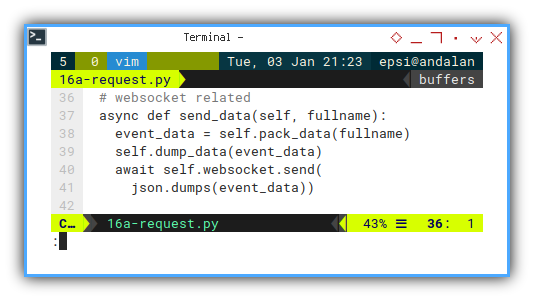
  async def monitor_localfile(self):
    async for changes in awatch(self.filepath):
      xlsx = self.filepath + '/' + self.filename

      for change in changes:
        if change[1] == xlsx:
          print(change[0])
          await self.send_data(change[1])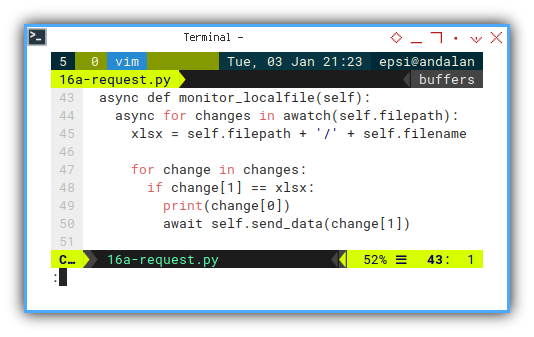
  async def monitor_webclient(self):
    while True:
      message = await self.websocket.recv()
      print(message)
      await self.send_data(None)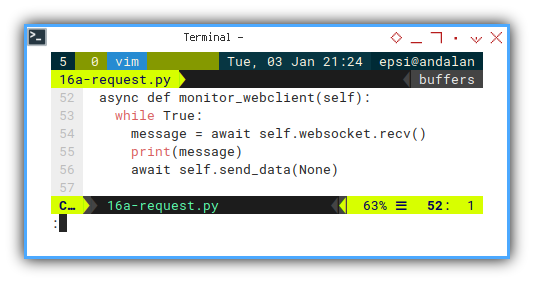
We need to add await keyword to mark some process,
as asynchronous.
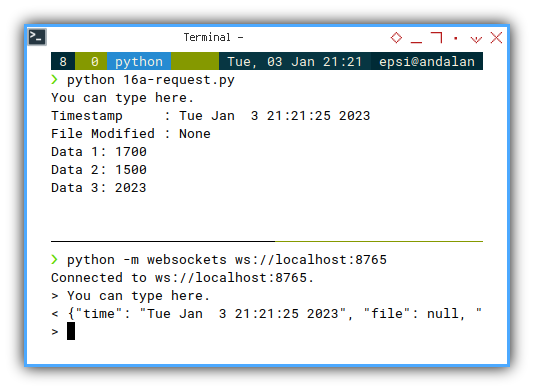
Output in CLI
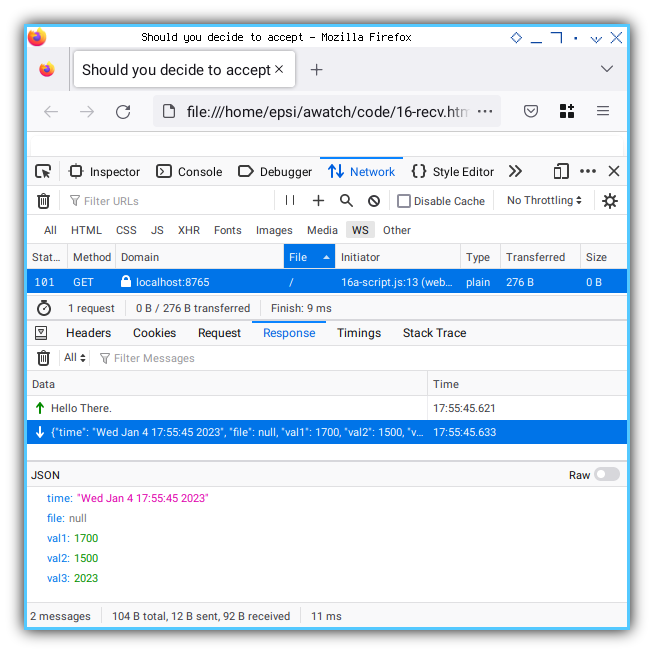
To test data receiveing, you can type in python websocket
❯ python -m websockets ws://localhost:8765Connected to ws://localhost:8765.
> You can type here...Then you can check if the data received in your python script.
❯ python 16a-request.pyYou can type here...The script will reply immediately, with reading result of your current excel file.
❯ python 16a-request.pyYou can type here...
Timestamp : Wed Jan 4 11:05:59 2023
File Modified : None
Data 1: 1700
Data 2: 1500
Data 3: 2023And also sent the result via websocket.
❯ python -m websockets ws://localhost:8765Connected to ws://localhost:8765.
> You can type here...
< {"time": "Wed Jan 4 11:05:59 2023", "file": null, "val1": 1700, "val2": 1500, "val3": 2023}
> 
Web Source Code: HTML
Client Side
Consider also examine the result in browser.
<head>
  <title>Should you decide to accept</title>
  <link rel="stylesheet" href="bulma.min.css">
  <script src="16a-script.js"></script>
</head>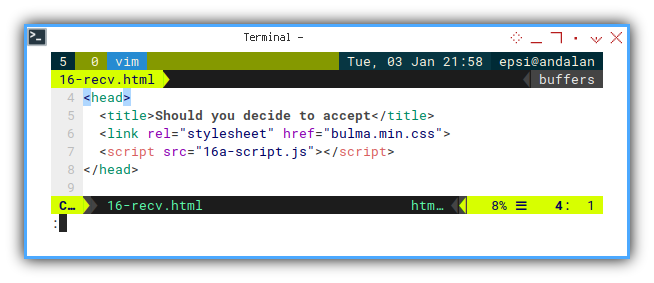
And also prepare the status element.
    <div class="column is-full">
      Time Received: <span id="time-a"></span>
      <br/>
      Connection Status: <span id="status-a"></span>
    </div>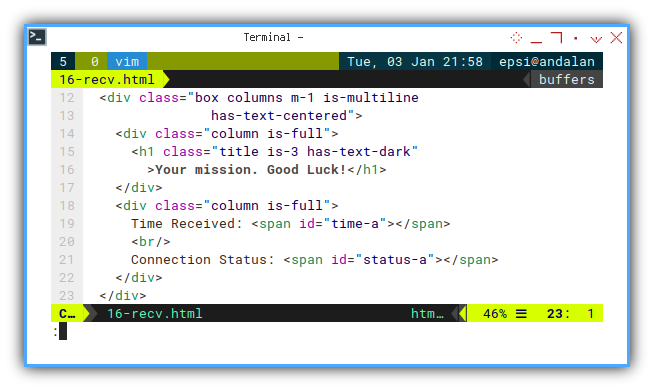
Web Source Code: Javascript
We can manage the status in javacript.
document.addEventListener(
  "DOMContentLoaded", function(event) {

    // Get all value placholder
    ...

    // Loop Entry Point
    function startWS(){
      const websocket = new WebSocket("ws://localhost:8765");

      websocket.onopen = function () {...};
      websocket.onmessage = function(event) {...};
      websocket.onclose = function() {...};
    }

    startWS();
});
Prepare the value placholder element id.
    // Get all value placholder
    const time_a   = document.getElementById("time-a");
    const status_a = document.getElementById("status-a");
    const value_a1 = document.getElementById("value-a1");
    const value_a2 = document.getElementById("value-a2");
    const value_a3 = document.getElementById("value-a3");

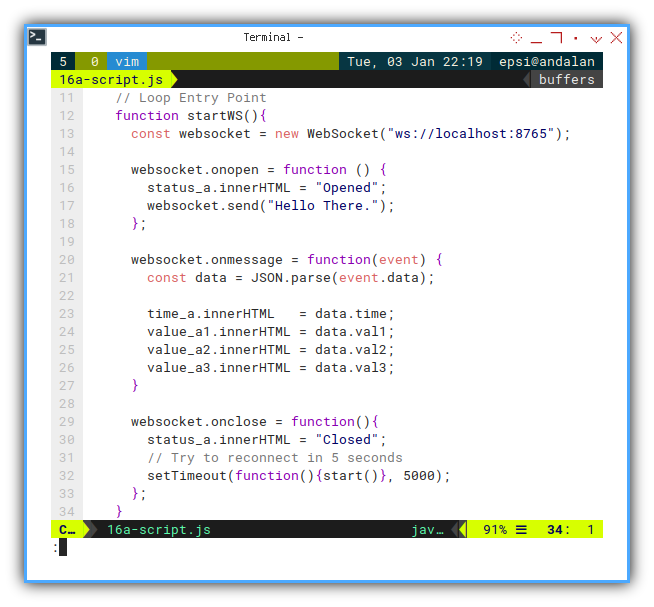
What is new here is we send Hello There. message,
back to our script.
      websocket.onopen = function () {
        status_a.innerHTML = "Opened";
        websocket.send("Hello There.");
      };
This part is ordinary, we have discussed previously.
      websocket.onmessage = function(event) {
        const data = JSON.parse(event.data);

        time_a.innerHTML   = data.time;
        value_a1.innerHTML = data.val1;
        value_a2.innerHTML = data.val2;
        value_a3.innerHTML = data.val3;
      }
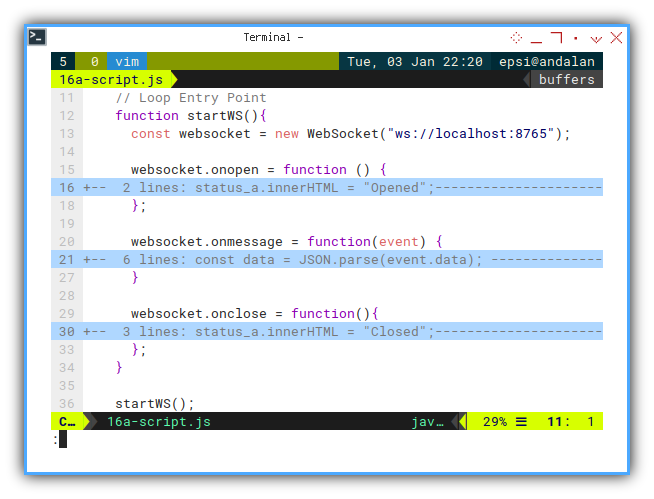
Beware of the startWS function name.
I forgot to rename once,
and become to lazy too repair the screenshot.
Reestablish connection.
This is the loop. The core part of this javascript.
      websocket.onclose = function(){
        status_a.innerHTML = "Closed";
        // Try to reconnect in 5 seconds
        setTimeout(function(){startWS()}, 5000);
      };
Why do we need the loop anyway? Because from some reason, data connection can be closed from time to time. So need to reestablish the connection.
I haven’t got much experience with websocket. So I can’t explain further, about websocket closing behaviour.
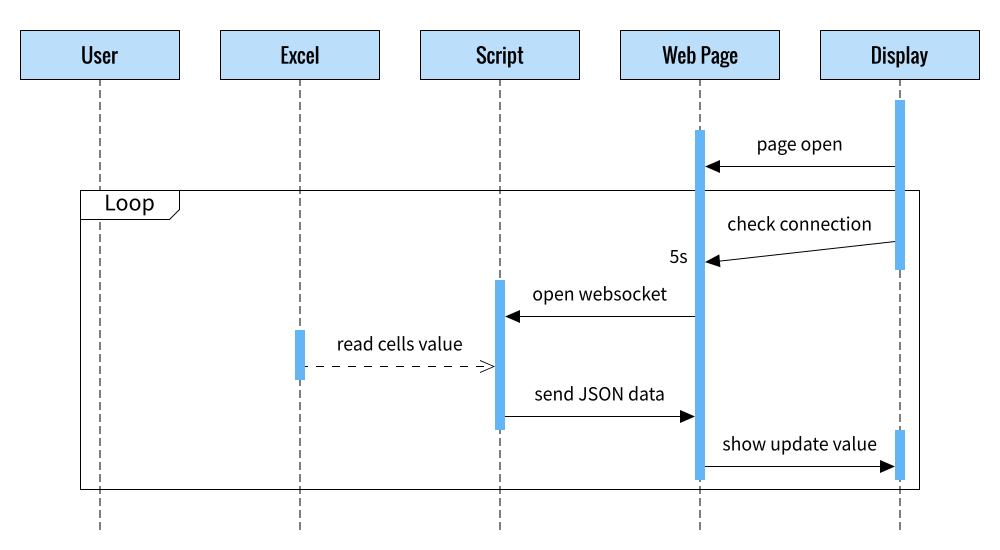
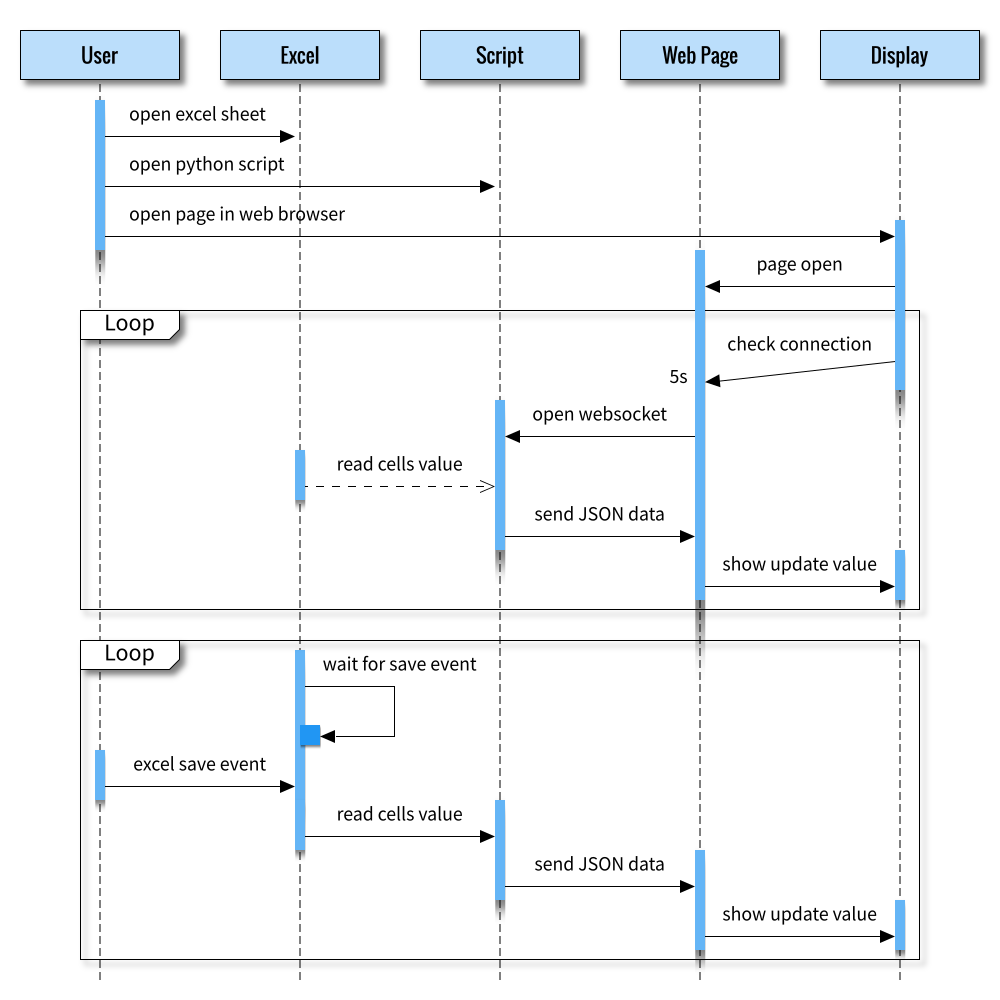
How does it Works?
We have additional loop as shown in sequence diagram below.
Browser Result
The result can be examined as below:
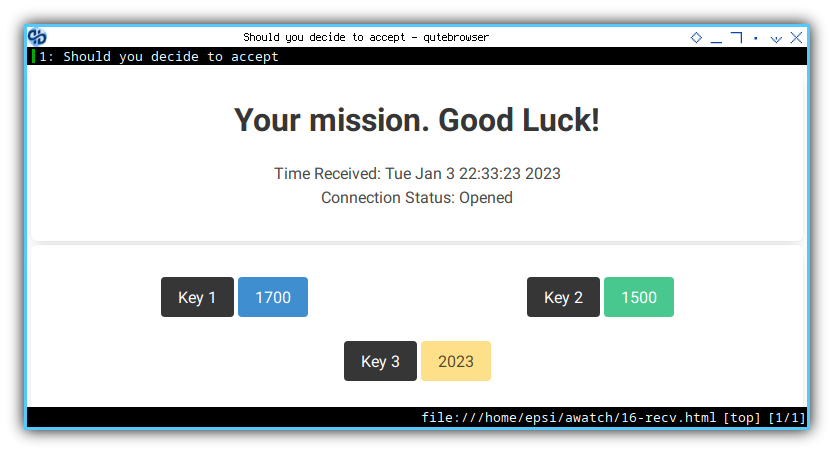
Or object inspector if you wish.
Class: Init
Additional connections property,
initialized as empty set.
class Xl2WebExample:
  def __init__(self, filepath, filename, site, port):
    # save initial parameter
    self.filepath = filepath
    self.filename = filename
    self.site = site
    self.port = port

    # websocket broadcast collection
    self.connections = set()
![Python: Broadcast: Init][13b-py-init]
How does it Works?
Consider review, the big picture. We have two loops as shown in sequence diagram below.
Pretty nice. But we are not done yet.
What is Next 🤔?
It works on my computer
We are done with two way communication between script and web page. How about receiving from multiple port?
Consider continue reading [ Excel - Monitor - Multiple Connection ].