Preface
Goal: Starting openPyXl from writing simple table.
Embarking on the openPyXL lesson, our starting point involves creating a simple spreadsheet table, as indicated in the well-organized learning flowchart provided in the overview.
Preview
The envisioned worksheet is elegantly straightforward.
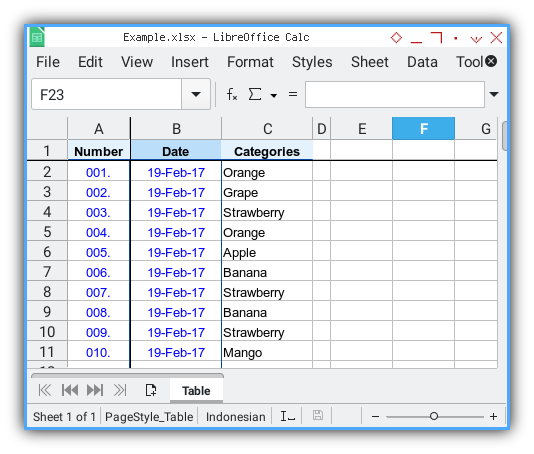
A neatly crafted table adorned with subtle decorations.
Reading Reference
For beginners delving into this topic,
a valuable resource is Chapter 13
of the book authored by Al Sweigart:
Source Examples
Access the source examples conveniently here:
Simple Sheet: Main Script
Transitioning from a plain data model displayed in text mode to the representation in a worksheet marks the next phase of our exploration.
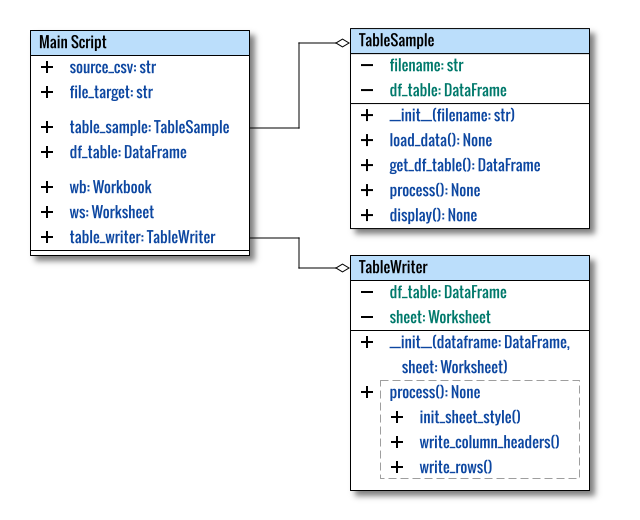
Class Diagram
This progression introduces a new class, visually represented through a conceptual diagram. It’s worth noting that, for the sake of clarity, the diagram doesn’t strictly adhere to standard UML conventions.
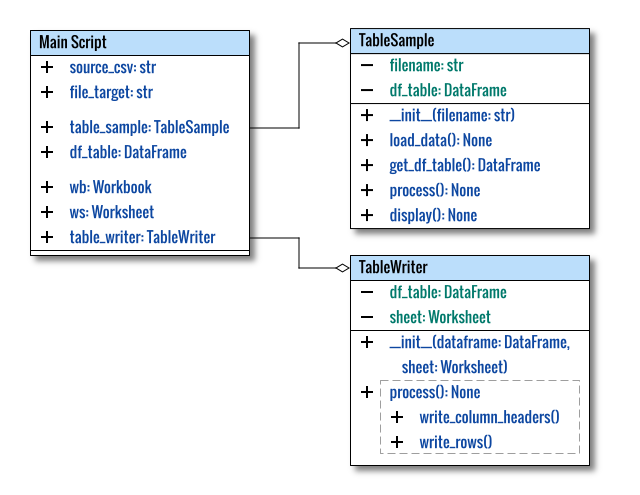
The class diagram, crafted with Inkscape’s multiple pages feature, is accessible here for your reference and adaptation.
While viewing the diagram in a browser displays only the initial image, utilizing Inkscape allows you to explore additional pages.
Local Libraries
This script relies on two local libraries:
from lib.TableSample   import TableSample
from lib.TableWriter14 import TableWriter
The first library, TableSample,
carries forward the data modeling aspect
discussed in a previous article.
We can just utilize the class right away,
without further discussion.
The second library, TableWriter14,
is the focal point of our current discussion.
Detailed insights into this new class will follow shortly.
Directory Structure
Employing a structured approach,
the number 14 corresponds to the script’s lesson number,
mirroring the naming of the associated file containing the class.
.
├── 14-writer.py
└── lib
    ├── TableSample.py
    └── TableWriter14.py
Program Entry Point
To interact with the openPyXL library and write to a spreadsheet, we initialize the Workbook object.
The main script unfolds as follows:
#!/usr/bin/env python3

# openPyXL
from openpyxl import Workbook

# Local Library
from lib.TableSample   import TableSample
from lib.TableWriter14 import TableWriter

def main() -> None:
  ...

if __name__ == "__main__":
  main()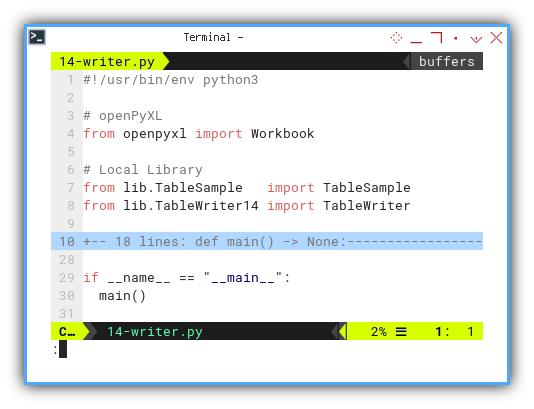
Main Method
Utilizing the previously established dataframe table as input,
we feed it into the TableWriter class,
whose intricacies will be explored shortly.
The script generates a new file, labeled Example.xlsx,
with a worksheet named Table.
def main() -> None:
  file_source = 'sample-data.csv'
  file_target = 'Example.xlsx'

  table_sample = TableSample(file_source)
  table_sample.process()

  df_table = table_sample.get_df_table()

  wb = Workbook()
  ws = wb.active
  ws.title = 'Table'

  table_writer = TableWriter(df_table, ws)
  table_writer.process()

  # Save the file
  wb.save(file_target)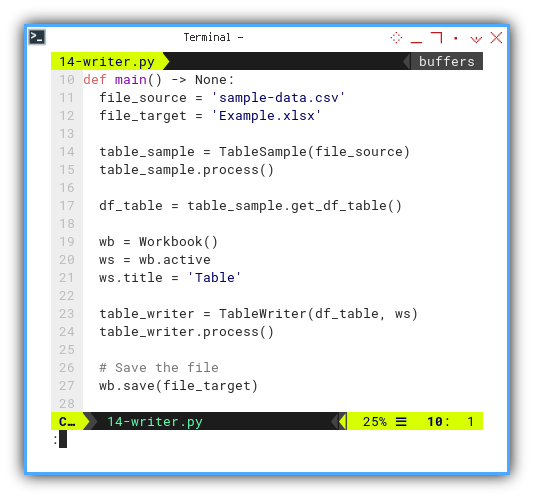
Adhering to the pattern set in earlier articles,
the class method named process orchestrates
the execution of other class methods.
It’s noteworthy that the sheet name
has already been modified to Table
using worksheet title property,
eliminating the need to pass a sheet name
to the class explicitly.
Simple Sheet: Table Writer Class
This script essentially consists of a loop iterating through the dataframe items, encapsulated within a class structure.
Although seemingly straightforward, it lays the foundation for more advanced tutorials.
Internal Diagram
To help you understand what’s happening internally in openpyxl, let’s write down method used in this script, then visualize the class diagram.
To illuminate the internal workings of openpyxl, we’ll outline the methods employed in this script and subsequently visualize them through a class diagram.

The class diagram, constructed with Inkscape’s multiple pages feature, is accessible here for your reference and adaptation.
Library
from pandas import DataFrame

# openPyXL
from openpyxl.worksheet.worksheet import Worksheet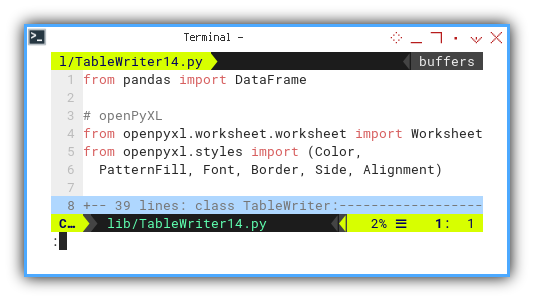
The Worksheet object, imported from openPyXL,
plays a pivotal role in this script.
It serves as the data type
for the parameter argument during the class initialization.
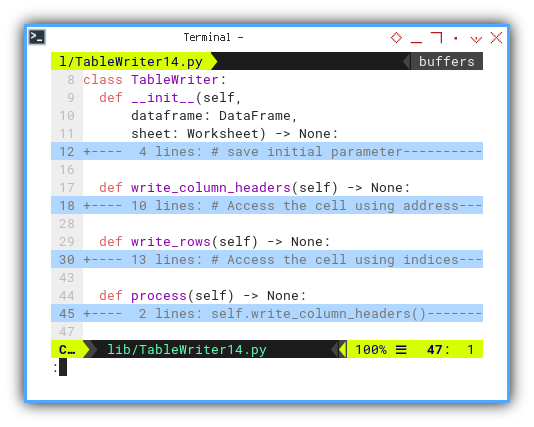
Class Skeleton
The class skeleton is outlined as follows:
class TableWriter:
  def __init__(self,
      dataframe: DataFrame,
      sheet: Worksheet) -> None:
    ...

  def write_column_headers(self) -> None:
    ...

  def write_rows(self) -> None:
    ...

  def process(self) -> None:
    ...
Initialization
This segment encompasses two parameter arguments:
- First the data source.
- Second the worksheet target.
  def __init__(self,
      dataframe: DataFrame,
      sheet: Worksheet) -> None:

    # save initial parameter
    self.dataframe = dataframe
    self.sheet = sheet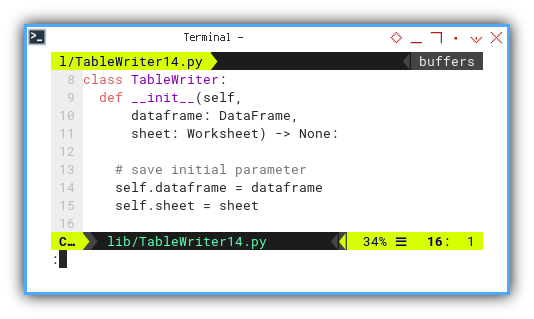
Process
The primary method of the class, this encapsulates the entire process in a concise manner.
  def process(self) -> None:
    self.write_column_headers()
    self.write_rows()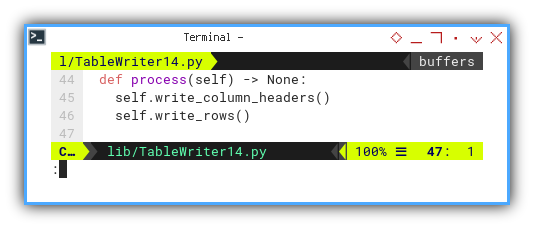
While it may appear simple for beginners, it serves as a foundational representation that will be expanded upon in subsequent lessons.
This reflect the whole process.
Writing Column Headers
Demonstrating the access of cells in a sheet using addresses, this section exemplifies how column headers are written.
  def write_column_headers(self) -> None:
    # Access the cell using address

    cell = self.sheet['A1']
    cell.value = 'Number'

    cell = self.sheet['B1']
    cell.value = 'Date'

    cell = self.sheet['C1']
    cell.value = 'Categories'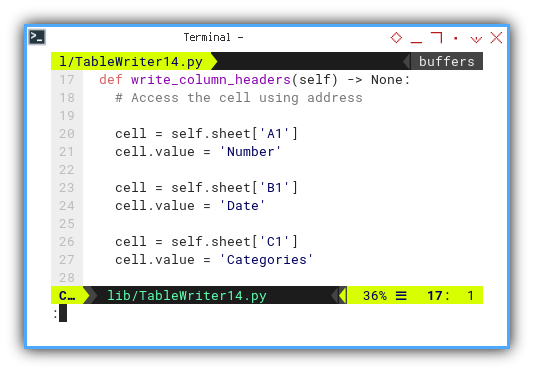
Writing Rows
Illustrating the access of cells in a sheet using indices, this section demonstrates how rows are written.
  def write_rows(self) -> None:
    # Access the cell using indices
    for index, row in self.dataframe.iterrows():
      # Index: Number
      cell = self.sheet.cell(index + 2, 1)
      cell.value = row['Number']

      # Date: Date
      cell = self.sheet.cell(index + 2, 2)
      cell.value = row['Date']

      # Categories: Fruit
      cell = self.sheet.cell(index + 2, 3)
      cell.value = row['Fruit']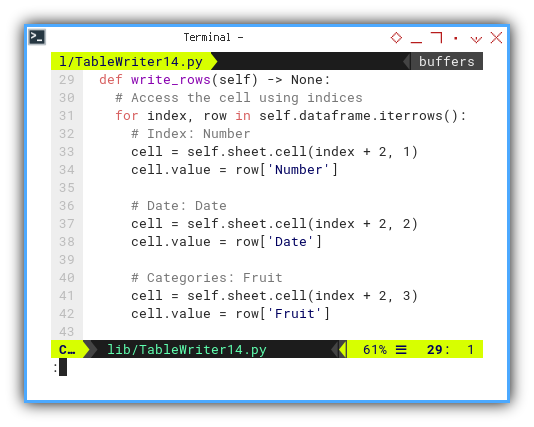
Sheet Result
The result is a plain data. We can see how openPyXL handling date value very nice.
The outcome is a plain dataset. Notably, openPyXL handles date values seamlessly, as observed in the LibreOffice Calc screenshot. I use value highlight in LibreOffice Calc, to differ between value (blue) and text (string). You can see in the formula bar, the date is already stored as date value, instead of string.
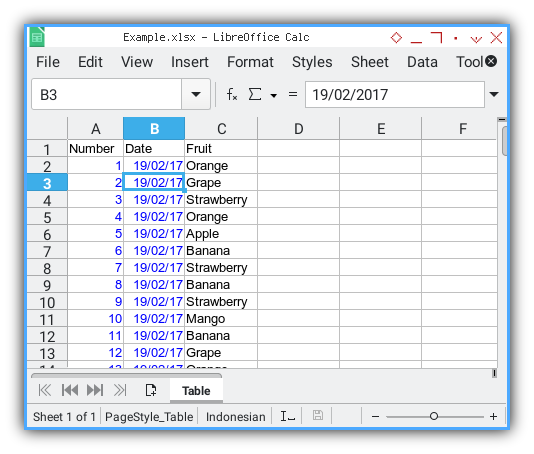
In the upcoming section, we’ll enhance this unadorned sheet in a simple yet effective manner.
Decoration: Main Script
In the main script, minimal alterations are needed to introduce the decoration features.
Class Diagram
To incorporate the decoration functionality, only one additional method is necessary in the class diagram.
Local Libraries
# openPyXL
from openpyxl import Workbook

# Local Library
from lib.TableSample   import TableSample
from lib.TableWriter15 import TableWriter
Directory Structure
.
├── 15-writer.py
└── lib
    ├── TableSample.py
    └── TableWriter15.py
Program Entry Point
The main script is as below:
#!/usr/bin/env python3

# openPyXL
from openpyxl import Workbook

# Local Library
from lib.TableSample   import TableSample
from lib.TableWriter15 import TableWriter

def main() -> None:
  ...

if __name__ == "__main__":
  main()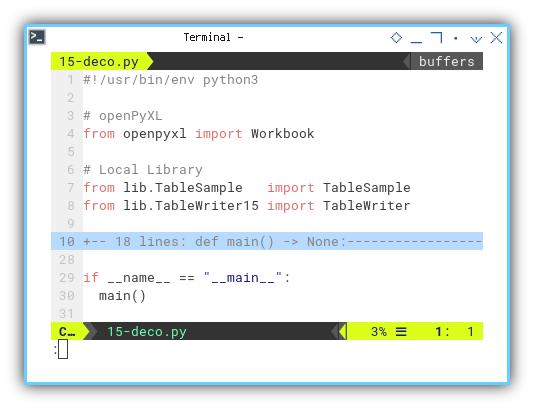
Main Method
The main method is exactly the same.
As we delve into the next section, we’ll explore the subtle yet impactful enhancements that decoration can bring to our worksheet.
Decoration: Table Writer Class
While a plain sheet might suffice for basic data processing, the reality of document sharing often demands a more visually appealing presentation. Colleagues, managers, customers, and other stakeholders appreciate well-designed sheets, making decoration an essential aspect of our work.
Luckily, decorating with openPyXL is easy as shown below.
Fortunately, openPyXL makes sheet decoration relatively straightforward.
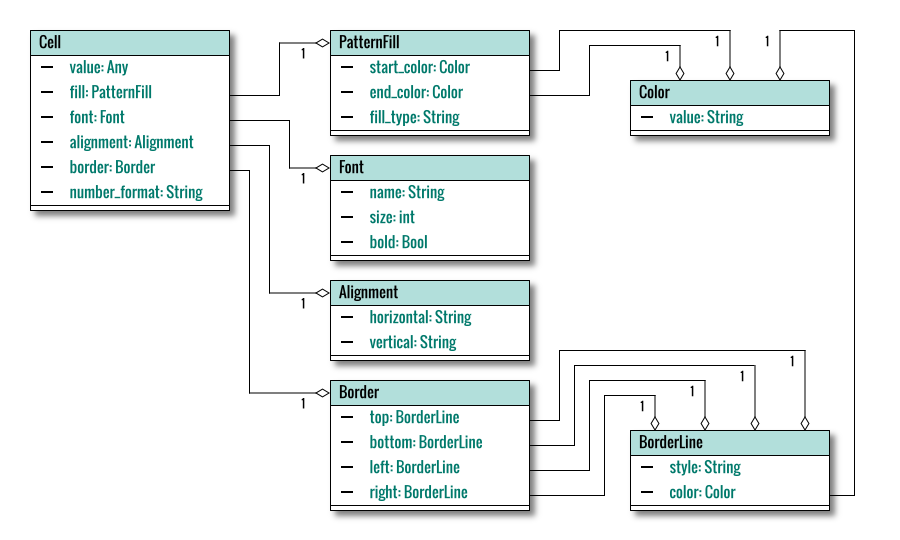
Internal Diagram
Internally, the class relies on the same openpyxl components, but with the addition of some key methods:
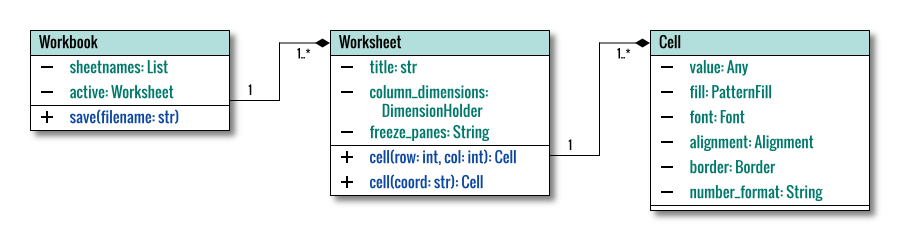
The styles object in the diagram comprises various components, including color, pattern fill, font, border, side, and alignment.
You can access the PlantUML file here:
Libraries
For sheet decoration, we introduce an additional set of tools:
- Color, PatternFill, Font, Border, Side, and Alignment.
from pandas import DataFrame
from datetime import datetime

# openPyXL
from openpyxl.worksheet.worksheet import Worksheet
from openpyxl.styles import (Color,
  PatternFill, Font, Border, Side, Alignment)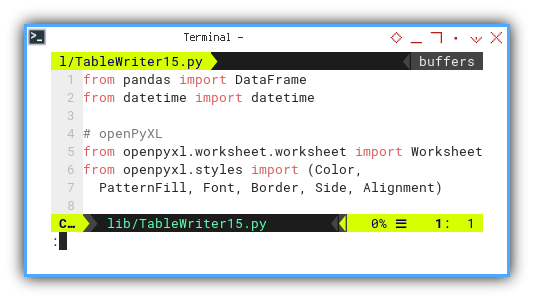
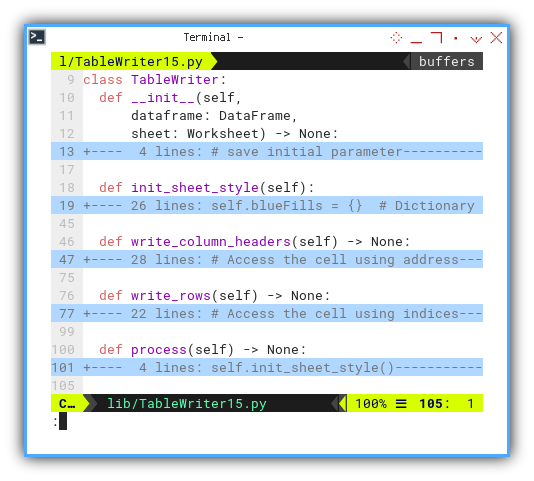
Class Skeleton
The class skeleton remains largely unchanged,
with the addition of the init_sheet_style method:
class TableWriter:
  def __init__(self,
      dataframe: DataFrame,
      sheet: Worksheet) -> None:

    ...

  def init_sheet_style(self):
    ...

  def write_column_headers(self) -> None:
    ...

  def write_rows(self) -> None:
    ...

  def process(self) -> None:
    ...
Initialization
No changes.
The initialization method remains consistent with the previous structure.
Process
However, we introduce a new method,
init_sheet_style(), to facilitate the sheet decoration process:
  def process(self) -> None:
    self.init_sheet_style()

    self.write_column_headers()
    self.write_rows()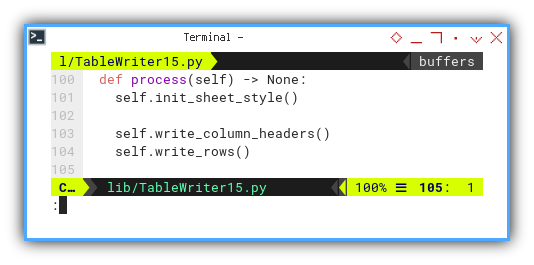
Style: Fill Color
Sheet Decoration
The method for setting fill color is extensive, providing a range of gradient options. All predefined style is prepared as class properties, and can be access with self keyword.
Let’s start with fill color. the oroginal color can be set as below.
    self.blueFill = PatternFill(
      start_color='ff4fc3f7',
      end_color='ff4fc3f7',
      fill_type='solid')
Since we have gradient of color, we can make a list of fill
  def init_sheet_style(self):
    self.blueFills = {}  # Dictionary to store PatternFill objects
    blueScale = {
      0: 0xE3F2FD, 1: 0xBBDEFB, 2: 0x90CAF9,
      3: 0x64B5F6, 4: 0x42A5F5, 5: 0x2196F3,
      6: 0x1E88E5, 7: 0x1976D2, 8: 0x1565C0,
      9: 0x0D47A1
    }

    for key, color_value in blueScale.items():
      # Convert the color value to a hexadecimal string
      hex_color = f'ff{color_value:06x}'
      self.blueFills[key] = PatternFill(
        start_color=hex_color,
        end_color=hex_color,
        fill_type='solid')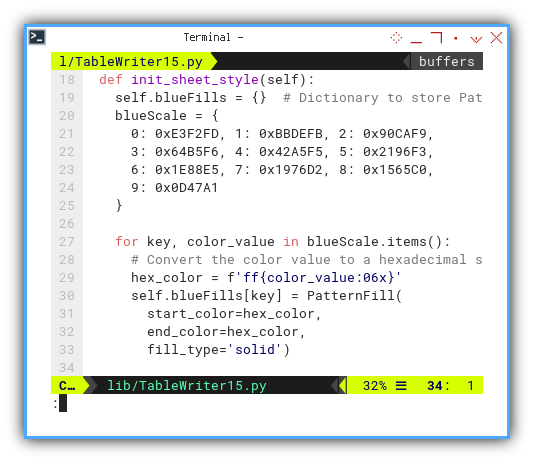
This allows convenient access
to specific fills using self.blueFills[key].
Style: Cell Decoration
Cell decoration encompasses font variations:
- Normal
- Bold, for header
And alignment preferences
    self.headerFont = Font(name='Arial', sz='10', bold=True)
    self.normalFont = Font(name='Arial', sz='10')
    self.centerText = Alignment(horizontal='center')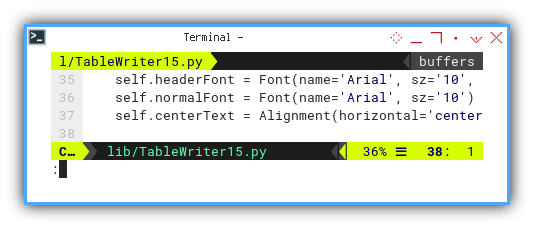
Style: Border
To enhance the sheet’s appearance, we introduce different border styles:
But for starter we use only two.
    # Define the border style and color
    self.bottom_border = Border(
      bottom=Side(style='thin', color='0D47A1'))
    self.inner_border = Border(
      left=Side(style='thin', color='0D47A1'),
      right=Side(style='thin', color='0D47A1'))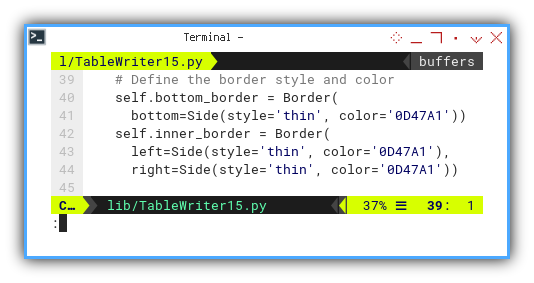
Writing Column Headers
The process for writing column headers includes additional fill color considerations for a visually pleasing header section:
For starter, I pick the color gradient manually. I like very soft color for header.
  def write_column_headers(self) -> None:
    # Access the cell using address

    cell = self.sheet['A1']
    cell.value = 'Number'
    cell.fill  = self.blueFills[0]

    cell = self.sheet['B1']
    cell.value = 'Date'
    cell.fill  = self.blueFills[1]

    cell = self.sheet['C1']
    cell.value = 'Categories'
    cell.fill  = self.blueFills[0]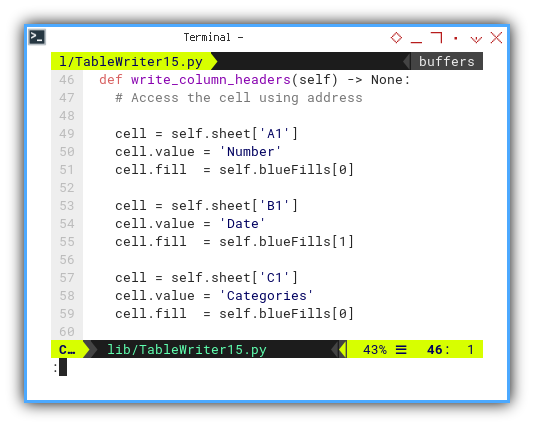
Following cell writing, a loop applies: font, border, and alignment styles to all three headers.
Customizable column widths, specified with predefined values, contribute to a well-organized presentation:
    for index in [0,1,2]:
      cell = self.sheet.cell(1, index + 1)
      cell.font = self.headerFont
      cell.alignment = self.centerText
      cell.border = self.bottom_border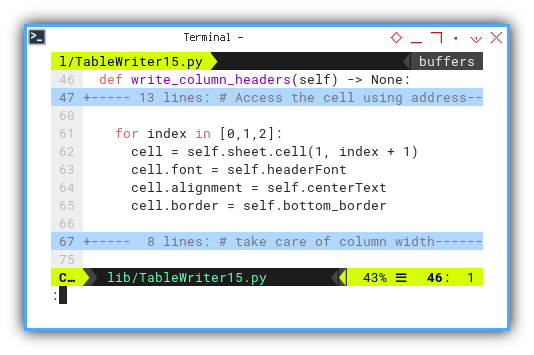
And the last thing is the column width.
I have made predefined width for each column letter,
for example with {'B': 2.5, 'C': 2.5, 'D': 0.5},
the apply the width using this code below:
    # take care of column width
    wscd = self.sheet.column_dimensions
    for letter, width in \
        {'B': 2.5, 'C': 2.5, 'D': 0.5}.items():
      wscd[letter].width = 5.1 * width

    # Set the freeze point to B2
    self.sheet.freeze_panes = 'B2'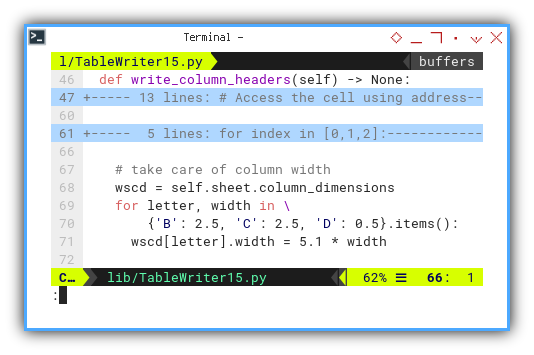
And also the freeze panes.
Writing Rows
Beware of the index
While writing rows, we consider the choice of indices, allowing for flexibility.
We can make a function to decorating each cell shorter. But for this example, I let the code be verbose. So we can examine what decoration applied for each cell.
Each cell’s decoration is individually addressed,
with cell number formatting for improved visual clarity.
I add cell number format as 000\..
For example when the value is 10,
it will be shown as 010..
  def write_rows(self) -> None:
    # Access the cell using indices
    for index, row in self.dataframe.iterrows():
      # Index: Number
      cell = self.sheet.cell(index + 2, 1)
      cell.value = row['Number']
      cell.number_format = '000\.'
      cell.font = self.normalFont
      cell.alignment = self.centerText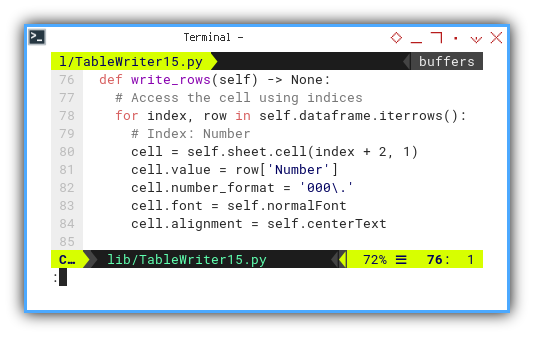
This is similar as above, but we change the value and data type of the date, so I can have flexibility, to change the number format to ‘DD-MMM-YY;@’.
Then I change the border of the middle cell, to have inner boerder, both left and right.
  def write_rows(self) -> None:
    # Access the cell using indices
    for index, row in self.dataframe.iterrows():
    ...
      # Date: Date
      cell = self.sheet.cell(index + 2, 2)
      cell.value = \
        datetime.strptime(row['Date'], "%d/%m/%Y")
      cell.number_format = 'DD-MMM-YY;@'
      cell.font = self.normalFont
      cell.alignment = self.centerText
      cell.border = self.inner_border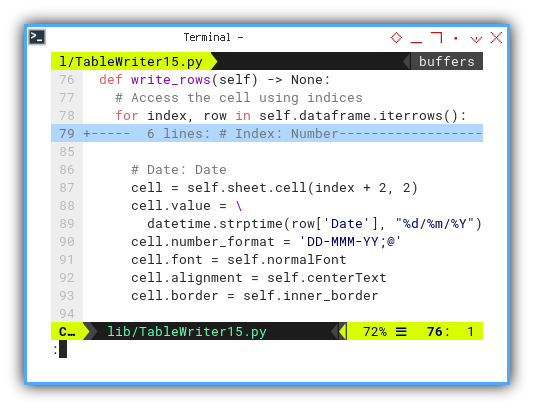
For the last column, a simple string representing the category is added.
  def write_rows(self) -> None:
    # Access the cell using indices
    for index, row in self.dataframe.iterrows():
    ...
      # Categories: Fruit
      cell = self.sheet.cell(index + 2, 3)
      cell.value = row['Fruit']
      cell.font = self.normalFont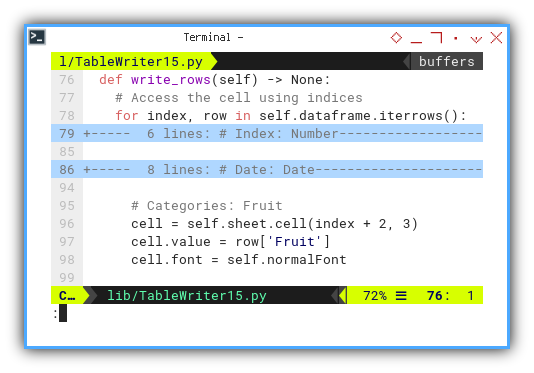
Decoration Result
It’s simple right?
Upon execution, the script produces a visually appealing result:
With this working example, you can further customize your sheets to suit your preferences and communication needs.
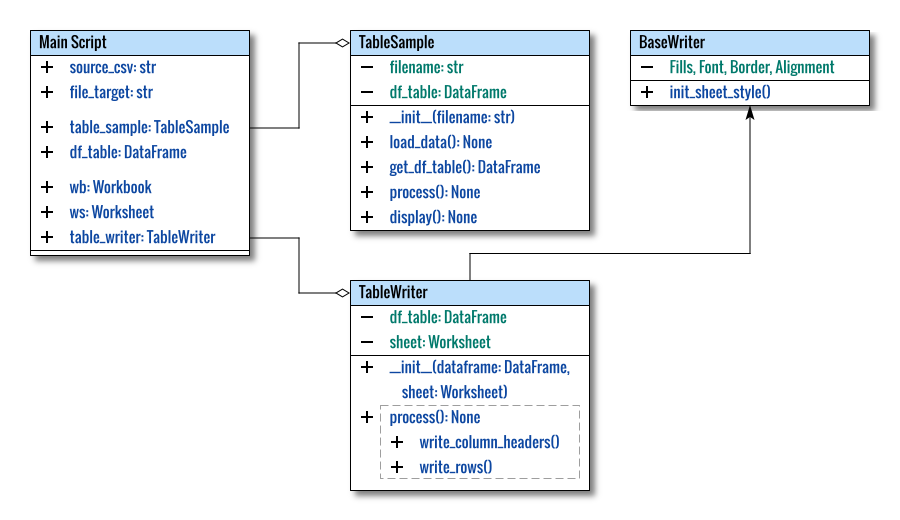
Refactoring: Base Writer Class
Our journey isn’t over. As we anticipate utilizing this class across various projects, creating reusable and modular code becomes imperative. One way to achieve this is by refactoring the existing code, particularly by extracting the styling logic into a base class.
Class Diagram
To illustrate the shift to inheritance, our class diagram requires a slight adjustment:
Class Skeleton
The revised class skeleton now incorporates the changes introduced by our refactoring efforts:
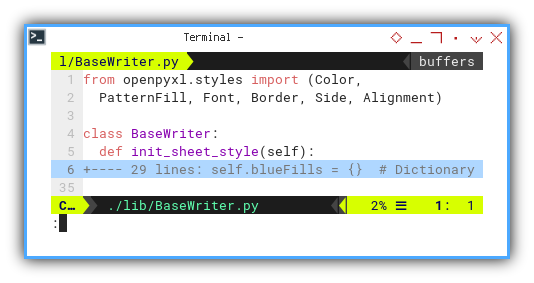
from openpyxl.styles import (Color,
  PatternFill, Font, Border, Side, Alignment)

class BaseWriter:
  def init_sheet_style(self):
    ...
Additional Border
A notable enhancement in our style refinement is the comprehensive treatment of borders, providing a more polished appearance:
    # Define the border style and color
    side = Side(style='thin', color='2196F3')
    self.top_border    = Border(top   = side)
    self.bottom_border = Border(bottom= side)
    self.inner_border  = Border(
      left  = side, right = side)
    self.left_border   = Border(left  = side)
    self.right_border  = Border(right = side)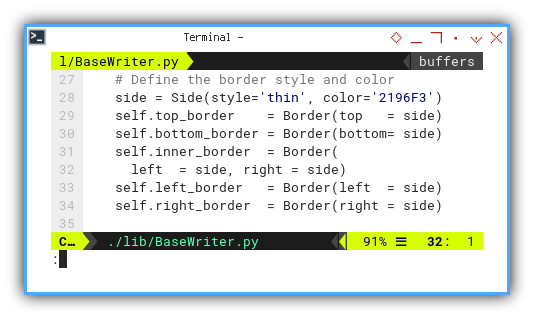
Complete Base Class
This refactored version serves as a foundation for future projects, allowing for a consistent and streamlined approach to sheet writing tasks.
The base class’s completeness ensures that styling nuances are encapsulated, promoting code reusability and maintainability across various endeavors.
from openpyxl.styles import (Color,
  PatternFill, Font, Border, Side, Alignment)

class BaseWriter:
  def init_sheet_style(self):
    self.blueFills = {}  # Dictionary to store PatternFill objects
    blueScale = {
      0: 0xE3F2FD, 1: 0xBBDEFB, 2: 0x90CAF9,
      3: 0x64B5F6, 4: 0x42A5F5, 5: 0x2196F3,
      6: 0x1E88E5, 7: 0x1976D2, 8: 0x1565C0,
      9: 0x0D47A1
    }

    for key, color_value in blueScale.items():
      # Convert the color value to a hexadecimal string
      hex_color = f'ff{color_value:06x}'
      self.blueFills[key] = PatternFill(
        start_color=hex_color,
        end_color=hex_color,
        fill_type='solid')

    self.headerFont = Font(
      name='Arial', sz='10', bold=True)
    self.normalFont = Font(name='Arial', sz='10')
    self.centerText = Alignment(horizontal='center')

    # Define the border style and color
    side = Side(style='thin', color='2196F3')
    self.top_border    = Border(top   = side)
    self.bottom_border = Border(bottom= side)
    self.inner_border  = Border(
      left  = side, right = side)
    self.left_border   = Border(left  = side)
    self.right_border  = Border(right = side)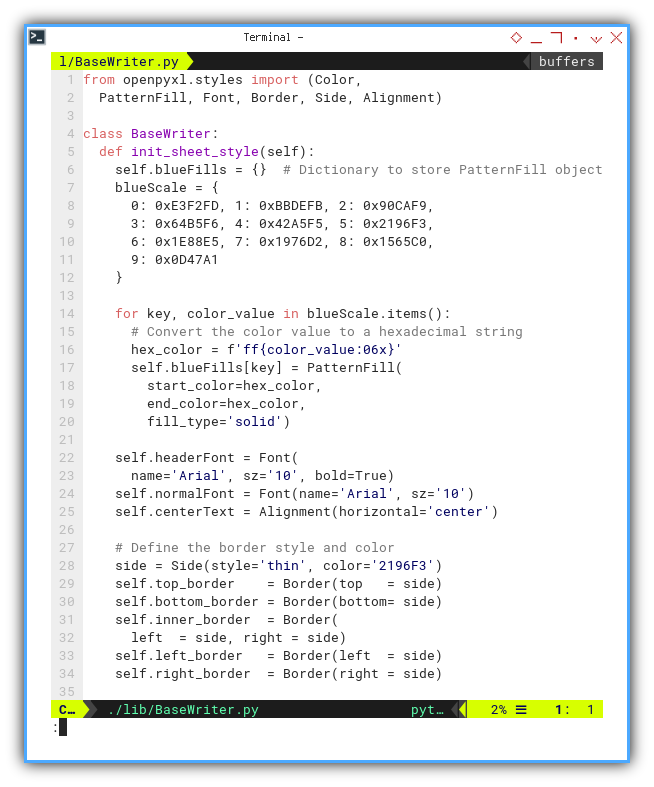
Refactoring: Table Writer Class
With the introduction of the base class, we’ve paved the way to streamline our sheet writer classes.
The TableWriter class,
having matured through our learning journey,
no longer requires numerical designations for its identity.
.
└── lib
    ├── BaseWriter.py
    ├── TableWriter.py
    └── PivotWriter.py
The refactored Table Class
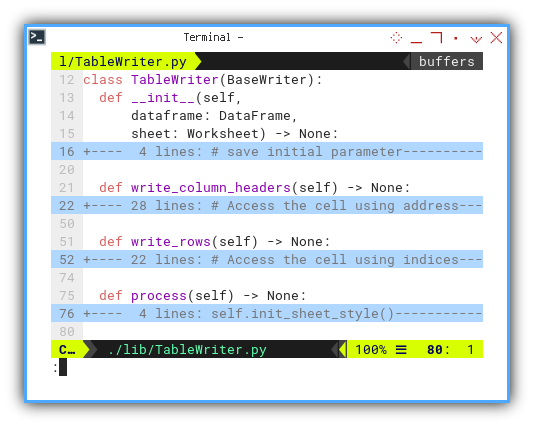
Our refactored class now stands as a leaner version, benefiting from the inheritance of the base class.
As a descendant class, it inherits the essential styling and writing functionalities, contributing to a more concise and focused implementation.
class TableWriter(BaseWriter):
  def __init__(self,
    ...

  def write_column_headers(self) -> None:
    ...

  def write_rows(self) -> None:
    ...

  def process(self) -> None:
    ...
This refined TableWriter class is set
to play a pivotal role in our upcoming articles,
demonstrating its versatility and effectiveness
as a foundation for diverse sheet writing tasks.
What’s in Store for Us Next 🤔?
Having successfully translateda simple dataframe source into a plain table within a worksheet, the logical next step is to extend this method to inscribe our custom pivot dataframe onto a pivot worksheet right away.
Consider delving into the next stage by reading [ Pivot - openPyXL - Pivot Writer ]. This exploration will build upon our foundational knowledge, seamlessly transitioning us into the realm of crafting pivot tables in worksheets.