Preface
Goal: Formatting header and data rows using using unified configuration.
By now, we have conquered the wild lands of basic script, and survived the labyrinth of abstract methods. But today, we level up, stepping boldly into unified configuration territory. Why? Because handling 40 worksheets by hand is a punishment no one deserves (not even the office coffee machine).
Instead of wrestling with scattered settings, we’re bundling everything into a clean, centralized configuration. This means fewer hard-coded headaches and more flexibility to tweak styles, without rummaging through the code like a lost sock in the dryer.
Key Points to Consider
-
Consistency: No more rogue borders or mismatched headers. Our sheets will finally look like they belong in the same universe.
-
Scalability: Whether we have 4 sheets or 400, unified configuration scales smoothly, like a scripts on steroids.
-
Maintainability: Future-us will thank present-us for not turning this into an unreadable spaghetti script
Example Sheet
Just in case you’ve misplaced the magic, here are the sample XLSX files to follow along:
This workbook boasts 40 worksheets, each waiting patiently to be transformed from plain data into a polished masterpiece. By the end of this journey, oour spreadsheets will shine, with crisp borders, bold headers, and colors so vibrant they might make our monitor blush.
06: Additional Helper
You might think applying borders is a simple “draw a line and move on” task. but no! Welcome to the world of Excel border complexities, where edges and corners need special attention, and inner lines have their own rules. Let’s dive into the helper methods that make this magic happen.
Supporting helper method for specific method have private visibility specifiers:
__apply_head_border().
Reusable supporting helper methods have private visibility specifiers:
_border_cell_outer()_border_cell_inner_oneliner()
Helper: Apply Head Border
Think of __apply_head_border() as the bouncer for your spreadsheet’s header.
It ensures only the fanciest edges and dividers get through.
It handles two main types of borders:
- Outside Border: Edges and Corner
- Inside Border: Vertical dividers only
This helper is used exclusively within _format_head_borders().
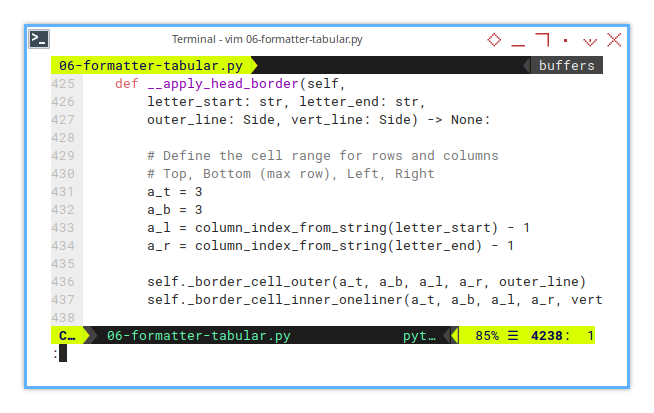
Here’s how it works under the hood:
    def __apply_head_border(self,
        letter_start: str, letter_end: str,
        outer_line: Side, vert_line: Side) -> None:

        # Define the cell range for rows and columns
        # Top, Bottom (max row), Left, Right
        a_t = 3
        a_b = 3
        a_l = column_index_from_string(letter_start) - 1
        a_r = column_index_from_string(letter_end) - 1

        self._border_cell_outer(a_t, a_b, a_l, a_r, outer_line)
        self._border_cell_inner_oneliner(a_t, a_b, a_l, a_r, vert_line)
This helper ensures that our headers have a clear, professional look, while keeping our spreadsheet boundaries crisp and neat.
Step Six and Seven
To perform border sorcery, we rely on three private methods:
_border_cell_outer()_border_cell_inner_oneliner()_border_cell_inner()
The header only have one row. Since it is a one-rower, we need to set only the inner vertical divider line.
Border Cell Trick
Forget boring standard border methods. Tthis is a homebrewed border setter, tailored for our needs. The approach is quite different from the LibreOffice macro version. If you know a better way, feel free to share your wizardry!
Border Cell Outer
The outer border covers these:
- Set horizontal: top and bottom
- Set vertical: left and right
Here’s the general layout:
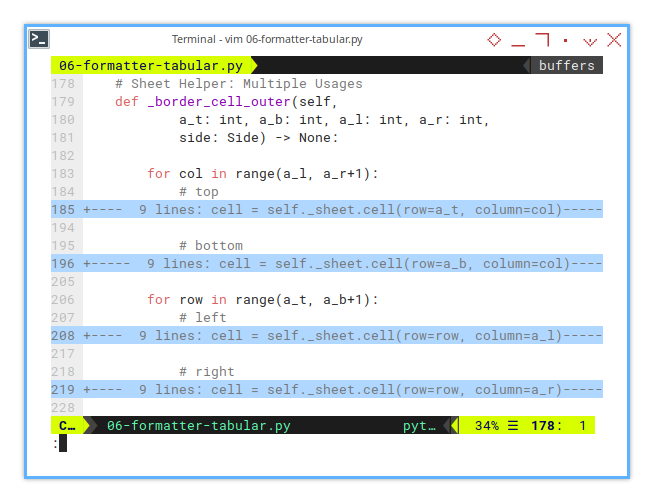
This method preserves the original alignment, only changing the specific sides needed. No accidental style casualties here!
def _border_cell_outer(self,
a_t: int, a_b: int, a_l: int, a_r: int,
side: Side) -> None:
for col in range(a_l, a_r+1):
# top
...
# bottom
...
for row in range(a_t, a_b+1):
# left
...
# right
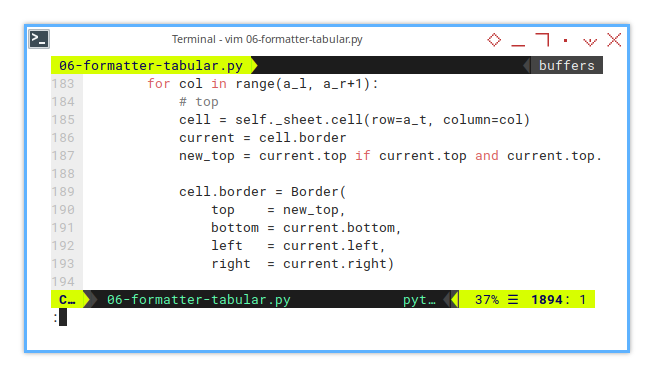
...The trick is to retain the original alignment. And only change for specific part. For example this top part. I only alter the top style part.
cell = self._sheet.cell(row=a_t, column=col)
current = cell.border
new_top = current.top if current.top and current.top.style else side
Here’s a closer look at how we retain other properties (bottom, left, right).
cell.border = Border(
top = new_top,
bottom = current.bottom,
left = current.left,
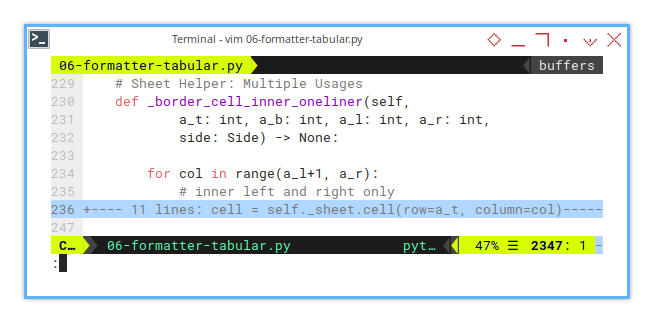
right = current.right)Border Cell Inner Oneliner
This minimalist method sets inner vertical lines between cells. No fluff, just efficiency.

    def _border_cell_inner_oneliner(self,
            a_t: int, a_b: int, a_l: int, a_r: int,
            side: Side) -> None:

        for col in range(a_l+1, a_r):
            # inner left and right only
            ...
This helps create visual divisions within the header while keeping the code lean.
Border Cell Inner
This helper have multiple loops, handling both bottom and right borders. Double trouble!
    def _border_cell_inner(self,
            a_t: int, a_b: int, a_l: int, a_r: int,
            vert_side: Side, horz_side: Side) -> None:

        for col in range(a_l, a_r+1):
            for row in range(a_t, a_b+1):
                # bottom and right only
                ...
This helper tackles the tricky task of drawing internal borders. As you can see, this only alter the bottom and right only.
Basically, there is no inner part. Just tricking one side of the rectangle.
Helper: Border Cell Outer
Let’s break down the outer cell method further.
Each side is handled with care. Preserving what’s already styled while adding the missing borders.
Top
for col in range(a_l, a_r+1):
    # top
    cell = self._sheet.cell(row=a_t, column=col)
    current = cell.border
    new_top = current.top if current.top and current.top.style else side

    cell.border = Border(
        top    = new_top,
        bottom = current.bottom,
        left   = current.left,
        right  = current.right)

    # bottom
   ...
Bottom

for col in range(a_l, a_r+1):
    # top
    ...

    # bottom
    cell = self._sheet.cell(row=a_b, column=col)
    current = cell.border
    new_bottom = current.bottom if current.bottom and current.bottom.style else side

    cell.border = Border(
        top    = current.top,
        bottom = new_bottom,
        left   = current.left,
        right  = current.right)
Left
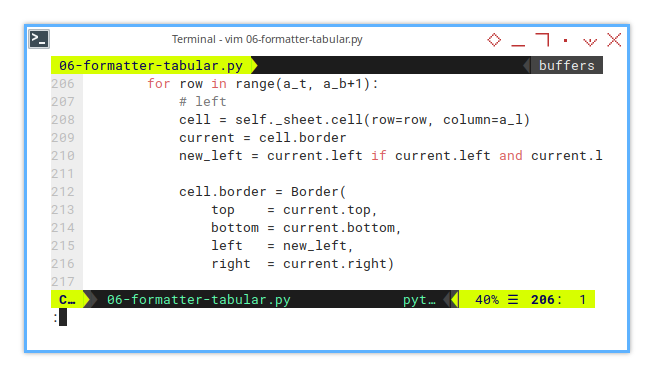
for row in range(a_t, a_b+1):
    # left
    cell = self._sheet.cell(row=row, column=a_l)
    current = cell.border
    new_left = current.left if current.left and current.left.style else side

    cell.border = Border(
        top    = current.top,
        bottom = current.bottom,
        left   = new_left,
        right  = current.right)

    # right
    ...
Right
for row in range(a_t, a_b+1):
    # left
    ...

    # right
    cell = self._sheet.cell(row=row, column=a_r)
    current = cell.border
    new_right = current.right if current.right and current.right.style else side

    cell.border = Border(
        top    = current.top,
        bottom = current.bottom,
        left   = current.left,
        right  = new_right)
And there you have it. Helper methods that make oour Excel sheets look crisp and professional. It’s like giving your data a tailored suit. Sharp and ready for business!
Helper: Border Cell Inner Oneliner
The same applies to the inner side. But this time, we’re multitasking. We tweak two border elements in a single pass. Actually it is one-rower, not really a one-liner.
Left and Right
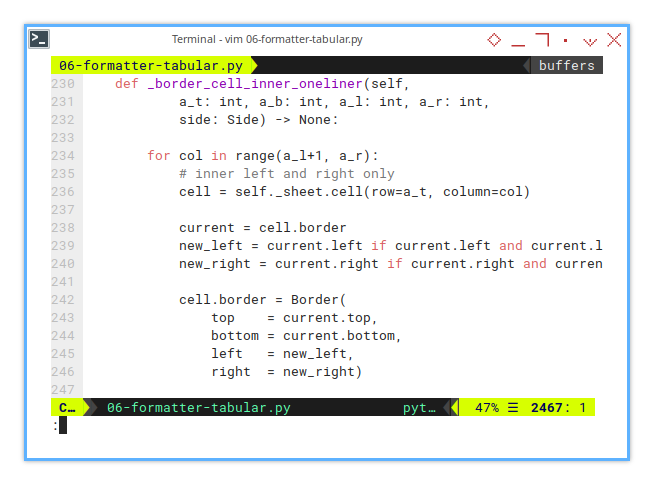
for col in range(a_l+1, a_r):
    # inner left and right only
    cell = self._sheet.cell(row=a_t, column=col)

    current = cell.border
    new_left = current.left if current.left and current.left.style else side
    new_right = current.right if current.right and current.right.style else side

    cell.border = Border(
        top    = current.top,
        bottom = current.bottom,
        left   = new_left,
        right  = new_right)
This method saves us from manually handling each border one by one. Less code repetition means fewer opportunities, to accidentally turn our worksheet into modern art.
Helper: Border Cell Inner
Bottom and Right
This is the multi-stage loop.
for col in range(a_l, a_r+1):
    for row in range(a_t, a_b+1):
        # bottom and right only
        cell = self._sheet.cell(row=row, column=col)
        current = cell.border
Here’s the sneaky part, selectively updating only what we need.
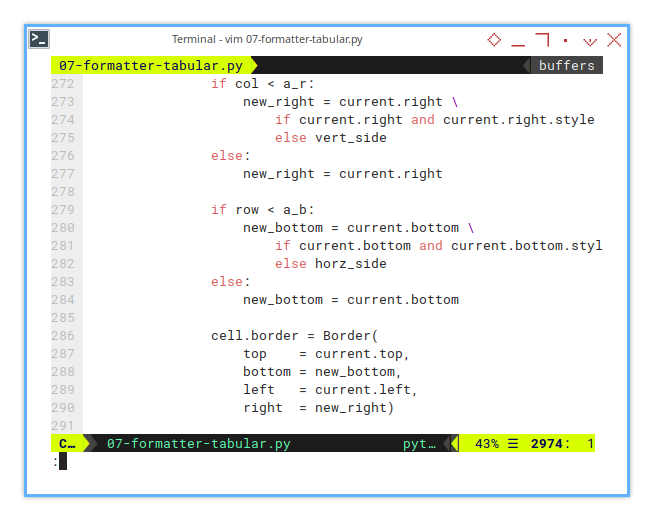
        if col < a_r:
            new_right = current.right \
                if current.right and current.right.style \
                else vert_side
        else:
            new_right = current.right

        if row < a_b:
            new_bottom = current.bottom \
                if current.bottom and current.bottom.style \
                else horz_side
        else:
            new_bottom = current.bottom
And finally, we carefully put the new border pieces in place. Like assembling IKEA furniture, but without the missing screws.
        cell.border = Border(
            top    = current.top,
            bottom = new_bottom,
            left   = current.left,
            right  = new_right)
By updating only the edges we care about, we preserve existing formatting while adding the precise borders we need. It’s all about surgical precision, no more accidental border chaos.
If you’ve got a slicker way to handle this, feel free to share—we’re always open to border brilliance!
06: Step Six
From plain, utilitarian spreadsheets to visually striking sheets. Let’s level up the aesthetics.
Step Overview
This section covers the following topics:
- Helper: Border Cell: Outer, Inner (one row)
- Helper: apply head border
- Formatting Procedure: Format head border
- Formatting Procedure: Format head colors
- Configuration: Head Borders
Borders and colors aren’t just about, making our spreadsheet look pretty (though that’s a bonus). They help distinguish sections, highlight key data, and prevent our eyes from glazing over during those long analysis sessions.
Script Source
The script source for this step is available, in the following repository:
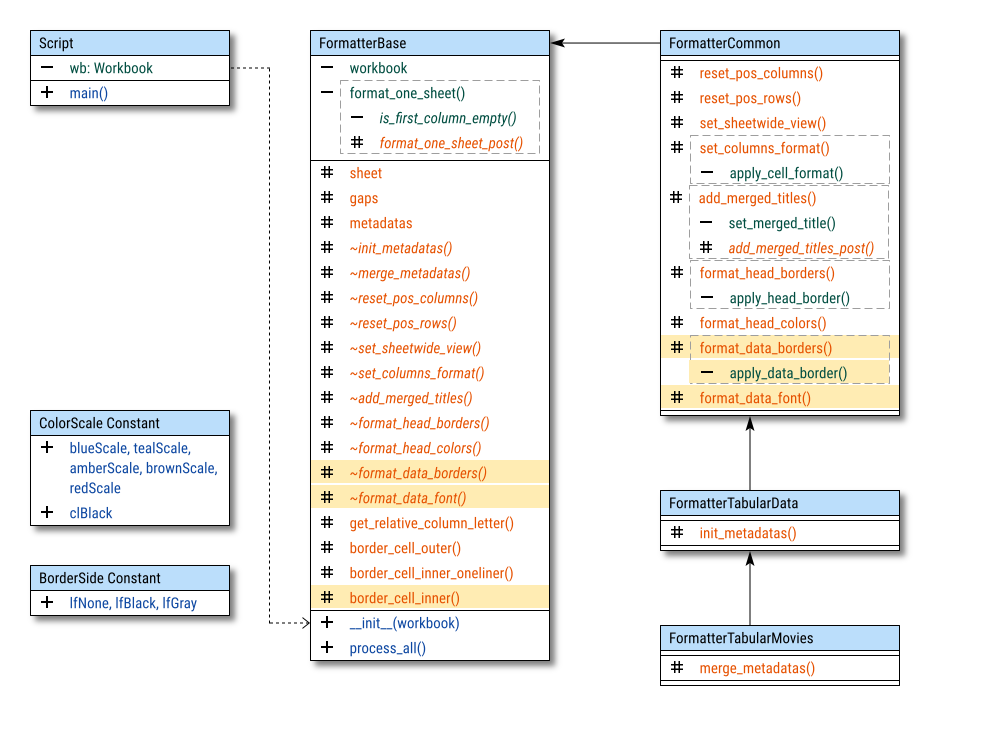
Class Diagram
Two new abstract methods make their debut, each with specific implementations.
-
_format_head_borders. For drawing crisp, professional borders. -
_format_head_colors. Because black-and-white spreadsheets are just sad.
The _format_head_borders method relies on,
a helper function called __apply_head_borders,
which in turn depends on two other helpers:
_border_cell_outer()_border_cell_inner_oneliner()
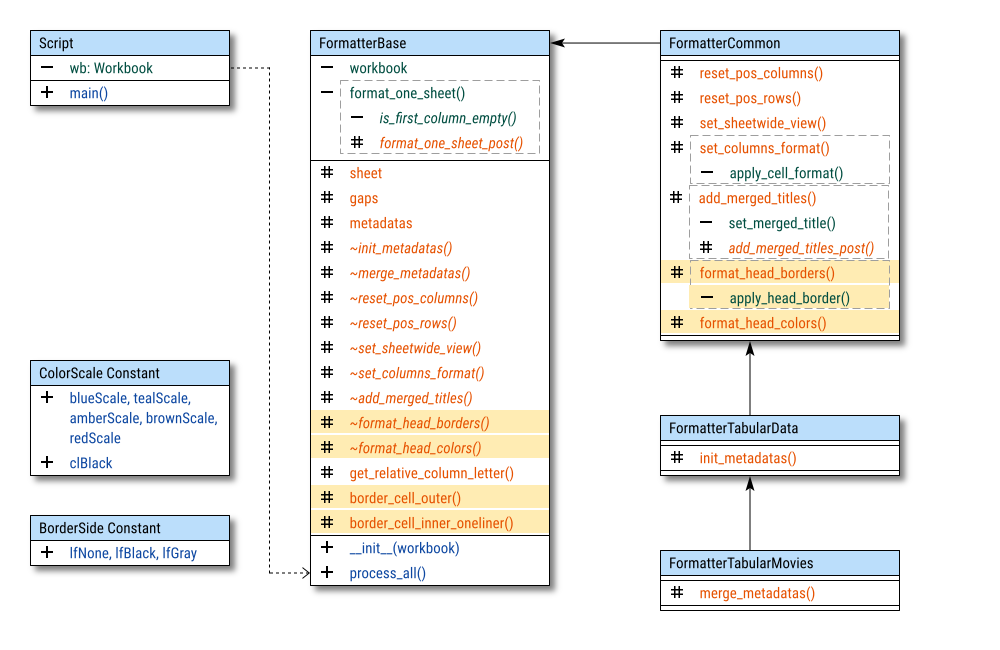
These helpers break down the complex logic into bite-sized tasks. Because debugging a monolithic method is like, finding a needle in a haystack while blindfolded.
Abstract Method
What’s new?
Two fresh abstract methods are introduced, to handle formatting logic.
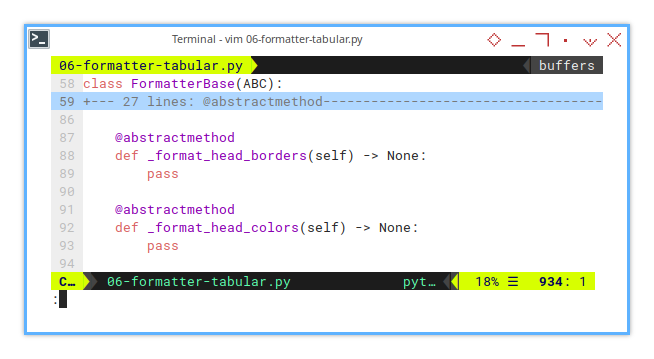
class FormatterBase(ABC):
    ...

    @abstractmethod
    def _format_head_borders(self) -> None:
        pass

    @abstractmethod
    def _format_head_colors(self) -> None:
        pass
Abstract methods enforce consistency across different formatters. Like a strict dress code for your spreadsheet logic.
Basic Flow
Apply Header Settings
This is where things start looking fancy.
Because who wants a boring spreadsheet?
The basic formatting flow now extends to include
_format_head_borders() and _format_head_colors().
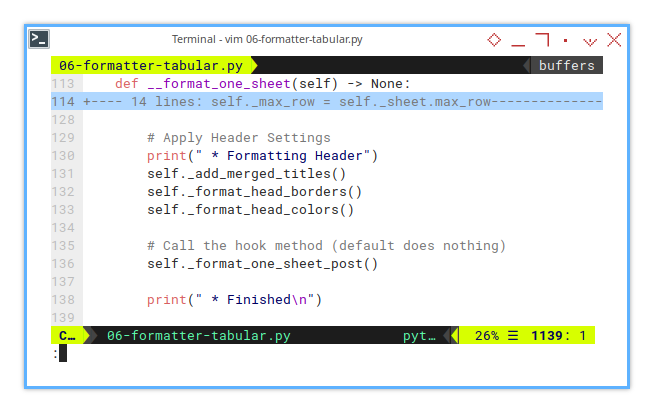
    def __format_one_sheet(self) -> None:
        ...

        print(" * Formatting Header")
        self._add_merged_titles()
        self._format_head_borders()
        self._format_head_colors()

        ...
Adding these calls ensures that your header isn’t just a plain row of cells. It’s a structured, visually distinct masterpiece. Plus, it helps our data breathe (metaphorically speaking).
Configuration: Init Metadatas
Instance Variables
A new key head-borders is introduced in the metadata configuration.
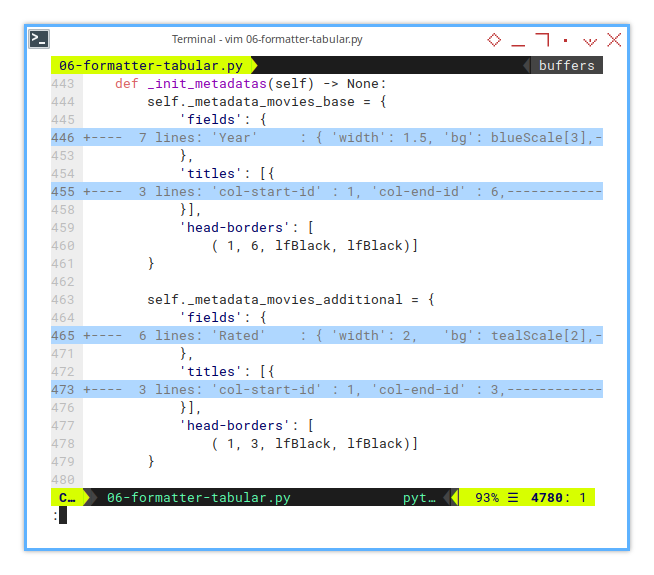
Each metadata section represents a block of columns, ensuring organized formatting and alignment.
class FormatterTabularData(FormatterCommon):
    def _init_metadatas(self) -> None:
        self._metadata_movies_base = {
            'fields': {...},
            'titles': [{...}],
            'head-borders': [...]
        }

        self._metadata_movies_additional = {
            'fields': {...},
            'titles': [{...}],
            'head-borders': [...]
        }
This design allows you to maintain a clean separation of concerns. Each section manages its own formatting. Future us will thank us for this clarity.
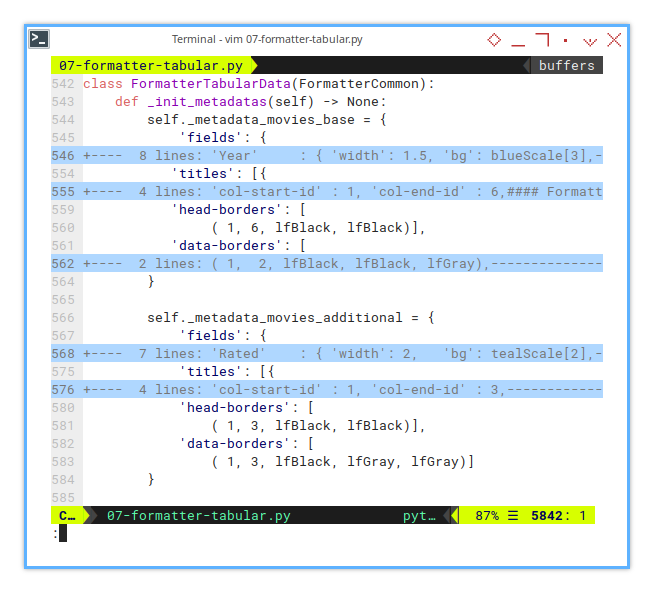
Configuration: Head Borders
Now let’s break down the supplementary extra keys.
The Basic Column Block
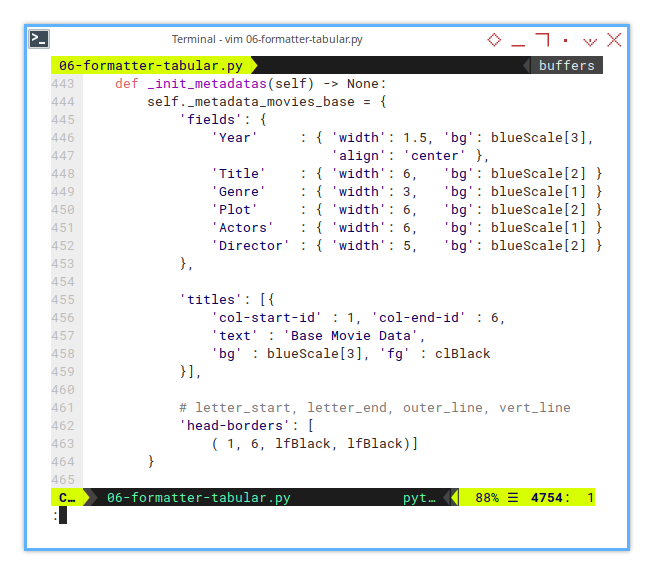
self._metadata_movies_base = {
    'fields': {...},
    'titles': [{
        'col-start-id' : 1, 'col-end-id' : 6,
        'text' : 'Base Movie Data',
        'bg' : blueScale[3], 'fg' : clBlack
    }],

    # letter_start, letter_end, outer_line, vert_line
    'head-borders': [
        ( 1, 6, lfBlack, lfBlack)]
}
The Additional Column Block
self._metadata_movies_additional = {...},
    'titles': [{ ...}],
    'head-borders': [
        ( 1, 3, lfBlack, lfBlack)]
}
Borders aren’t just about making things pretty. They provide a clear visual boundary between different sections of our data. Because nobody likes a data spillover.
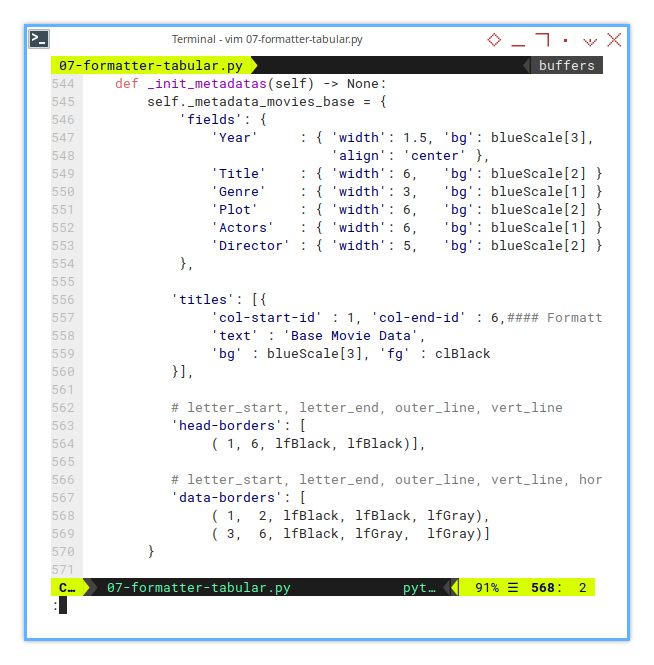
Configuration: Head Colors
Color scales are embedded within the fields configuration.
The Basic Column Block
For the same section, I usually use the same color, but different scale.
self._metadata_movies_base = {
    'fields': {
        'Year'     : { 'width': 1.5, 'bg': blueScale[3],
                        'align': 'center' },
        'Title'    : { 'width': 6,   'bg': blueScale[2] },
        'Genre'    : { 'width': 3,   'bg': blueScale[1] },
        'Plot'     : { 'width': 6,   'bg': blueScale[2] },
        'Actors'   : { 'width': 6,   'bg': blueScale[1] },
        'Director' : { 'width': 5,   'bg': blueScale[2] }
    },
    'titles': [{...}],
    'head-borders': [...]
}
The Additional Column Block
Then different color, for other section. But also the same light scale as previous.
self._metadata_movies_additional = {
    'fields': {
        'Rated'    : { 'width': 2,   'bg': tealScale[2],
                        'align': 'center' },
        'Runtime'  : { 'width': 2.5, 'bg': tealScale[1],
                        'align': 'center' },
        'Metascore': { 'width': 2,   'bg': tealScale[2],
                    'align': 'center' }
    },
    'titles': [{...}],
    'head-borders': [...]
}
Consistent header colors bring clarity to our sheets. They guide the eye, reduce errors, and. Let’s be honest, they make us look like a spreadsheet wizard.
Formatting: Format Head Borders
How do we implement unified config for head borders?
We handle this with two loop stages:
- Outer loop: Iterates over unified metadata.
- Inner loop: Applies head borders for each metadata block.
Think of it like painting a fence. First, you measure the whole thing (outer loop), then you carefully paint each panel (inner loop). Except here, the paint is Python code, and your fence is a beautifully formatted spreadsheet.
Here’s the implementation of
the protected _format_head_borders() in the descendant class:
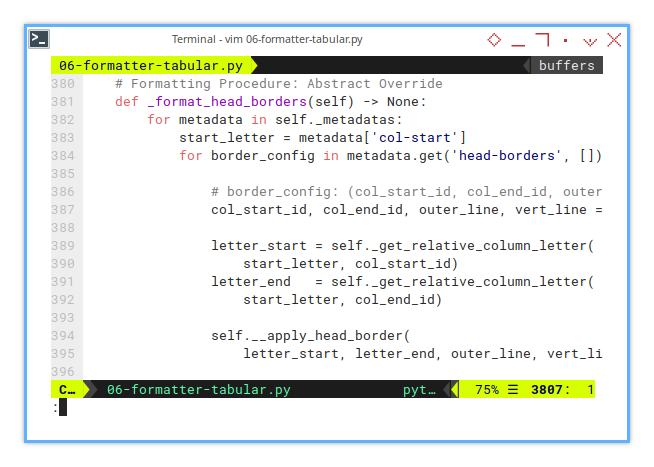
Stage One: Outer Loop
The outer loop processes each metadata block. Scanning through the head border configurations, like a librarian organizing book spines.
    # Formatting Procedure: Abstract Override
    def _format_head_borders(self) -> None:
        for metadata in self._metadatas:
            start_letter = metadata['col-start']
            for border_config in metadata.get('head-borders', []):

                ...
Stage Two: Inner Loop – Applying Formats
Then the inner loop formats the borders according to the configuration. This is where the real action happens, each border is applied precisely where it belongs, ensuring no column feels left out.
for border_config in metadata.get('head-borders', []):

    # border_config: (col_start_id, col_end_id, outer_line, vert_line)
    col_start_id, col_end_id, outer_line, vert_line = border_config

    letter_start = self._get_relative_column_letter(
        start_letter, col_start_id)
    letter_end   = self._get_relative_column_letter(
        start_letter, col_end_id)

    self.__apply_head_border(
        letter_start, letter_end, outer_line, vert_line)
Without these loops, your header borders would be wild and unruly. Like a toddler with a crayon. This code keeps everything in check, applying borders in a predictable, elegant way.
Now we can spot apply_head_border at the end of the method.
We need to refactor complex code.
Helper: Apply Head Border
This helper is used exclusively within _format_head_borders().
The __apply_head_border() method handles two types of borders:
- Outside Border: Edges and Corner (because even data needs boundaries)
- Inside Border: Vertical divider only (we keep it neat, not noisy)

Think of this as the fine brushwork after the broad strokes. It ensures each header cell is boxed in properly. No gaps, no mess. Precision like this transforms our sheet from “meh” to “magnificent”.
    def __apply_head_border(self,
        letter_start: str, letter_end: str,
        outer_line: Side, vert_line: Side) -> None:

        # Define the cell range for rows and columns
        # Top, Bottom (max row), Left, Right
        a_t = 3
        a_b = 3
        a_l = column_index_from_string(letter_start) - 1
        a_r = column_index_from_string(letter_end) - 1

        self._border_cell_outer(a_t, a_b, a_l, a_r, outer_line)
        self._border_cell_inner_oneliner(a_t, a_b, a_l, a_r, vert_line)
This process requires two supporting private methods:
-
__border_cell_outer()Handles the outer edges. -
__border_cell_inner_oneliner(()Draws the inner vertical divider lines
Together, they ensure your headers stand proud and polished, not like a half-painted fence left out in the rain.
Formatting: Format Head Colors
When it comes to headers, a splash of color isn’t just about looking pretty. It’s about clarity. Colors help highlight categories, guide the reader’s eyes and prevent oour spreadsheet from looking like a barren wasteland.
We apply header colors using a familiar two-stage loop:
- Outer loop: Iterates through each metadata block.
- Inner loop: Paints each field with its assigned color within each metadata block
How does the coloring magic work?
Here’s the _format_head_colors() method in the descendant class:
Outer Loop: Gathering the Troops
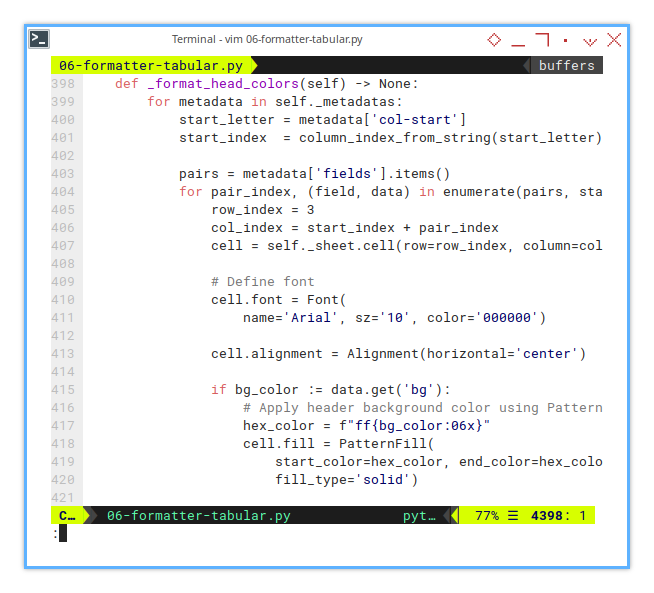
    # Formatting Procedure: Abstract Override
    def _format_head_colors(self) -> None:
        for metadata in self._metadatas:
            start_letter = metadata['col-start']
            start_index  = column_index_from_string(start_letter)

            pairs = metadata['fields'].items()
            for pair_index, (field, data) in enumerate(pairs, start=0):
                ...
The outer loop scans each metadata block.
Inner Loop: Bringing the Colors to Life
In the inner loop, each field is processed.
for pair_index, (field, data) in enumerate(pairs, start=0):
    row_index = 3
    col_index = start_index + pair_index
    cell = self._sheet.cell(row=row_index, column=col_index)

    # Define font
    cell.font = Font(
        name='Arial', sz='10', color='000000')

    cell.alignment = Alignment(horizontal='center')

    ...
Each field gets its moment in the spotlight, set neatly in row 3, ready for the makeover. And here’s where things get fancy:
- We check if a background color exists using the mighty walrus operator (:=).
- If a color is found, we splash it onto the cell with a
PatternFill.
for pair_index, (field, data) in enumerate(pairs, start=0):
    ...

    if bg_color := data.get('bg'):
        # Apply header background color using PatternFill
        hex_color = f"ff{bg_color:06x}"
        cell.fill = PatternFill(
            start_color=hex_color, end_color=hex_color,
            fill_type='solid')
This method keeps the color logic clean and contained. No rogue cells escaping the makeover session. By following a unified configuration, we avoid scattered style logic, and ensure every header gets its deserved polish.
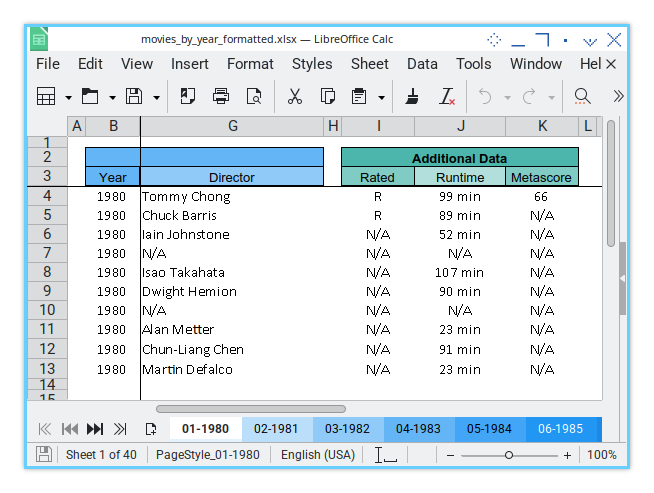
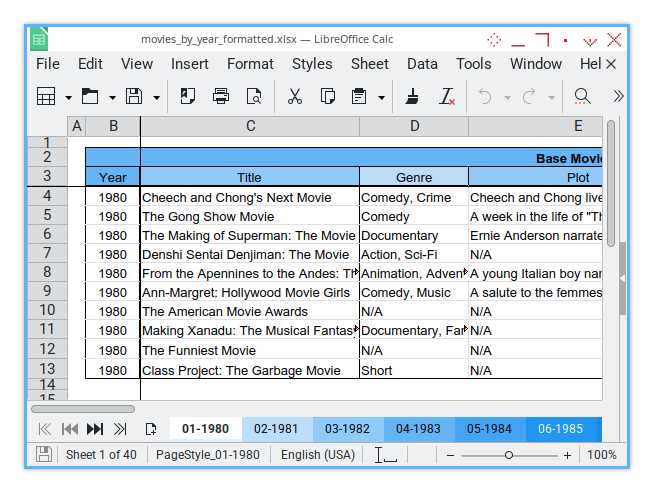
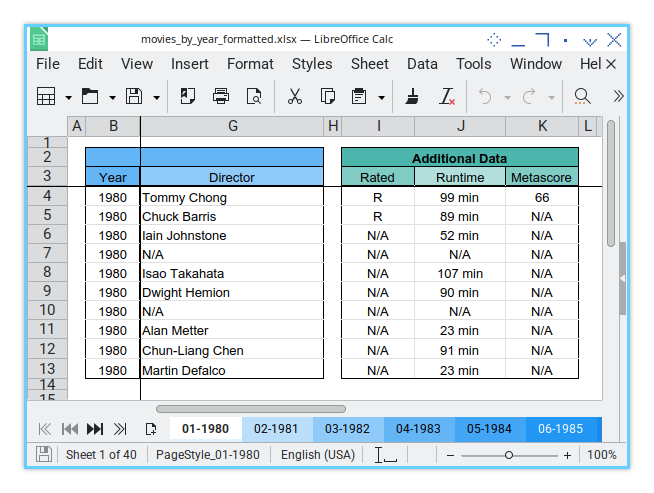
Sheet Result
Here’s the current output. Feast your eyes on these perfectly formatted headers:
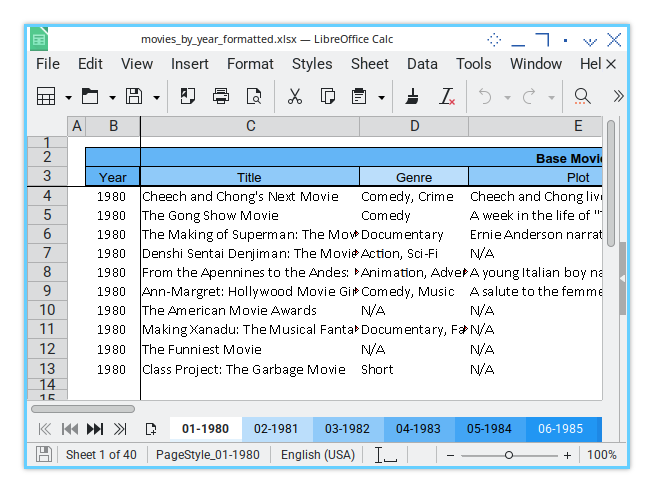
And you can see the other section in the rest of the columns.
Terminal Log
Even our terminal logs are keeping up appearances. No surprises here.
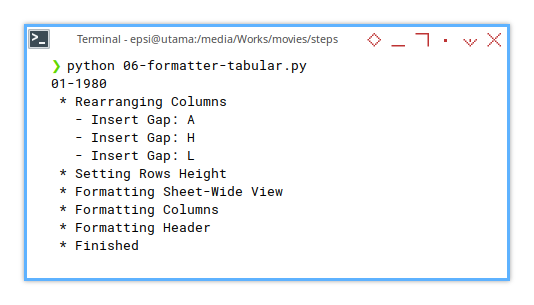
❯ python 06-formatter-tabular.py
01-1980
 * Rearranging Columns
   - Insert Gap: A
   - Insert Gap: H
   - Insert Gap: L
 * Setting Rows Height
 * Formatting Sheet-Wide View
 * Formatting Columns
 * Formatting Header
 * Finished

02-1981
...
It’s the same trusty log output as before. But don’t be fooled, behind the scenes, our headers are undergoing a glamorous transformation.
Header formatting contain more than one methods.
07: Step Seven
After enhancing the header’s visual appeal, it’s time to give your data rows some well-deserved attention. Think of it as extending special treatment to the rest of our spreadsheet
Just like with headers, we follow a structured, two-stage approach. Consistency is key, unless we’re plotting a time-travel movie. Much like the header, the data formatting follows similar methods.
Step Overview
In this section, we dive into the magic of unified configuration for data rows:
- Helper: Border Cell: Inner
- Helper: Apply Data Border
- Formatting Procedure: Format Data Border
- Configuration: Data Borders
Clean, consistent borders aren’t just for aesthetics. They make our data easier to read and analyze. Plus, it spares our future self from deciphering a chaotic spreadsheet.
Script Source
You can obtain the script source from this repository:
Class Diagram
What’s new?
In this step, we roll out the red carpet,
for a new abstract method: _format_data_border().
This method wears a protected visibility badge.
Even methods need boundaries.
The structure mirrors the header borders process,
with a supporting method named __apply_data_border().
Why reinvent the wheel?
This method relies on two trusty sidekicks:
_border_cell_outer()and,_border_cell_inner()
All three are tucked away with private visibility. I like to keep things organized (and mysterious).
Abstract Method
Much like its header-based sibling _format_head_borders(),
the _format_data_borders() method is an abstract method in the base class,
with a protected visibility specifier.
This sets the stage for concrete implementations in descendant classes.
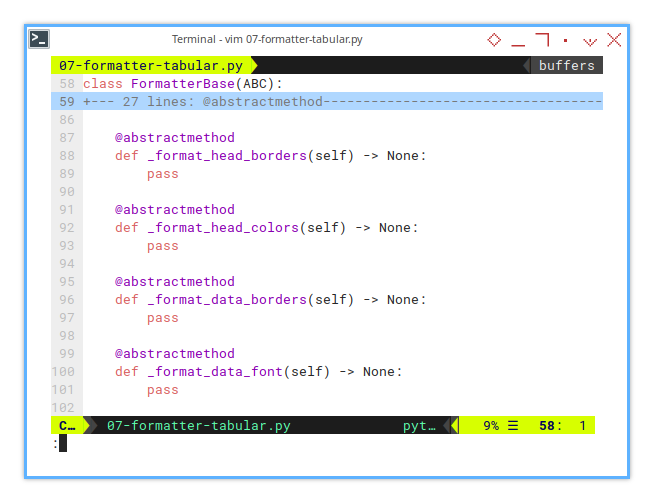
class FormatterBase(ABC):
    ...

    @abstractmethod
    def _format_data_borders(self) -> None:
        pass

    @abstractmethod
    def _format_data_font(self) -> None:
        pass
This ensures that any descendant class must implement these methods. No freeloaders allowed.
Basic Flow
Apply borders to the specified range
Next, we extend the basic flow,
by adding the _format_data_borders() method.
This method handles the border styling for the data rows. Because our data deserves a fancy frame too!

    # Basic Flow
    def __format_one_sheet(self) -> None:
        ...

        print(' * Formatting Border')
        self._format_data_borders()
        self._format_data_font()

        ...
This call ensures our data rows aren’t just floating in an empty void. Instead, they’re neatly contained.
An organized spreadsheet is a happy spreadsheet.
Configuration: Init Metadatas
Managing Instance Variables
A new key, data-borders,
has been added to the metadata configuration.
This new key allows us to define borders,
specifically for the data rows, separate from the headers.
Each part of the metadata corresponds to a column block.
class FormatterTabularData(FormatterCommon):
    def _init_metadatas(self) -> None:
        self._metadata_movies_base = {
            'fields': {...},
            'titles': [{...}],
            'head-borders': [...],
            'data-borders': [{...}]
        }

        self._metadata_movies_additional = {
            'fields': {...},
            'titles': [{...}],
            'head-borders': [...],
            'data-borders': [{...}]
        }
By handling data-borders separately, we maintain clear separation between header and data styling. This approach allows easier updates and more flexible formatting.
Configuration: Head Borders
Now let’s break down the supplementary extra keys.
The Basic Column Block
        self._metadata_movies_base = {
            'fields': {...},
           'titles': [{...}],

           # letter_start, letter_end, outer_line, vert_line
           'head-borders': [
                ( 1, 6, lfBlack, lfBlack)],

           # letter_start, letter_end, outer_line, vert_line, horz_line
           'data-borders': [
                ( 1,  2, lfBlack, lfBlack, lfGray),
                ( 3,  6, lfBlack, lfGray,  lfGray)]
        }
The Additional Column Block
        self._metadata_movies_additional = {
            'fields': {...},
            'titles': [{...}],
            'head-borders': [
                ( 1, 3, lfBlack, lfBlack)],
            'data-borders': [
                ( 1, 3, lfBlack, lfGray, lfGray)]
        }
Here we precisely define how each column block should be framed. It’s like giving each section of our spreadsheet, its own stylish border. No more rogue cells going off-grid!
Formatting: Format Data Borders
As with previous steps, we use two loop stages. Think of this as giving our Excel sheet, a sharp new suit. Even our data deserves to dress to impress.
- Outer loop: Iterates through unified metadata
- Inner loop: Iterates over
data-bordersfor each metadata entry
Let’s now examine the implementation of the protected
_format_data_borders() method in the descendant class.

Two Stages Loop - The Border Patrol
Without proper borders, oour data ends up looking like a chaotic spreadsheet jungle. Good luck finding anything! This structure keeps things visually organized, making it easier to read and analyze data blocks.
    def _format_data_borders(self) -> None:
        for metadata in self._metadatas:
            start_letter = metadata['col-start']

            for border_config in metadata['data-borders']:

                # border_config: (col_start_id, col_end_id, outer_line, vert_line, horz_line)
                col_start_id, col_end_id, \
                    outer_line, vert_line, horz_line = border_config

                letter_start = self._get_relative_column_letter(
                    start_letter, col_start_id)
                letter_end   = self._get_relative_column_letter(
                    start_letter, col_end_id)

                self.__apply_data_border(
                  letter_start, letter_end,
                  outer_line, vert_line, horz_line)
Now we can spot apply_head_border at the end of the method.
We need to refactor complex code.
Helper: Apply Data Border
This helper is used exclusively within _format_head_borders().
The __apply_head_border() method handles two types of borders:
-
Outside Border: The edges and corners. Like a crisp frame for your data masterpiece.
-
Inside Border: Vertical and horizontal dividers to separate data. Noone likes a messy grid.
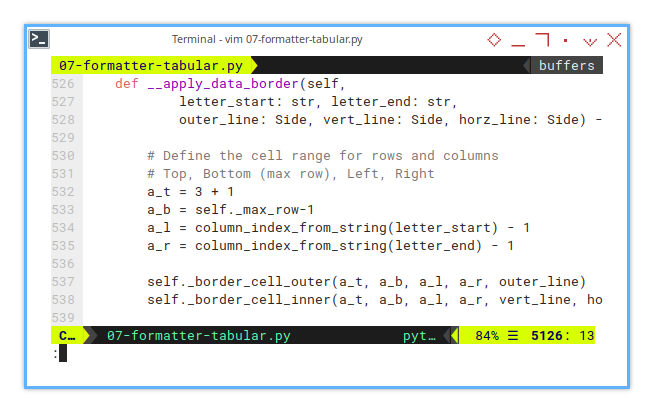
    def __apply_data_border(self,
            letter_start: str, letter_end: str,
            outer_line: Side, vert_line: Side, horz_line: Side) -> None:

        # Define the cell range for rows and columns
        # Top, Bottom (max row), Left, Right
        a_t = 3 + 1
        a_b = self._max_row-1
        a_l = column_index_from_string(letter_start) - 1
        a_r = column_index_from_string(letter_end) - 1

        self._border_cell_outer(a_t, a_b, a_l, a_r, outer_line)
        self._border_cell_inner(a_t, a_b, a_l, a_r, vert_line, horz_line)
This helper method is where the magic happens. Without it, our borders would be as unreliable as, a Wi-Fi connection during a thunderstorm. It ensures consistency by defining clear boundaries, improving both aesthetics and data clarity.
This process requires two supporting private methods:
__border_cell_outer()__border_cell_inner(()
Together, they make sure your data doesn’t just exist. It stands out.
Formatting: Data Font
We apply data font in a similar two-stage loop:
- Outer loop: Iterates over unified metadata.
- Inner loop: Applies font to the fields within each metadata block.
Raw data without proper formatting is like wearing pajamas to a job interview. It technically works, but it doesn’t leave the best impression.
How does the font formatting work?
Let’s take a look at _format_data_font() method in the descendant class:
Outer Loop
    # Formatting Procedure: Abstract Override
    def _format_head_colors(self) -> None:
        for metadata in self._metadatas:
            start_letter = metadata['col-start']
            start_index  = column_index_from_string(start_letter)

            pairs = metadata['fields'].items()
            for pair_index, (field, data) in enumerate(pairs, start=0):
                ...
Inner Loop
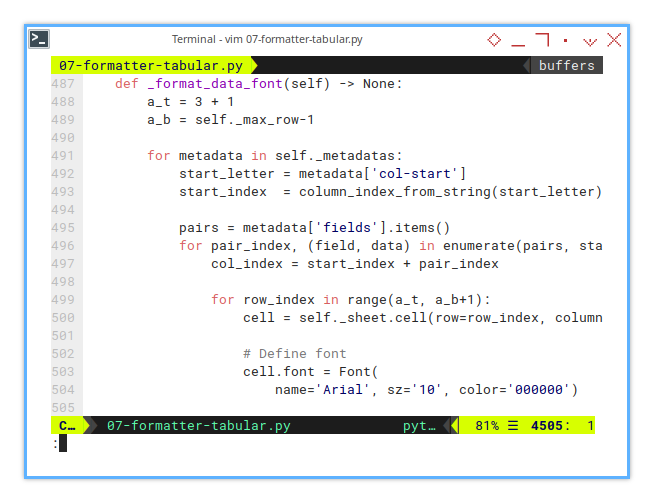
In the inner loop, each field is processed.
    def _format_data_font(self) -> None:
        a_t = 3 + 1
        a_b = self._max_row-1

        for metadata in self._metadatas:
            start_letter = metadata['col-start']
            start_index  = column_index_from_string(start_letter)

            pairs = metadata['fields'].items()
            for pair_index, (field, data) in enumerate(pairs, start=0):
                ...
Let’s apply that font to the corresponding cell.
pairs = metadata['fields'].items()
for pair_index, (field, data) in enumerate(pairs, start=0):
    col_index = start_index + pair_index

    for row_index in range(a_t, a_b+1):
        cell = self._sheet.cell(row=row_index, column=col_index)

        cell.font = Font(
            name='Arial', sz='10', color='000000')
At this point, we’re not just moving data around. We’re dressing it up for the big Excel ball. This approach ensures clean, maintainable code that, follows the unified configuration structure.
Sheet Result
Here’s the current step output:
And also the rest of the columns:
This concludes the core functionality. However, I’d like to provide some additional material. You can integrate hooks into the basic flow, allowing for custom modifications. For example, you could add functionality, to color rows based on specific values.
Why settle for boring monochrome, when you can have a rainbow of meaning?
Terminal Log
For this step, the log result can be displayed in the terminal as follows:

❯ python 07-formatter-tabular.py
01-1980
 * Rearranging Columns
   - Insert Gap: A
   - Insert Gap: H
   - Insert Gap: L
 * Setting Rows Height
 * Formatting Sheet-Wide View
 * Formatting Columns
 * Formatting Header
 * Formatting Border
 * Finished

02-1981
...
This approach is much more efficient,
than constantly checking htop,
to monitor a single CPU core maxing out at 100%.
Let’s be honest,
our time is better spent analyzing the content in perfectly formatted,
than watching htop.
What is Next 🤔?
We’re almost there! Just a few more tweaks, and our Excel sheets, will be looking so sharp they’ll make pivot tables jealous.
Up next, we’ll explore how to extend this class structure. For instance, we’ll implement a data coloring procedure to highlight key areas, (because some numbers deserve the spotlight).
But wait—there’s more! We’ll also break the script apart, making it modular and reusable across multiple projects. Less copy-pasting, more automating.
Life’s too short to format the same sheet twice.
Consider continuing with [ Formatter - Excel Config - Five ].