Preface
Goal: Formatting column styles and merged titles using using unified configuration.
Now that we’ve wrestled the basics into submission, it’s time to unlock the real magic, unified configuration. This means no more hardcoding every tiny detail (unless you enjoy self-inflicted pain). Instead, we’ll centralize formatting rules and let our code gracefully adapt.
In this chapter, we’re diving deeper into column formats, and the glorious power of merged titles. Buckle up! We’re turning structured chaos into elegant automation.
04: Step Four
Welcome to Step Four, where things get serious, but not too serious. This time, we’re pulling in configuration metadata to drive our formatting. Instead of hardcoding every cell’s style like a control freak, we let metadata take the wheel. It’s like giving our script a checklist so it knows exactly how to behave.
As our spreadsheets grow more complex, manually tweaking every column becomes a one-way ticket to frustration. With a unified configuration, we make the script smarter, faster, and far easier to maintain.
Step Overview
In this section, we tackle the following:
-
Class: FormatterTabularData. Our new fancy subclass.
-
Helper: Get Relative Column Letter. Because “A” is easier to read than “1”.
-
Formatting Procedure: Format Columns. Where the magic happens.
-
Configuration: Field Metadata Configuration. Centralized rules for flexible formatting..
Script Source
The script source for this step lives here. Sure, I believe in sharing:
Class Diagram
What’s new?
Glad you asked! We’re not just adding fluff. This step brings:
- Two abstract methods (because one isn’t enough), each with an implementation.
- One supporting method to handle the heavy lifting.
- Metadata variables to steer the formatting ship.
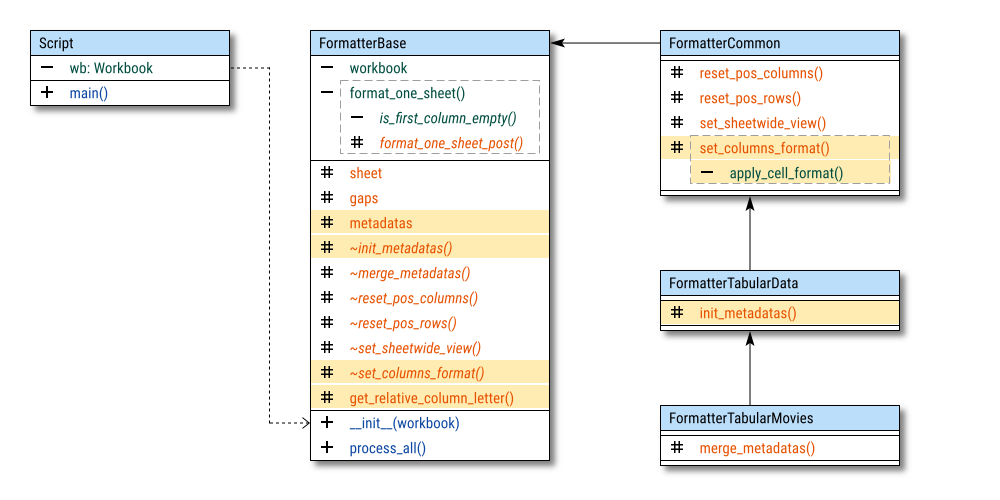
Oh, and there’s a new class on the block: FormatterTabularData.
Import Statements
We’re expanding our toolkit with new utilities and styles from openpyxl, because no one likes reinventing the wheel.
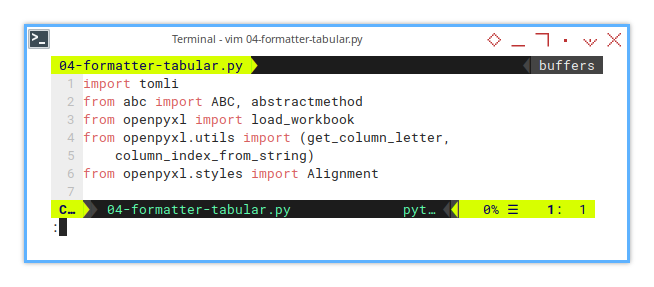
import tomli
from abc import ABC, abstractmethod
from openpyxl import load_workbook
from openpyxl.utils import (get_column_letter,
    column_index_from_string)
from openpyxl.styles import Alignment
Abstract Method
This step adds two new abstract methods,
_init_metadatas(): Gathers and stores configuration metadata._set_columns_format(): Applies those sweet formatting rules.

class FormatterBase(ABC):
    @abstractmethod
    def _init_metadatas(self) -> None:
        pass

    @abstractmethod
    def _merge_metadatas(self) -> None:
        pass

   ...

    @abstractmethod
    def _set_columns_format(self) -> None:
        pass
Abstract methods ensure each descendant class follows the same structure, like a well-behaved citizen in our formatting kingdom.
Initialization: Init Metadatas
The _init_metadatas() method is introduced here,
alongside the initial value for the _metadatas variable.
We need to set the initial value.
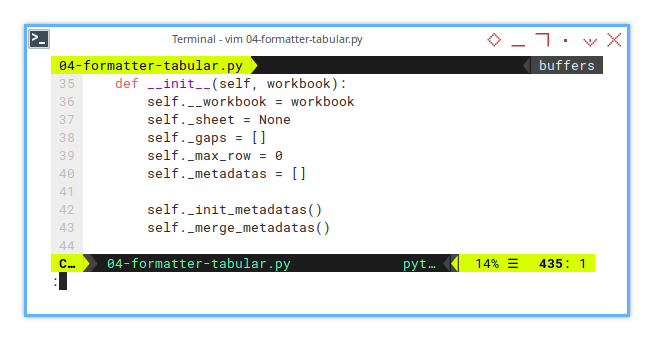
    def __init__(self, workbook):
        self.__workbook = workbook
        self._sheet = None
        self._gaps = []
        self._max_row = 0
        self._metadatas = []

        self._init_metadatas()
        self._merge_metadatas()
Then give it a real value for each sheet variant later.
At this point, _metadatas is an empty list,
like a blank notebook.
We’ll fill it with meaningful values later for each sheet variant.
Configuration: Init Metadatas
Managing Instance Variables
To unify the configuration metadata, we start by organizing our fields into dictionaries, each describing the column’s letter, width, and (optionally) alignment.
The _init_metadatas() method takes care of this organization.
It’s like giving your script a blueprint for every column
In our movie-themed example, we manage two distinct blocks:
-
_metadata_movies_base: The essential movie details (year, title, genre, etc.). -
_metadata_movies_additional. Bonus info (rating, runtime, metascore).
Here’s how it begins:
class FormatterTabularData(FormatterCommon):
    def _init_metadatas(self) -> None:
        self._metadata_movies_base = {
            'fields': {...}
        }

        self._metadata_movies_additional = {
            'fields': {...}
        }
Instead of having column letters are hardcoded individually, we determine column positions dynamically, by merging all blocks. So if the sheet layout changes, your script adapts without a tantrum.
Dynamic Column Positioning
Because Life Is Too Short for Manual Updates
Instead of sweating over manual column letters,
we call in the cavalry, a helper method named _get_relative_column_letter(),
to dynamically find starting positions.
This means no more tedious letter-by-letter corrections,
when the source sheet evolves.
Here’s the complete setup, decked out with actual values:
class FormatterTabularData(FormatterCommon):
    # Unified Configuration
    def _init_metadatas(self) -> None:
        self._metadata_movies_base = {
            'fields': {
                'Year'     : { 'width': 1.5, 'align': 'center' },
                'Title'    : { 'width': 6 },
                'Genre'    : { 'width': 3 },
                'Plot'     : { 'width': 6 },
                'Actors'   : { 'width': 6 },
                'Director' : { 'width': 5 }
            }
        }

        self._metadata_movies_additional = {
            'fields': {
                'Rated'    : { 'width': 2,   'align': 'center' },
                'Runtime'  : { 'width': 2.5, 'align': 'center' },
                'Metascore': { 'width': 2,   'align': 'center' }
            }
        }
When we juggle different sheets with varying structures, this modular approach saves us from endless manual tweaks. It also makes our script easier to extend, just add a new metadata block and we’re good to go.
Configuration: Merge Metadatas
Combining Block Configurations
Now that we’ve defined individual blocks,
it’s time to merge them into one unified metadata collection.
This is where _merge_metadatas() enters the scene,
keeping everything tidy and accessible.

class FormatterTabularMovies(FormatterTabularData):
    def _merge_metadatas(self) -> None:
        # Columns:    A, H,  L
        self._gaps = [0, 7, 11]
        self._freeze = "C4"

        self._metadatas = [{
            'col-start'     : 'B',
            **self._metadata_movies_base
        }, {
            'col-start'     : 'I',
            **self._metadata_movies_additional
        }]
The focus here is on keeping track of starting points for each block.
In this case, columns B and I mark the beginning of each section.
Instead of adjusting column letters one-by-one, whenever the sheet structure shifts, we manage everything by defining key positions. Less grunt work. More automation.
Life’s too short for manual edits.
By merging metadata dynamically, our script becomes adaptable, ready to handle new fields or structural changes without breaking a sweat.
Basic Flow
Formatter Base Class
At this point, our script is starting to resemble a well-rehearsed stage play.
Each part knows its cue, and the _set_columns_format() method,
is about to step into the spotlight.
Fits naturally, into the flow.
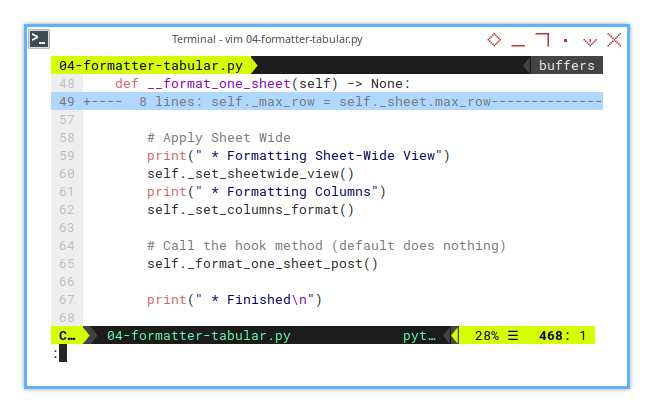
This method ensures our columns are dressed properly (widths, alignment, the whole fashion show). Here’s how the formatting process flows:
    def __format_one_sheet(self) -> None:
        ...

        # Apply Sheet Wide
        print(" * Formatting Sheet-Wide View")
        self._set_sheetwide_view()
        print(" * Formatting Columns")
        self._set_columns_format()

        # Call the hook method (default does nothing)
        self._format_one_sheet_post()

        print(" * Finished\n")
Think of _format_one_sheet() as your backstage crew handling all the dirty work.
It’s modular, extendable, and ensures we won’t be adjusting columns at 3 AM.
Helper: Get Relative Column Letter
Dynamic Column Navigation
This helper method retrieves the Excel-style column letter at an offset from the start_letter.
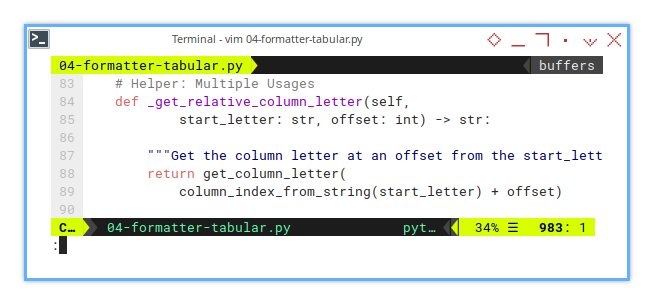
Manually mapping columns (A, B, C…) is a soul-crushing experience. I did that a lot of time, and that was exhausting. This method lets us dynamically find columns by relative position, saving us from countless adjustments.
    def _get_relative_column_letter(self,
            start_letter: str, offset: int) -> str:
        return get_column_letter(
            column_index_from_string(start_letter) + offset)
This method use built-in openpyxl method. No need to reinvent the wheel.
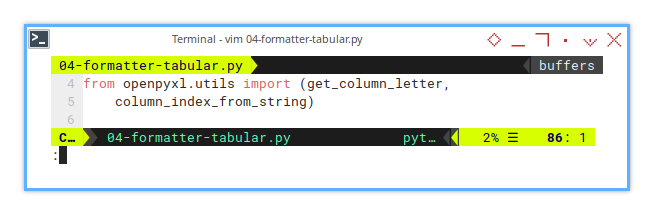
from openpyxl.utils import (get_column_letter,
    column_index_from_string)
This little method isn’t just a one-hit wonder. It’s everywhere. We’ll use it in multiple places, throughout the code to navigate and format sheets.
Formatting: Set Columns Formats
We’ve reached the point where columns get their well-earned makeover. This isn’t just about making things look pretty. It’s about ensuring your data stays neat, readable, and free from the chaos of misaligned numbers.
We can break down the method into two main stages:
- Outer loop: Iterates through unified metadata blocks.
- Inner loop: Applies formatting to each field within those blocks.
Stage One: Outer Loop
The outer loop iterates over each metadata block stored in _metadatas.
This is where we prepare to apply individual field formats.
    # Formatting Procedure: Abstract Override
    def _set_columns_format(self) -> None:
        factor = 5.1
        wscd = self._sheet.column_dimensions

        for metadata in self._metadatas:
            start_letter = metadata["col-start"]
            ...
At this stage, the method prepares for the inner loop, by extracting fields and starting positions. The start_letter indicates the beginning of each block.
The outer loop effectively creates a foundation, for iterating through each field within the block.
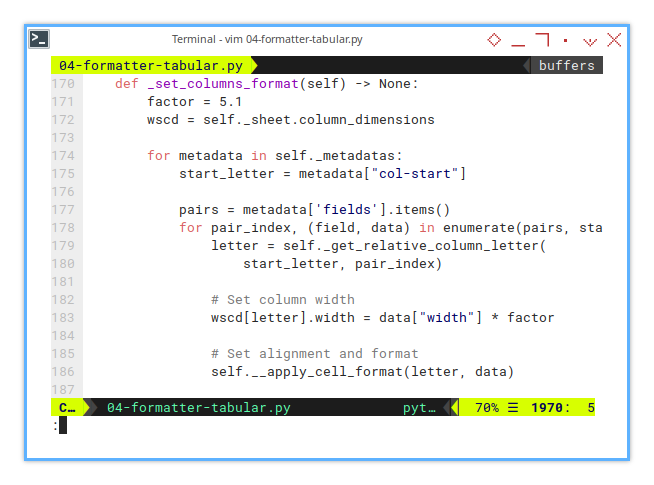
Stage Two: Inner Loop – Applying Formats
Now that we’ve gathered our metadata, it’s time for the inner loop to get to work. Assigning the right width and alignment for each field.
    for metadata in self._metadatas:
        start_letter = metadata["col-start"]

        pairs = metadata['fields'].items()
        for pair_index, (field, data) in enumerate(pairs, start=0):
            letter = self._get_relative_column_letter(
                start_letter, pair_index)

            wscd[letter].width = data["width"] * factor
            self.__apply_cell_format(letter, data)
In this part:
- Column letters are dynamically calculated using
_get_relative_column_letter(). - Column widths are set by multiplying the configured width by factor.
The letter variable points to the correct column, and the width adjustment happens directly on the column object. Dynamic calculation means no more fragile hardcoding.
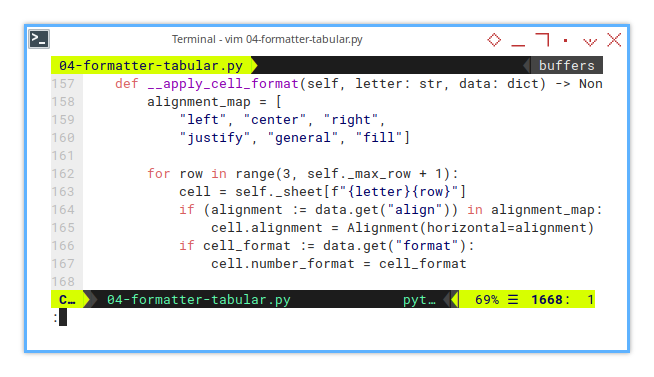
Formatting Cell Ranges
Column width alone isn’t enough.
What about alignment and number formats?
That’s where __apply_cell_format() comes in.
    def __apply_cell_format(self, letter: str, data: dict) -> None:
        alignment_map = [
            "left", "center", "right",
            "justify", "general", "fill"]

        for row in range(3, self._max_row + 1):
            cell = self._sheet[f"{letter}{row}"]
            if (alignment := data.get("align")) in alignment_map:
                cell.alignment = Alignment(horizontal=alignment)
            if cell_format := data.get("format"):
                cell.number_format = cell_format
Here’s what happens:
- A cell range is created from row 3 to the maximum row in the sheet.
- Horizontal alignment is applied if specified in the metadata.
- If a number format is provided, then also applied directly.
A correctly formatted sheet makes our data easier to read and interpret.
Summary: What We Just Automated
By combining these steps, we achieve fully automated column formatting.
- Width: No more manual resizing in Excel.
- Alignment: Ensures your numbers and text are visually organized.
- Number Formats: Perfect for dates, currencies, and other custom formats.
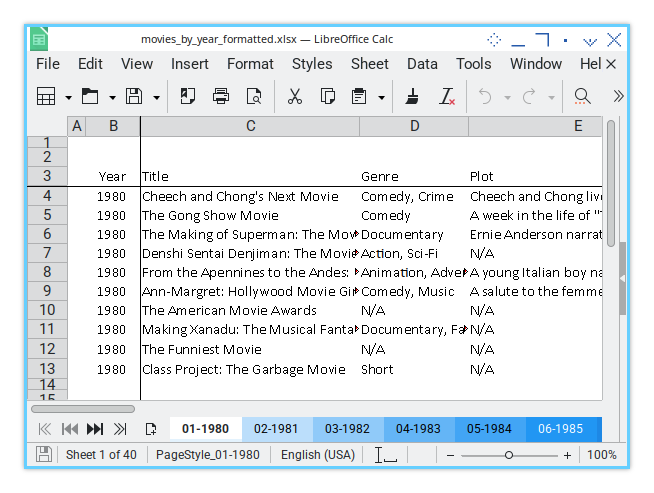
Sheet Result
Here’s what the formatted sheet looks like. Clean, structured, and easier to navigate:
Terminal Log
No Surprises—Just Smooth Execution
Our logs give us a clear, step-by-step breakdown of the formatting process.
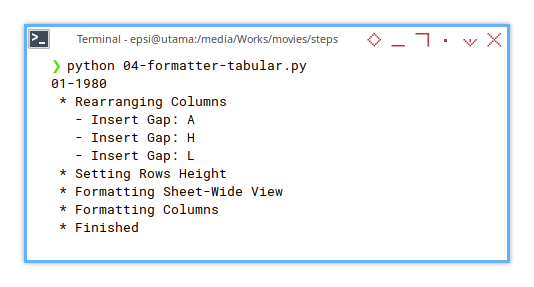
❯ python 04-formatter-tabular.py
01-1980
 * Rearranging Columns
   - Insert Gap: A
   - Insert Gap: H
   - Insert Gap: L
 * Setting Rows Height
 * Formatting Sheet-Wide View
 * Formatting Columns
 * Finished

02-1981
...
Clear logs mean faster debugging. If something breaks, we’ll know exactly where to look.
Final Thoughts: Why This Flow Works
-
Adaptability: Changes in metadata? No problem. Our script updates dynamically.
-
Efficiency: No more manual tweaking. Just run the script and enjoy perfectly formatted sheets.
-
Clarity: With consistent logs and a modular structure, understanding what happens is easy.
No hidden traps or unexpected behaviors. Just a python script doing its job.
05: Constant and Configuration
Let’s keep things organized.
In order to avoid complexity with an unmanageably long section, let’s break things down. We’ll introduce the configuration of column blocks, and define some handy constants we’ll need for step five.
Constant Summary
Color scale constant:
blueScale,tealScale,amberScale,brownScale.clBlack(because classic black never goes out of style).
Border Side:
lfNone,lfBlack,lfGray. (for those moments when you’re feeling fancy).
Actually I use light blue for accounting inner border. But for now, let’s keep things simple.
I even have a whole article series, about spreadsheet formatting in my other blog, if you want to be an Excel Engineer.
Constant: Color Scale
Since we’re adding some color, let’s define the color scale first. Why? Because bland spreadsheets are so last season.
I prefer the Google Material Color Scale. It’s vibrant, modern, and doesn’t make your eyes bleed. For example, here’s the blue scale:
blueScale = {
  0: 0xE3F2FD, 1: 0xBBDEFB, 2: 0x90CAF9,
  3: 0x64B5F6, 4: 0x42A5F5, 5: 0x2196F3,
  6: 0x1E88E5, 7: 0x1976D2, 8: 0x1565C0,
  9: 0x0D47A1
}
Feel free to continue with the rest. You can even add your own favorite color scales. Just don’t go overboard, or your spreadsheet might start looking like a carnival.

blueScale  = {...}
tealScale  = {...}
amberScale = {...}
brownScale = {...}
redScale   = {...}
And because no script is complete without, a classic touch of the default black color:
clBlack = 0x000000A consistent color scale makes your data easier to read and visually appealing, no more guessing if darkish blue is darker than slightly bluish.
Constant: Border Side
Borders may not sound exciting, but they add clarity to our data. Like a good frame around an abstract painting. Let’s keep things concise by defining border sides in a cleaner way.
Instead of verbose self.lfNone1 references,
we’ll use simple variables like lfNone.
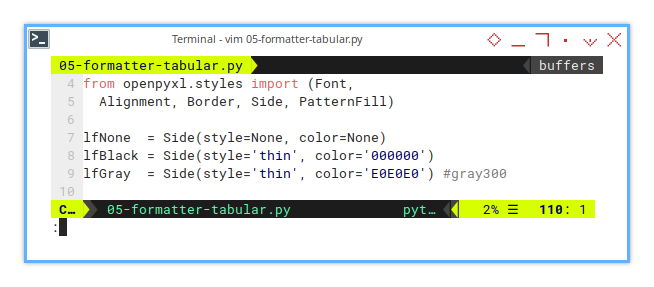
from openpyxl.styles import (Border, Side)

lfNone  = Side(style=None, color=None)
lfBlack = Side(style='thin', color='000000')
lfGray  = Side(style='thin', color='E0E0E0') #gray300
Cleaner, shorter code makes it easier to add new borders, or update existing ones without digging through endless lines of code. Plus, who doesn’t love a neat script?
Configuration: Init Metadatas
Instance Variables: Where all the magic starts.
In line with the unified configuration approach,
we consolidate metadata initialization into a structured format.
This starts with the fields dictionary,
defining column letters, widths, and optional alignments.
On top of that, we introduce titles to manage block-level configurations.
class FormatterTabularData(FormatterCommon):
    def _init_metadatas(self) -> None:
        self._metadata_movies_base = {
            'fields': {...},
            'titles': [{...}]
        }

        self._metadata_movies_additional = {
            'fields': {...},
            'titles': [{...}]
        }
Each section represents a discrete block of columns, simplifying layout management.
Real Life Use
Keeping our metadata structured makes it easier to extend or modify later. It’s like building with LEGO. I want my foundation solid, since I stacked more on top. The truth is, I have a lot of configs in my real life. And also a few different descendant class, based on this article series.
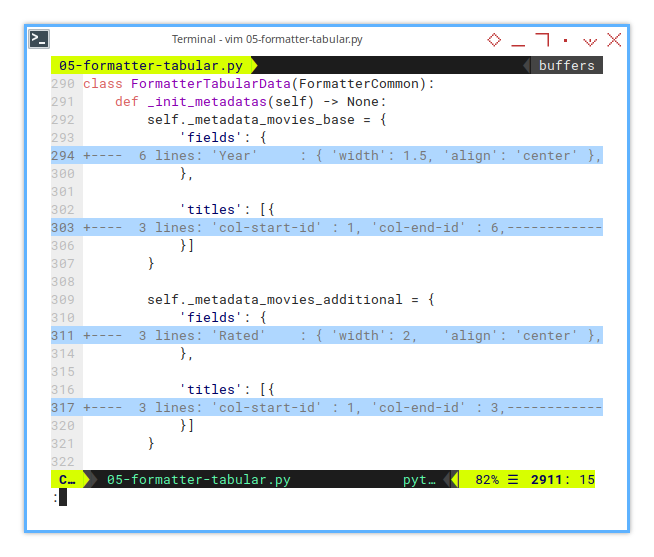
Configuration: Column Blocks
Now let’s break down the individual column blocks. Each block represents a chunk of related information. This separation keeps things modular and manageable.
Base Column Block
The base block covers the core movie attributes:
- year, title, genre, plot, and the usual suspects.
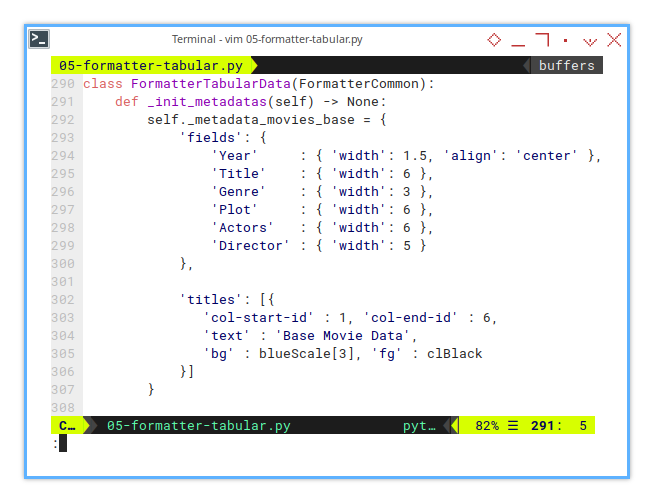
    self._metadata_movies_base = {
        'fields': {
            'Year'     : { 'width': 1.5, 'align': 'center' },
            'Title'    : { 'width': 6 },
            'Genre'    : { 'width': 3 },
            'Plot'     : { 'width': 6 },
            'Actors'   : { 'width': 6 },
            'Director' : { 'width': 5 }
        },

        'titles': [{
            'col-start-id' : 1, 'col-end-id' : 6,
            'text' : 'Base Movie Data',
            'bg' : blueScale[3], 'fg' : clBlack
        }]
    }
Additional Column Block
The additional block handles auxiliary data, things like ratings, runtime, and metascore. Because every movie deserves its stats.
    self._metadata_movies_additional = {
        'fields': {
            'Rated'    : { 'width': 2,   'align': 'center' },
            'Runtime'  : { 'width': 2.5, 'align': 'center' },
            'Metascore': { 'width': 2,   'align': 'center' }
        },

        'titles': [{
            'col-start-id' : 1, 'col-end-id' : 3,
            'text' : 'Additional Data',
            'bg' : tealScale[3], 'fg' : clBlack
        }]
    }
Dividing data into logical blocks makes it easier to manage, extend, or debug. No more searching through a haystack to find a single field.
Configuration: Titles
You might be wondering. why bother using a list for titles? Simple: flexibility.
        'titles': [{
            'col-start-id' : 1, 'col-end-id' : 6,
            'text' : 'Base Movie Data',
            'bg' : blueScale[3], 'fg' : clBlack
        }]
This structure allows multiple title rows within the same block. Want to split a block into sub-sections? Easy.
        'titles': [{
            'col-start-id' : 1, 'col-end-id' : 3,
            'text' : 'Base Movie Data',
            'bg' : blueScale[3], 'fg' : clBlack
        }, {
            'col-start-id' : 4, 'col-end-id' : 6,
            'text' : 'Other Movie Data',
            'bg' : blueScale[3], 'fg' : clBlack
        }]
This modular approach allowing us to add, split, or tweak section, without overhauling our entire configuration. It’s the gift of future-proofing our code.
05: Step Five
After the basic formatting, which may seem quite plain, we can now move on to adding color and borders.
Step Overview
In this section, we focus on expanding the configuration with a few key additions:
-
Predefined Constant:
- Color Scale (GMC)
- Line Format
-
Formatting Procedure
- Add merged title
- Set merge title
- Add merged titles post (Hook)
-
Configuration
- Merged Titles
While plain spreadsheets are fine, we want our Excel sheets to look sharp enough, to impress the office coffee machine.
Script Source
The full script source for this section can be found here:
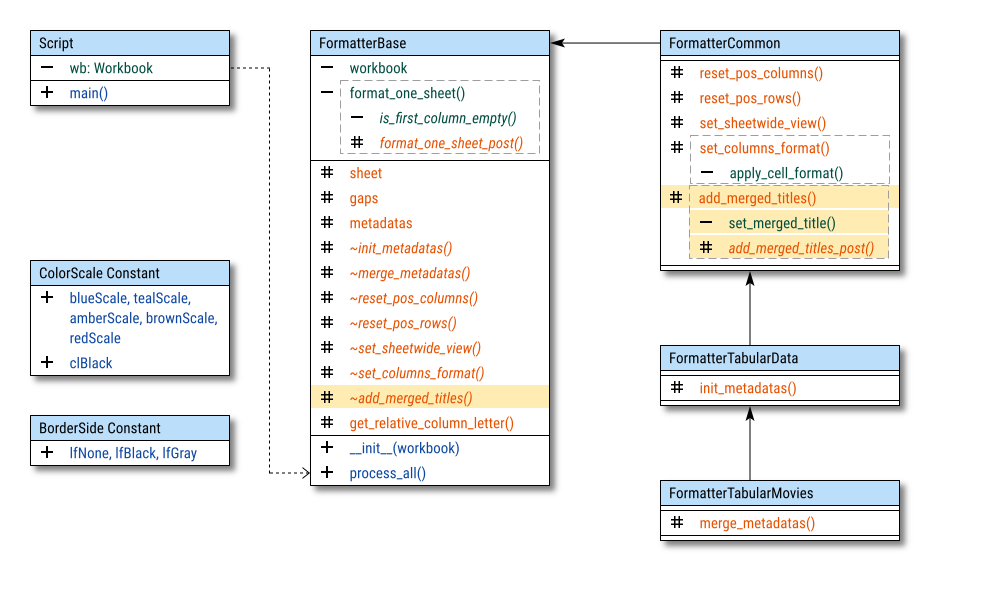
Class Diagram
Focus on the highlights, the new additions stand out.
In the updated diagram, you’ll notice a few key elements:
-
New Abstract Method:
_add_merged_titles(). Where the magic of merging begins. -
A hook:
_add_merged_titles_post(). An optional touch for additional tweaks. -
Color Scale Box: Holds our carefully curated Google Material Colors (because grayscale is just too serious).
-
Border Side Scale Box: Predefined border. Because even Excel cells need a sharp outline.
Import Statements
It is getting longer after some time.
As the script evolves, so do the import statements. It’s the natural law of Python scripts. But don’t worry, this is the final batch. No more imports until the grand finale.
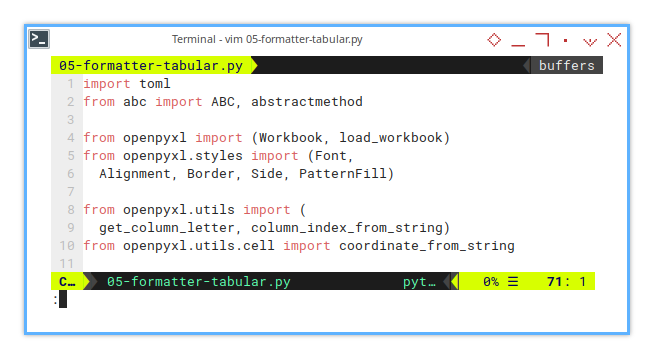
import toml

from abc import ABC, abstractmethod
from openpyxl import (Workbook, load_workbook)
from openpyxl.styles import (Font,
  Alignment, Border, Side, PatternFill)

from openpyxl.utils import (
  get_column_letter, column_index_from_string)
from openpyxl.utils.cell import coordinate_from_string
Organized imports mean cleaner code, and cleaner code means fewer facepalm moments later.
Abstract Method
One abstract method named _add_merged_titles() is introduced at this stage:
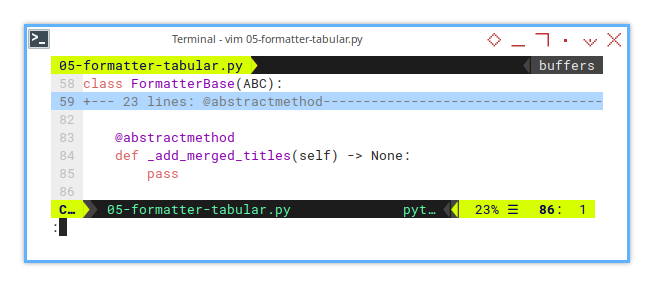
class FormatterBase(ABC):
   ...

    @abstractmethod
    def _add_merged_titles(self) -> None:
        pass
This sets the foundation for handling merged title formatting in descendant classes. Without this method, our column titles would remain stubbornly unmerged, and nobody wants that kind of chaos.
Basic Flow
Formatter Base Class
With this new method in place,
we extend the existing flow to incorporate,
the merged title formatting with add_merged_title().
# Basic Flow
def __format_one_sheet(self) -> None:
...
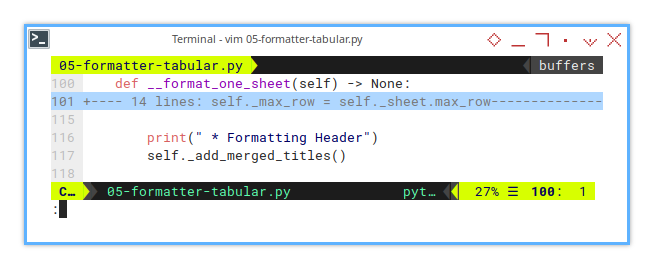
print(" * Formatting Header")
self._add_merged_titles()
...The actual implementation of _add_merged_titles(),
will be handled in the descendant class,
keeping the base class lean and abstract.
This separates concerns neatly, making it easier to add new title formats, without turning our code into spaghetti.
Formatting: Add Merged Title
Inner Loop
How do we implement unified configuration for merged titles?
The process involves two main loop stages:
- Outer Loop: Iterates over unified metadata blocks.
- Inner Loop: Iterates over:
- Fields: Handled separately by
set_columns_format(). - Titles: Directly relevant to merged title formatting.
- Fields: Handled separately by
In this method, we only leverage the titles portion of the inner loop,
because the fields logic resides in set_columns_format().
Let’s keep things tidy.
Now, let’s break down _add_merged_titles(),
which calls the helper method __set_merged_title().
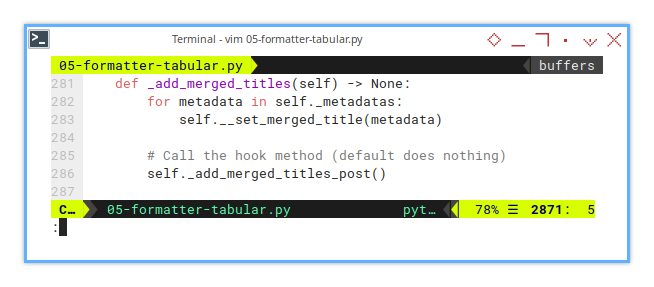
    def _add_merged_titles(self) -> None:
        for metadata in self._metadatas:
            self.__set_merged_title(metadata)

        self._add_merged_titles_post()
Hook for Extensibility
I’ve added a hook method _add_merged_titles_post()
for subclasses to override if necessary.
Most of the time, this hook stays untouched. However, in edge cases where additional formatting, or adjustments are required. This hook proves valuable.
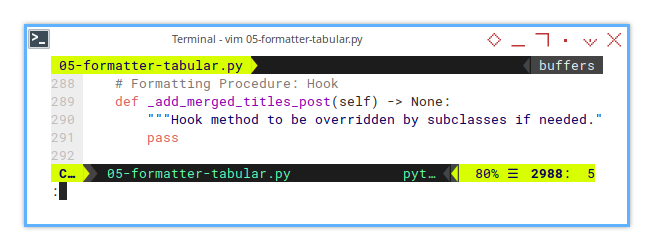
    def _add_merged_titles_post(self) -> None:
        pass
This setup ensures the base class maintains simplicity, while descendant classes can introduce custom behavior when needed.
Without modifying core logic.
Helper: Set Merged Title
To avoid cluttering _add_merged_titles() with too much detail,
I extracted the logic into a private method named __set_merged_title().
After refactoring, the method is much cleaner.
![openpyxl: Step Five: Set Merged Title][158-py-set-merge-title-01]
    def __set_merged_title(self, metadata: dict[str, any]) -> None:
        start_letter = metadata['col-start']

        for title in metadata['titles']:
            col_letter_start = self._get_relative_column_letter(
                start_letter, title['col-start-id']-1)
            col_letter_end   = self._get_relative_column_letter(
                start_letter, title['col-end-id']-1)

            # Set title text
            cell = self._sheet[f"{col_letter_start}2"]
            cell.value = title['text']
The merged header defaults to:
- Bold text (BOLD)
- Center-aligned (CENTER)
- Black border
- Predefined Font
Background Color and Border Style
![openpyxl: Step Five: Set Merged Title][158-py-set-merge-title-02]
        for title in metadata['titles']:
            ..

            hex_color = f"ff{title['bg']:06x}"
            cell.fill = PatternFill(
                start_color=hex_color,
                end_color=hex_color,
                fill_type='solid')

            side = lfBlack
            cell.border = Border(top = side,
                bottom = side, left  = side, right = side)
Font and Alignment
![openpyxl: Step Five: Set Merged Title][158-py-set-merge-title-03]
        for title in metadata['titles']:
            ..

            cell.font = Font(
                name='Arial', sz='10', bold=True,
                color='000000')

            cell.alignment = Alignment(horizontal='center')
Merging Cell
And finally merge the cells for the title.
        for title in metadata['titles']:
            ..

            merge_address = f"{col_letter_start}2:{col_letter_end}2"
            self._sheet.merge_cells(merge_address)
That’s It!
This refactor eliminates brittle hardcoding, ensuring the code adapts seamlessly to any column configuration.
Like our deadlines 😉, dynamic spreadsheets should stay flexible.
Sheet Result
The final output for this step will appear as follows:
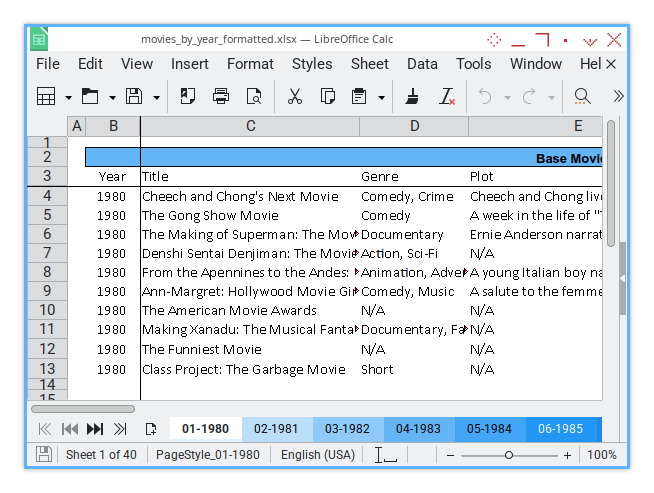
A beautifully formatted sheet isn’t just easier to read. It makes us look like we actually know what you’re doing. And hey, if we accidentally impress upper management, that’s a bonus, right?
Terminal Log
For this step, the terminal log will look like this:
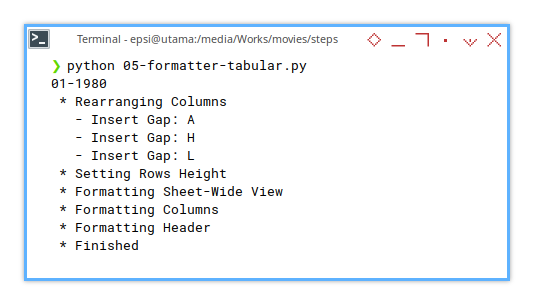
❯ python 05-formatter-tabular.py
01-1980
 * Rearranging Columns
   - Insert Gap: A
   - Insert Gap: H
   - Insert Gap: L
 * Setting Rows Height
 * Formatting Sheet-Wide View
 * Formatting Columns
 * Formatting Header
 * Finished

02-1981
...
A clean terminal log is like a well-oiled machine. Everything runs smoothly, and we get to look like the wizard pulling all the right levers. Plus, it’s oddly satisfying to watch our script tick through each stage like a checklist from a heist movie.
What is Next 🤔?
With the design pattern in place, we can now proceed to colorize the header. Why settle for grayscale, when you can make your spreadsheets pop like a neon sign?
But wait, there’s more! We’re also adding borders for both the header and the data.
Beyond the visual flair, adding colors and borders improves clarity. It helps distinguish sections, enhances data readability, Makes our spreadsheet look less like a relic from the 90s.
So, buckle up! The next step will make our Excel sheet look so polished, it might just ask for a promotion.
Feel free to continue reading [ Formatter - Excel Config - Four ].