Preface
Goal: Separate formatting code and configuration. Example class starting from simple configuration.
Successful automation often follows a familiar pattern:
- You read the documentation, use the API, and enjoy the results.
But when building your own automation, things aren’t always that smooth. You’ll encounter obstacles, and changing requirements as your work progresses.
After preparing a raw XLSX workbook, we can automate sheet formatting. To keep things simple and manageable, we’ll start with a basic class, one step at a time.
Iterative Problem-Solving Approach
Taming the beast by Trial and Error
Innovation requires experimentation. This work is undoubtedly built on trial and error. Solutions emerge by iterating, learning from failures, and refining designs. And here’s the best part, I’ve already done the hard work and errors so that you don’t have to.
As an IT blogger, I’m no stranger to debugging, refactoring, and optimizing code. Even seasoned programmers rarely get it perfect on the first try. The process is iterative: test, debug, refine, repeat.
The challenge is to avoid oversharing. Patience is key. I resist the urge to dump everything into one article. It often takes months to mature the code before it’s ready to share.
Overview
For a high-level overview, you can revisit the introductory article:
Why Separate Config?
We frequently work with diverse data sources and outputs, but want to avoid touching the code every time. Here’s a guiding principle:
- Keep the code static.
- Make the configuration flexible.
But don’t overdo it. Sometimes, the fastest way to get results is, to tweak the code directly. What matters most is having a stable core, and adaptable script logic when necessary.
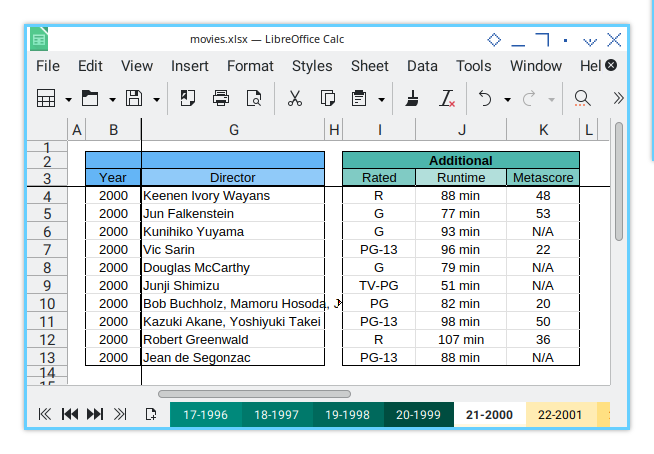
Example Sheet
You can download the example XLSX files here:
- Input Source: github.com/…/movies/xlsx/movies_by_year.xlsx
- Formatted Result: github.com/…/movies/xlsx/movies_by_year_formatted.xlsx
This workbook contains 40 worksheets to play with.
Class Diagram
To visualize the structure, here’s a class diagram of the main script. While not a strict UML standard, it’s adapted for clarity and better understanding.
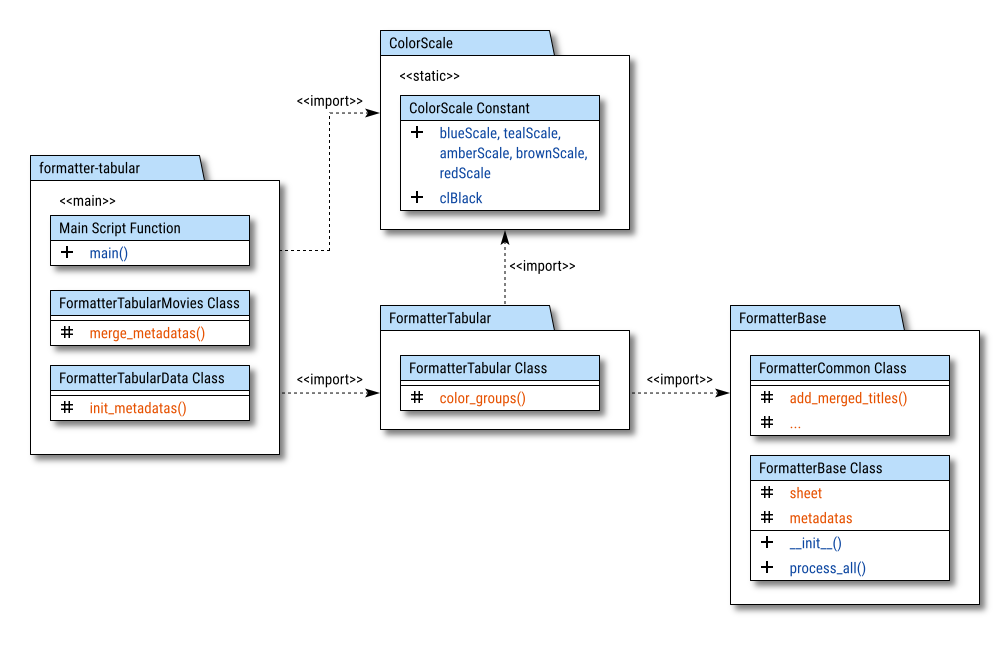
I’ve created the class diagram using Inkscape with multiple pages. Feel free to explore and modify the source to suit your needs:
We’ll begin with a simple diagram, and gradually enhance it step by step, until we reach the complete solution.
00: Overview
Let’s begin with a simple class. The basic flow will cover formatting multiple sheets. The first example would contain simple example of formatting procedure, just rearranging columns. then we are going to add more and more procedure later.
Journey Maps
Formatter Configuration Series
The journey path consists of multiple ordered steps:
- Basic Flow
- Setting Column Width and Gaps
- Setting Row Heights and Gaps
- Sheetwide View
- Formatting Column
- Configuration Basics
- Predefined Constant
- Merged Title
- Header Borders and Colors
- Data Borders and Fonts
- Data Colors
- Reusable Library
Steps Screenshot
Let me repeat the step once again, so you don’t need to switch to other article.
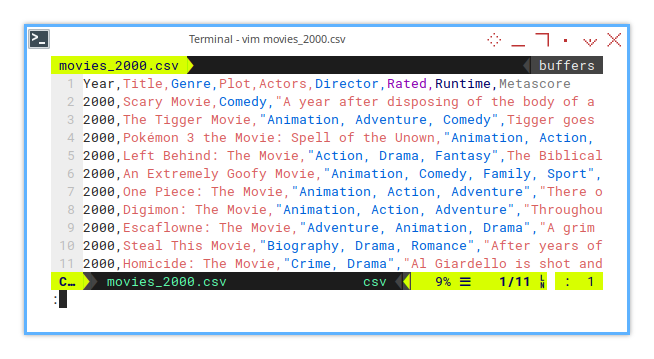
First, we need some example CSV data.
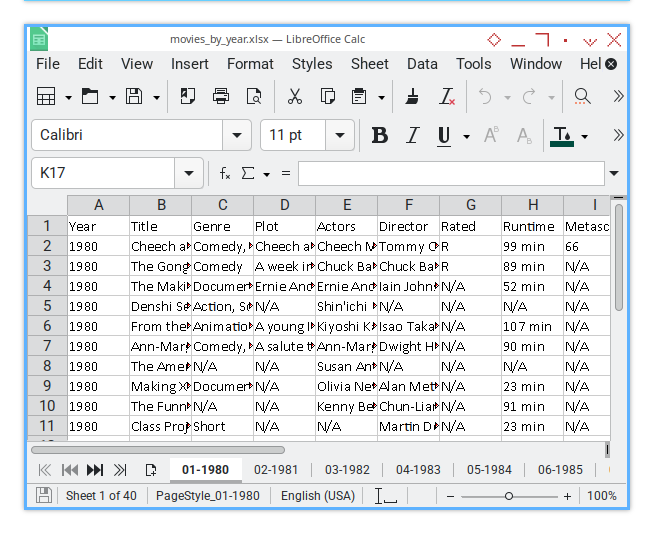
Next, we can export this CSV to XLSX with previous openpyxl importer script.
Once it’s open, we can use a openpyxl script, to format the data easily.
But it’s not just about basic formatting, we can control more details.
Example Configuration
The configuration would be as simple as below:
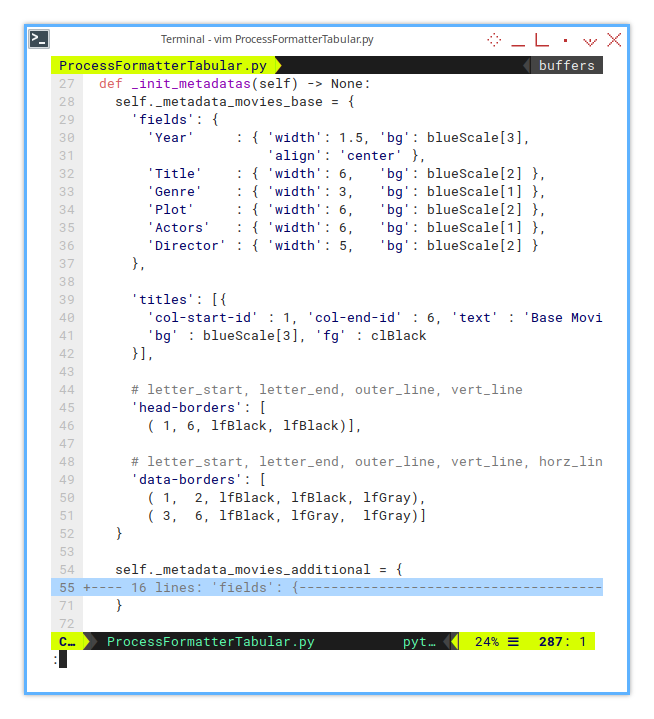
Basic Fields
        self._metadata_movies_base = {
            'fields': {
                'Year'     : { 'width': 1.5, 'bg': blueScale[3],
                               'align': 'center' },
                'Title'    : { 'width': 6,   'bg': blueScale[2] },
                'Genre'    : { 'width': 3,   'bg': blueScale[1] },
                'Plot'     : { 'width': 6,   'bg': blueScale[2] },
                'Actors'   : { 'width': 6,   'bg': blueScale[1] },
                'Director' : { 'width': 5,   'bg': blueScale[2] }
            },
Title, Header, Data
           'titles': [{
                'col-start-id' : 1, 'col-end-id' : 6,
                'text' : 'Base Movie Data',
                'bg' : blueScale[3], 'fg' : clBlack
           }],
           'head-borders': [
                ( 1, 6, lfBlack, lfBlack)],
           'data-borders': [
                ( 1,  2, lfBlack, lfBlack, lfGray),
                ( 3,  6, lfBlack, lfGray,  lfGray)]
        }
Formatting Steps
-
Step One
- Class: FormatterBase, FormatterTabularMovies
- Concept: Abstract Method, Hook
- Configuration: Gaps
-
Step Two:
- Helper: Last Row
- Helper: Prevent Re-inserting Column
- Formatting Procedure: Insert row gap, set row height
-
Step Three
- Formatting Procedure: Show grid, Freeze panes
-
Step Four
- Class: FormatterTabularData
- Helper: Get Relative Column Letter
- Formatting Procedure: Format Columns
- Configuration: Field Metadata Configuration
-
Step Five
- Predefined Constant: Color Scale (GMC)
- Predefined Constant: Line Format
- Formatting Procedure: Add merged title
- Formatting Procedure: Set merge title
- Formatting Procedure: Add merged titles post (Hook)
- Configuration: Merged Titles
-
Step Six
- Helper: Border Cell: Outer, Inner (one row)
- Helper: apply head border
- Formatting Procedure: Format head border
- Formatting Procedure: Format head colors
- Configuration: Head Borders
-
Step Seven
- Helper: Border Cell: Inner
- Helper: apply data border
- Formatting Procedure: Format data border
- Configuration: Data Borders
-
Step Eight
- Helper: Row coloring
- Formatting Procedure: Groups coloring
- Formatting Procedure: Format data font
-
Step Nine
- Separating class into libraries.
01: Step One: Basic
Now we can automate sheet formatting. Let’s kick things off with a simple class for rearranging columns. This is where the magic begins, no more manual dragging around cells like it’s the 90s! The basic flow will handle formatting both single and multiple sheets.
Step Overview
This section covers the following topics:
- Class: FormatterBase, FormatterCommon, FormatterTabularMovies
- Basic Flow: Working with multiple sheets
- Formatting Procedure: Insert column gap
Automating column arrangements saves time, reduces errors, and prepares us for handling complex formatting tasks down the road.
Import Statements
openpyxl
I bet you’re already acquainted with openpyxl. But if you’re not, no worries. I’m here to introduce the import statements. (and Google always has your back).
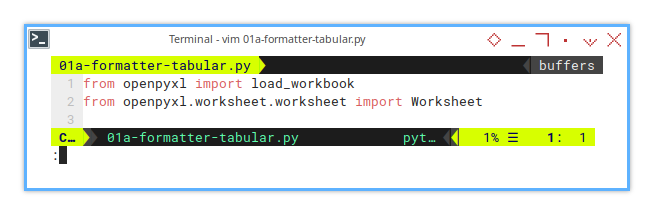
from openpyxl import load_workbook
from openpyxl.worksheet.worksheet import Worksheet
Because openpyxl is the Swiss Army knife for Excel automation in Python, without it, you’re back to clicking buttons manually.
The rest about openpyl API, Google always has your back.
Script Source
The script source can be found here:
Class Diagram
I’m experimenting with compact UML diagrams, to represent the code more efficiently. Instead of traditional legends, I’m using symbols:
- «private»: -
- «protected»: #
- «public»: +
- «abstract»: ~ italic
- «hook»: italic
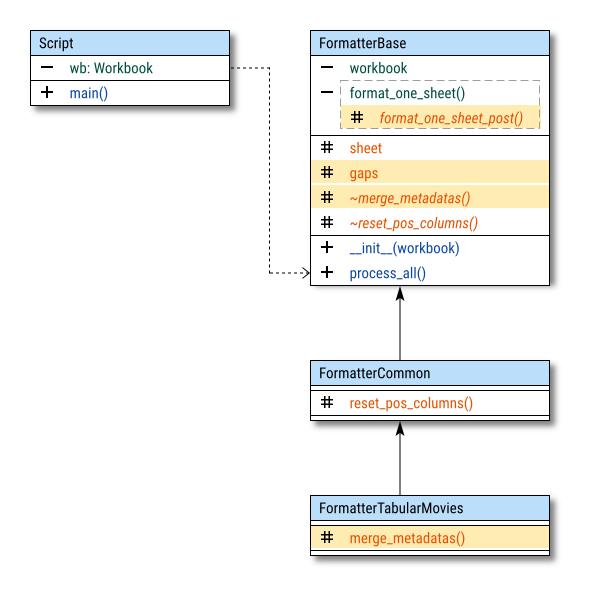
Here’s a conceptual class diagram that represents the code. We start with a simple diagram to understand the moving parts. Don’t worry if it looks intimidating. We’ll break it down step by step. It’s like assembling IKEA furniture, but with fewer missing screws.
The diagram focuses on visibility specifiers, rather than attributes or operations. To improve clarity, I’ve divided each class into three regions: private, protected, and public.
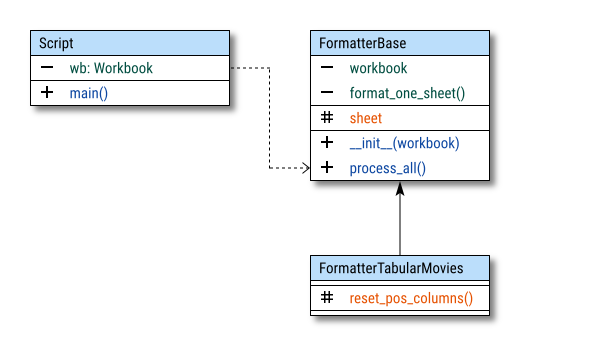
The diagram consists of three basic parts:
- Formatter Base: Basic Flow
- Formatter Tabular Movies: Formatting Procedure
- Script Call: Represents the class in the script
But why separate base and tabular?
In real-world scenarios, different data views demand different treatment. Tabular views (like rows of raw data), need different handling than summary views (like a pivot table).
By keeping the core functionality in the base class intact, we can customize descendant classes for specific use cases.
Separation means more flexibility and fewer headaches down the line.
Initialization
Since we now have two classes, and trust me, more are coming, handling the initialization properly is crucial. If we mess this up, everything else crumbles like a poorly-baked soufflé.
The core of the initialization is straightforward and does the following:
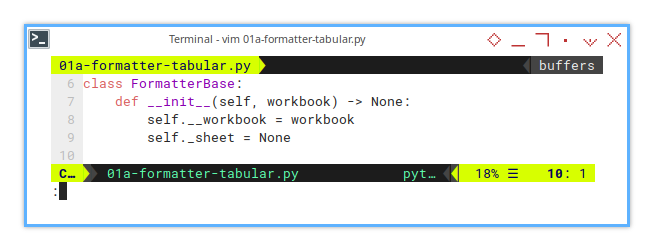
class FormatterBase:
    def __init__(self, workbook) -> None:
        self.__workbook = workbook
        self._sheet = None
For clarity and better encapsulation,
I apply visibility specifiers to methods and instance variables.
We lock down __workbook to make sure it stays private,
like your browser history.
Meanwhile, _sheet is protected,
meaning subclasses can mess with it but outsiders can’t.
This keeps our core logic clean while allowing flexibility where we need it.
_for protected (accessible within the class and subclasses)__for private (accessible only within the class)
This the complete initialization process for the first step. However, the complete script for the last step spans nearly 700 lines of code. As usual, I break down long code into chunks across different files.
Workbook in Diagram
In the class diagram,
the workbook variable is marked as private (-),
and italicized (~) to hint that it’s an abstract property.
- The tilde typically indicates abstract methods or properties.
- Abstract properties are rarely private, as they are meant to be overridden by subclasses.
- Italics signify either abstract or dynamic properties.
The type of this workbook is Workbook.
courtesy of the openpyxl API.
Internal Diagram
Visualizing the class structure.
To give you a deeper peek under the hood, here’s an internal breakdown of how openpyxl itself is structured. Don’t worry, no need to memorize this. It’s just to give you a mental model of how the pieces connect.
This diagram represents the openpyxl API’s internal architecture. It’s designed to provide clarity rather than strictly follow UML standards.
As usual, the focus is on illustrating conceptual relationships rather than producing a by-the-book UML representation.

Script Call
Represent the Class in Script
Alright, time to bring this all together.
Here’s how we use our formatter in a script.
This script processes multiple sheets (because why stop at one?).
So I named the method as process_all().
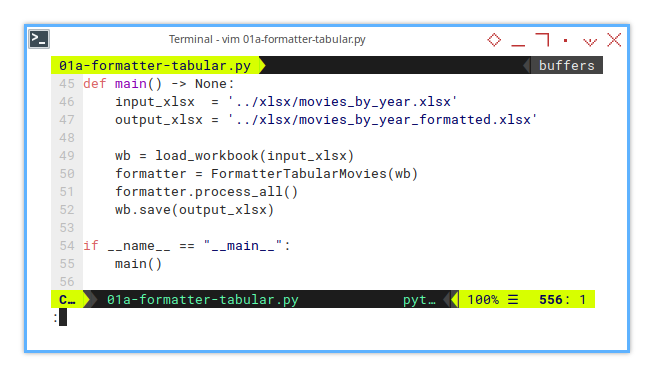
def main() -> None:
    input_xlsx  = '../xlsx/movies_by_year.xlsx'
    output_xlsx = '../xlsx/movies_by_year_formatted.xlsx'

    wb = load_workbook(input_xlsx)
    formatter = FormatterTabularMovies(wb)
    formatter.process_all()
    wb.save(output_xlsx )
And, of course, the familiar Python ritual:
if __name__ == "__main__":
    main()
Looks straightforward, right? That’s because it is. No dramatic twists, just reliable, predictable script behavior.
Keeping your main function clean means easier debugging.
It’s also a good practice to wrap the entry point,
in if __name__ == "__main__" to ensure,
it runs only when executed directly.
No unexpected fireworks.
If it ain’t broke, we’re not fixing it.
Real world script
In reality, life isn’t this simple. I have multiple configurations and views, like these
- tabular_multi_movies
- tabular_single_movies
- tabular_multi_songs
- tabular_single_songs
- tabular_multi_movies_filtered
- tabular_single_movies_filtered
Each function corresponds to a specific dataset configuration Want to process a new type of sheet? Just tweak the configuration. This modular approach keeps the code static, while allowing infinite possibilities.
Having multiple configurations isn’t a headache. Since they’re usually short and straightforward.
It’s a superpower.
Basic Flow
Formatter Base Class
All core logic resides in FormatterBase.
At this stage, the focus is on format_one_sheet().
Its job is simple: reset the column positions,
like tidying up a messy desk.
The initial flow is minimal, a single one-liner of code:

class FormatterBase:
    def __format_one_sheet(self) -> None:
        self._reset_pos_columns()
By isolating complex tasks into their own methods, the script remains readable, modular, and easy to maintain. because nobody enjoys debugging spaghetti code.
This method will be called by the process_all() method.
Simple, clean, and no surprise plot twists.
Handling Multiple Sheet
This script will process multiple sheets.
So I named the method as process_all().
This method loops through every worksheet in the workbook.
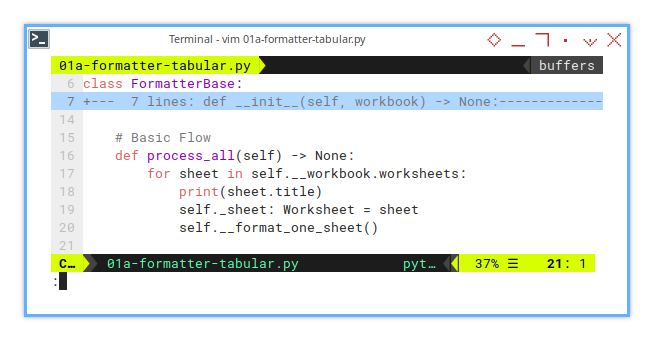
    def process_all(self) -> None:
        for sheet in self.__workbook.worksheets:
            print(sheet.title)
            self._sheet: Worksheet = sheet
            self.__format_one_sheet()
Why print the sheet name? Because debugging is easier when you can track what’s happening. More detailed logging will come as the script grows.
Formatter Tabular Movies Class
Formatting Procedure
This specialized class handles the heavy lifting, specifically, it’s responsible for rearranging the columns. and later formatting a movie table.
You’ve already seen the initialization. Now let’s highlight the key method that handles column adjustments.
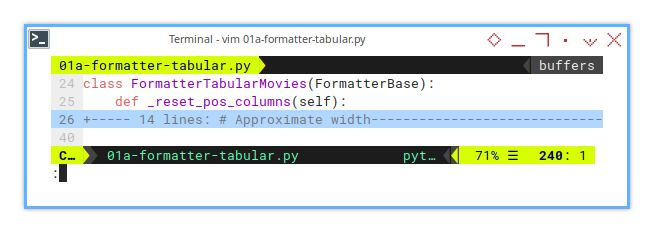
class FormatterTabularMovies(FormatterBase):
    def _reset_pos_columns(self):
        ...
Here’s where _reset_pos_columns() takes the stage, where the magic happens.
Responsible for rearranging columns according to the desired layout.
It’s a humble beginning, but this method will soon blossom into a powerful column wrangler. We’ll dive into its implementation next.
Arranging column
What does it do exactly?
Let’s break down the column resetting process, with some visual aids.
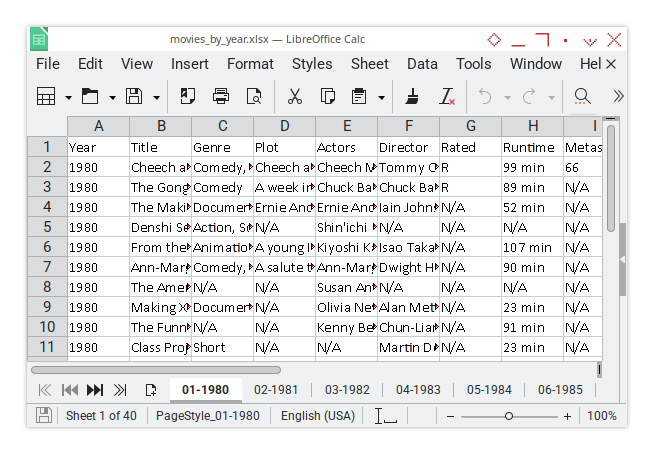
Here’s the initial input, plain columns without any modifications:
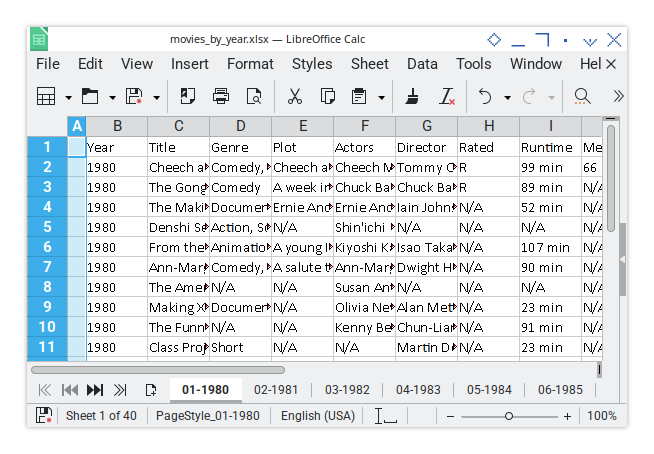
First, we inject a 0.5 cm gap before everything (Column A). Think of it as giving the data a little breathing room.
Next, a 0.5 cm gap slides in between column blocks (Column H). This divider is our visual “Hey, something new is starting here!” cue.
Finally, one more 0.5 cm gap lands after everything (Column L). like a nice closing bracket.
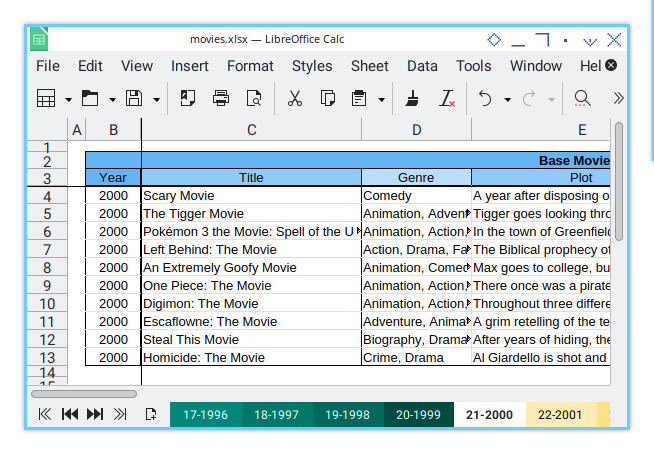
Here’s the final result:
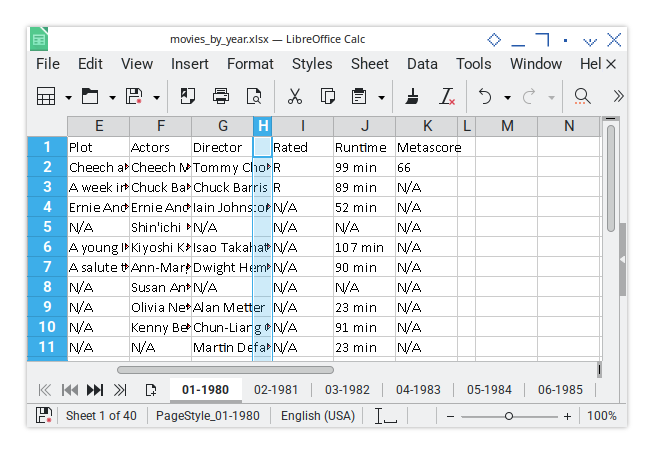
If you widen Column I, you’ll clearly spot the H-column gap doing its job. Yes, we’re being that detail.
Scaling Factor
Why 5.1? Science? Magic? A little of both.
The magic number for converting from centimeters to openpyxl column width is 5.1, arrived at through rigorous scientific methodology (read: trial and error).
- Scaling factor: 5.1
At first glance, it feels like an approximate width conversion between inches and centimeters, multiplied by two. Then I stumbled across an article about EMUs (English Metric Units) in in startbigthinksmall site, but the math there didn’t quite align either. I still have no clue.
This factor works well enough for practical purposes, but I’m still curious: if you have a better formula, or know the secret behind openpyxl’s width system, I’m all ears! Please let me know if you have any suggestions or better calculation.
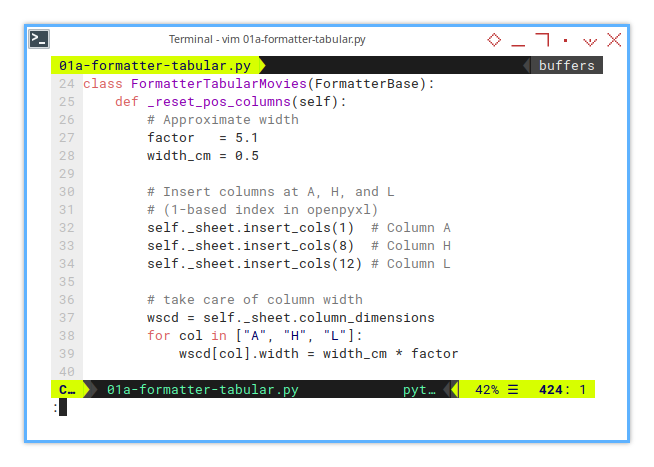
Implementation
Hardcoded for Now (A.K.A. “Quick and Dirty”)
At this point, this process is hardcoded:
- Our gaps live in three specific spots: [A, H, and L]
- Translating these to openpyxl’s 1-based indexing gives us [1, 8, 12].
        self._sheet.insert_cols(1)  # Column A
        self._sheet.insert_cols(8)  # Column H
        self._sheet.insert_cols(12) # Column L
But inserting columns isn’t enough, we need to control their width too.
- Gap size: 0.5 cm
- Scaling factor: 5.1 (our magical multiplier by trial and error)
        wscd = self._sheet.column_dimensions
        for col in ["A", "H", "L"]:
            wscd[col].width = width_cm * factor
Here’s the full method in action, our first true step toward Excel sheet perfection:
class FormatterTabularMovies(FormatterBase):
    def _reset_pos_columns(self):
        factor   = 5.1
        width_cm = 0.5

        self._sheet.insert_cols(1)  # Column A
        self._sheet.insert_cols(8)  # Column H
        self._sheet.insert_cols(12) # Column L

        wscd = self._sheet.column_dimensions
        for col in ["A", "H", "L"]:
            wscd[col].width = width_cm * factor
We’ll transform these hardcoded gaps, into a configurable parameter soon, because flexibility is king. For now, we’re building one clean, logical step at a time.
It’s like assembling a spaceship: you wouldn’t start with the hyperdrive, right? (Unless you’re in a hurry, I guess.)
Complete Formatting Procedure
Basic Flow
The final version of __format_one_sheet() pulls together,
all the formatting steps like a well-oiled assembly line.
Involves multiple steps, each piece fitting perfectly
(unless you forgot a semicolon, but hey, this is Python).
Here’s the core structure:
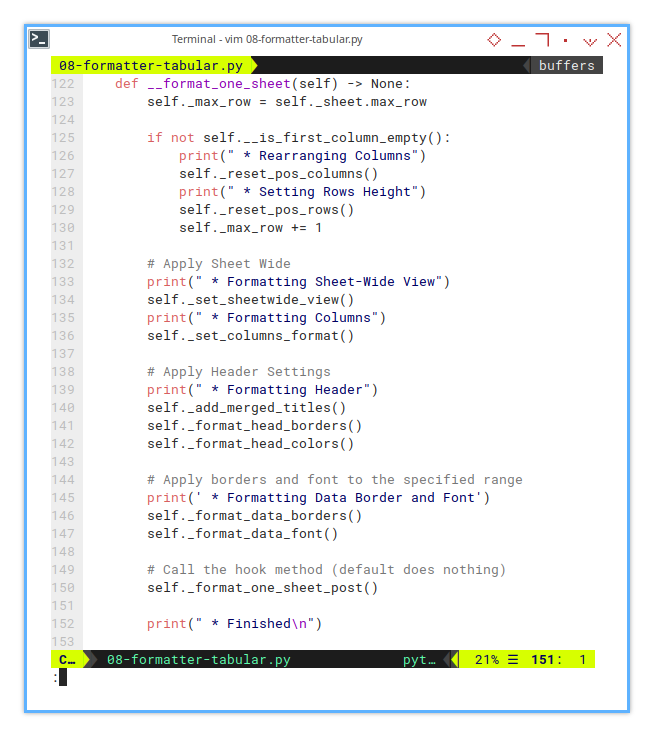
    def __format_one_sheet(self) -> None:
        self._max_row = self._sheet.max_row

        if not self.__is_first_column_empty():
            print(" * Rearranging Columns")
            self._reset_pos_columns()
            print(" * Setting Rows Height")
            self._reset_pos_rows()
            self._max_row += 1
Next, the process continues with additional formatting layers, like adding sprinkles to your code cupcake:
        print(" * Formatting Columns")
        self._set_sheetwide_view()
        self._set_columns_format()

        print(" * Formatting Header")
        self._add_merged_titles()
        self._format_head_borders()
        self._format_head_colors()
And of course, no formatting adventure is complete, ithout some borders and fonts for flair:
        # Apply borders to the specified range
        print(' * Formatting Border')
        self._format_data_borders()
        self._format_data_font()

        # Call the hook method (default does nothing)
        self._format_one_sheet_post()

        print(" * Finished\n")
A well formatted sheet isn’t just easier to read. It’s easier to debug when things go sideways. Each method is its own little helper, working in harmony to deliver a polished spreadsheet.
We’ll dive into each procedure in the next sections. For now, enjoy the calm before the config storm.
Sheet Result
The resulting sheet will look as polished as a showroom floor. Oops nope, it is actually a very basic looks, no fancy paint yet.

Terminal Log
Every major action gets logged. If your workbook has 40 sheets, the terminal output will resemble this epic scroll
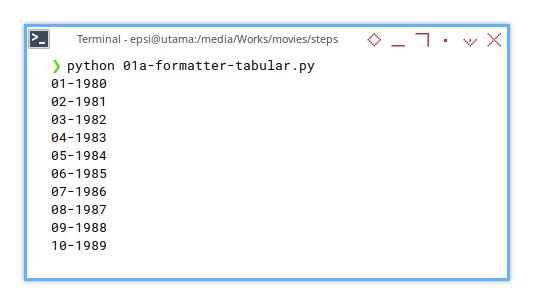
❯ python 01a-formatter-tabular.py
01-1980
02-1981
03-1982
...
...
38-2017
39-2018
40-2019
For now, we only track sheet names. As the code evolves, we’ll add more detailed logs to spotlight each formatting step. Because who doesn’t love knowing exactly where things went wrong?
And with that, we’ve wrapped up the foundational flow. Next, we’ll dive into the finer details of each formatting procedure. Buckle up, it only gets more interesting from here.
01: Step One: Improvement
The previous version is the basic class structure. But we need to make the fundamental class solid, even before we start coding for each formatting procedure.
The goal remains the same, but we’re dialing it up.
- Push further, make the code static.
- Push further, make the later configuration flexible.
Step Overview
This section covers the following topics:
- Class: FormatterBase, FormatterCommon, FormatterTabularMovies
- Concept: Abstract Method, Hook
- Configuration: Gaps
Import Statements
abstract
Let’s introduce required library.
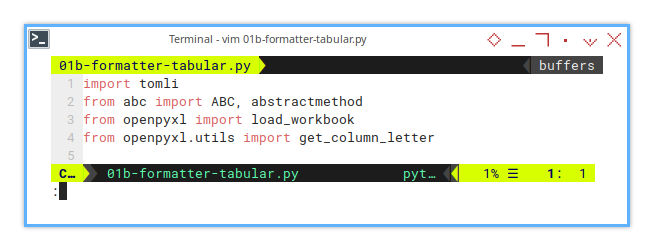
import tomli
from abc import ABC, abstractmethod
from openpyxl import load_workbook
from openpyxl.utils import get_column_letter
We are going to use abstract method.
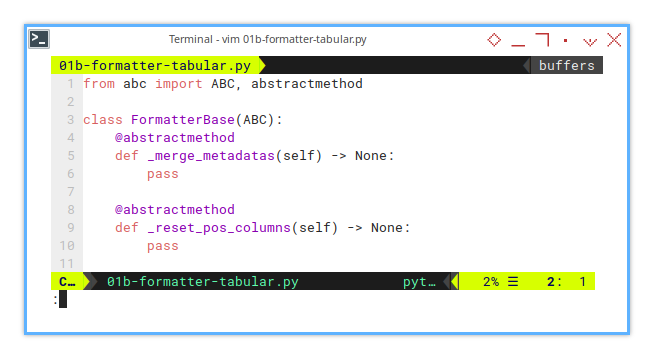
Abstract Method
Defined, but without any implementation.
To create an abstract class in Python,
we need to use the ABC (Abstract Base Class) library.
It’s like calling in reinforcements for enforcing structure.
The abstract methods are defined with the @abstractmethod decorator,
signaling that they must be implemented by any subclass of FormatterBase.
These methods will not have any implementation in the base class itself,
as their purpose is to define a contract that the subclasses need to follow.
The methods are defined but left gloriously empty,
waiting for subclasses to fill in the gaps.
Here’s how the abstract methods are defined in the FormatterBase class:
from abc import ABC, abstractmethod

class FormatterBase(ABC):
    @abstractmethod
    def _merge_metadatas(self) -> None:
        pass

    @abstractmethod
    def _reset_pos_columns(self) -> None:
        pass
This structure ensures that any subclass of FormatterBase,
will be required to implement the _reset_pos_columns()
and _merge_metadatas() methods.
Script Source
The script source can be found here:
Class Diagram
We’re making a few tweaks right from the start. Let’s get hands-on with reflective diagrams and code implementations below.
Remember, the diagram isn’t some grand master plan for later. It’s more like the doodles I made while trying to solve the problem. Back and forth process, between code and its reflection.
In this diagram, visibility takes priority here over attributes/operations. Each class has three regions: private, protected and public.
The diagram consists of three sections:
-
Script Call: Represents the class used by the script.
-
Static Code Parts:
- Formatter Base: Basic flow, abstract definitions, and helpers.
- Formatter Common: Actual formatting logic, implementing the abstract methods.
-
Configurable Parts:
- Formatter Tabular Movies: Merges the blocks to create specific report formats.
Many projects share similar column layouts, but vary slightly in reporting needs. By using column blocks, we can adapt the configuration for different reports, without touching the core code.
Column of Blocks
Embracing Variants
For example, this project uses the following column blocks:
- First Blocks: Year, Title, Genre, Plot, Actors, Director
- Second Blocks: Rated, Runtime, Metascore
Some reports might need just fisrt block, others might need both. By arranging columns into configurable blocks, report creation becomes much more flexible.
In real-world spreadsheets, columns will vary. But within the same project, patterns emerge. For longer reports, we can have five or six blocks, with each block having multiple variants.
The last class merges these blocks, adapting them for different reports. This allows for multiple report types. And all within just one script configuration.
It’s like LEGO, but for spreadsheets.
Initialization
Here’s the full initialization process, laid out clearly.

from abc import ABC, abstractmethod

class FormatterBase(ABC):
    ...

    def __init__(self, workbook):
        self.__workbook = workbook
        self._sheet = None
        self._gaps = []

        self._merge_metadatas()
Symbol in Diagram
Visibility specifiers are applied to both methods and instance variables. Here’s the breakdown:
_for protected__for private
In the class diagram, these translate into the following notations:
- «private»: -
- «protected»: #
- «public»: +
- «abstract»: ~ italic
- «hook»: italic
Expect to see a generous sprinkle of _ and __ throughout the classes.
They’re not just decorative; they serve a purpose.
Like seasoning for code, just enough makes everything better.
Script Call
No change, stay intact
Exactly the same from step 01 to step 07. No need to repeat my self here.
Bu we need to alter a little bit, at step 08.
Basic Flow
Formatter Base Class
Similar to the previous setup, but with a slight twist with hook.
All the essential flows live here.
The star of the show is format_one_sheet().
This method has an additional hook named format_one_sheet_post().
allowing subclass customization without disturbing the base class.
Think of it as a backstage pass,
subclasses can sneak in their logic without interrupting the main act.
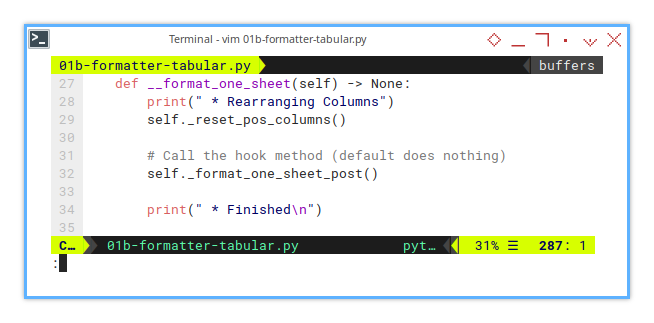
At the moment, format_one_sheet() has one job: reset column positions.
Simple, but foundational, like tuning an instrument before a performance.
    def __format_one_sheet(self) -> None:
        print(" * Rearranging Columns")
        self._reset_pos_columns()

        # Call the hook method (default does nothing)
        self._format_one_sheet_post()

        print(" * Finished\n")
Hook
Flexibility Without Obligation.
Hooks behave like abstract methods but with less pressure. There’s no requirement to implement them. If no subclass overrides the hook, it quietly steps aside. Like that one colleague who never volunteers for extra meetings (and we love them for it).
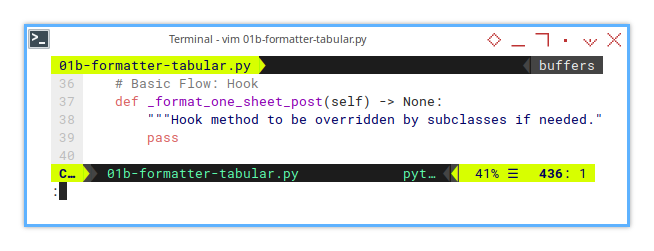
    def _format_one_sheet_post(self) -> None:
        pass
Later, we’ll see how to put this hook to good use. Because what fun is a hook if we never hang anything on it?
Helper: Column Index To Letter
Because Excel isn’t zero-based.
![openpyxl: Step One: Helper: Import Statements][116-py-import-stats-helper]
In openpyxl we can simply use built-in get_column_letter.
No need to reinvent the alphabet wheel.
from openpyxl.utils import get_column_letterJust be aware that Excel utilize 1-based column indices. Because why make things easy when we can make them confusing?
Configuration: Gaps
Instead of scattering hardcoded gaps throughout the logic, I’ve extracted them into a configuration. Think of it as decluttering your code’s closet, everything is now in one tidy space.
This way, the gap placements become part of the spreadsheet’s global settings, managed through the merge configuration. One tweak, and we control gaps across all reports.
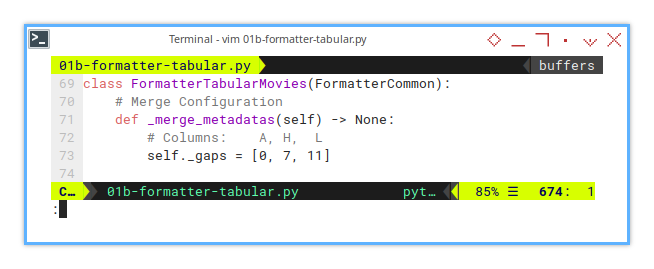
class FormatterTabularMovies(FormatterCommon):
    def _merge_metadatas(self) -> None:
        # Columns:    A, H,  L
        self._gaps = [0, 7, 11]
This small move makes big waves. By centralizing gap configuration, we future-proof our reports, without a scavenger hunt through the code.
Formatting: Arranging column
Resetting Columns Using Metadata
So, what’s actually happening during column resetting?
- A 0.5 cm gap is inserted before all columns (at column A).
- Another 0.5 cm gap acts as a divider between column blocks (at column H).
- Finally, a 0.5 cm gap is added after all columns (at column L).
The gap positions? Pulled straight from the configuration. Because hardcoding is so last century.
This keeps our spreadsheet neat, organized, and as predictable as Monday morning coffee routine.
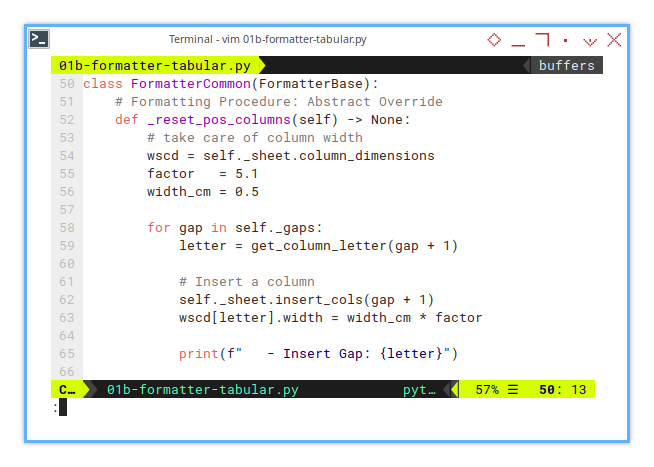
class FormatterCommon(FormatterBase):
    # Formatting Procedure: Abstract Override
    def _reset_pos_columns(self) -> None:
        # take care of column width
        wscd = self._sheet.column_dimensions
        factor   = 5.1
        width_cm = 0.5
Now we can start the loop. Because what’s life without a little repetition?
        for gap in self._gaps:
            letter = get_column_letter(gap + 1)

            # Insert a column
            self._sheet.insert_cols(gap + 1)
            wscd[letter].width = width_cm * factor

            print(f"   - Insert Gap: {letter}")
It’s pretty straightforward, no magic tricks here. The code practically explains itself.
Now we can have a peek at the result and the process log.
Sheet Result
We are laying a solid foundation for fancier tricks later.
The result? Identical to the previous code. Nothing changed in the formatting procedure, the magic is in the design pattern. So, no dramatic before-and-after shots here.
Terminal Log
Development Tools
After running the previous code, I realized the logs needed a little more… personality.
Real-world application development often demand some debugging, and I like to know exactly what’s happening under the hood. So, expect more messages along the way.
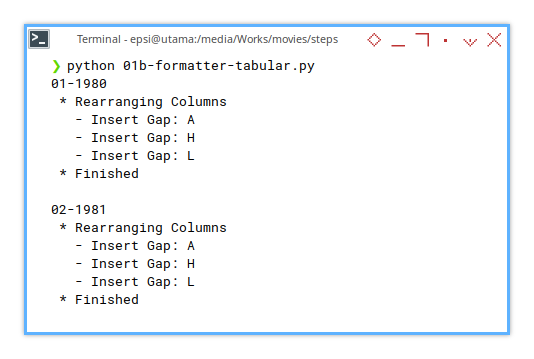
❯ python 01b-formatter-tabular.py
01-1980
 * Rearranging Columns
   - Insert Gap: A
   - Insert Gap: H
   - Insert Gap: L
 * Finished

02-1981
 * Rearranging Columns
   - Insert Gap: A
   - Insert Gap: H
   - Insert Gap: L
 * Finished

...
These logs provide a breadcrumb trail, helping us track what’s happening, when it happens, and where to poke if things go sideways.
After some time, the script become mature enough. Nowadays, I rarely look at the log. It just works.
Now that the basic formatting flow is in place, it’s time to dive into the next steps. Like peeling an onion, but without the tears.
One by one.
What is Next 🤔?
After completing the basic script, the next step is to implement the configuration. We’ll explore how far we can take the formatting process, incorporating more customization and refinements along the way.
Additionally, we’ll apply design patterns. Specifically the abstract method pattern, to make the code more modular, extensible, and easier to maintain.
To continue with this approach, you can read more in the next section: [ Formatter - Excel Config - Two ].