Preface
Goal: Separate formatting code from configuration using a unified approach.
After mastering basic macros, it’s time to dive into unified configuration. We’ll see how much we can simplify and streamline the formatting process, by transitioning from simple configuration to a more cohesive unified one.
Example Sheet
Download the example files here:
- ODS Source: github.com/…/movies/data/movies.ods
- XLSX Result: github.com/…/movies/data/movies.xlsx
This workbook contains 40 worksheets, ready to demonstrate the transformation process.
06: Additional Helper
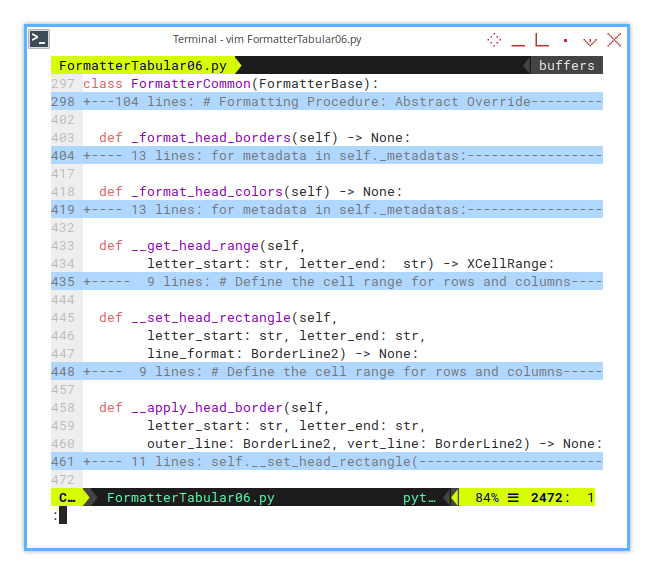
All supporting helper methods here have private visibility specifiers:
__apply_head_border().__set_head_rectangle()__get_head_range
Helper: Apply Head Border
This helper is used exclusively within _format_head_borders().
The __apply_head_border() method handles two types of borders:
- Outside Border: Edges and Corner
- Inside Border: Vertical only
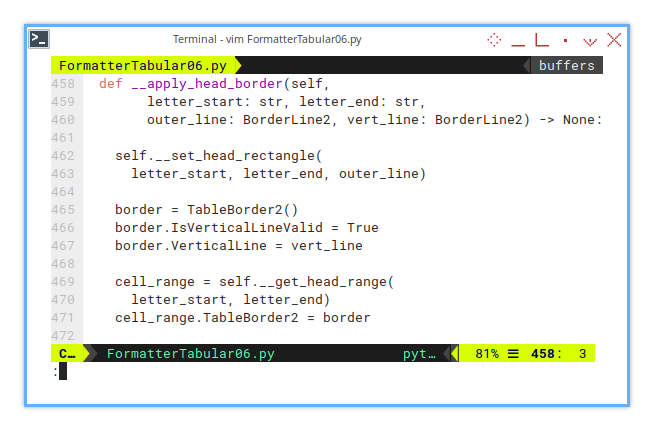
First, the outside border:
  def __apply_head_border(self,
        letter_start: str, letter_end: str,
        outer_line: BorderLine2, vert_line: BorderLine2) -> None:

    self.__set_head_rectangle(
      letter_start, letter_end, outer_line)

    ...
Now, the inside border:
    ...

    border = TableBorder2()
    border.IsVerticalLineValid = True
    border.VerticalLine = vert_line

    cell_range = self.__get_head_range(
      letter_start, letter_end)
    cell_range.TableBorder2 = border
This process requires two supporting private methods:
__set_head_rectangle()__get_head_range()
Supporting Helper: Head Rectangle
Outside Border: Edges and Corner
This helper is used exclusively within __apply_head_border().
It defines the cell range for the top, bottom, left, and right edges
in the context of column blocks.
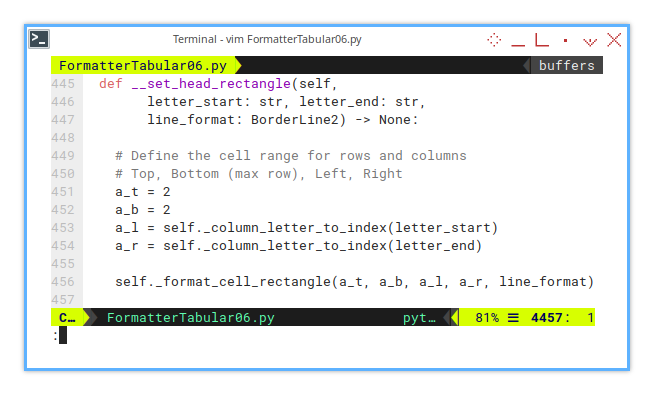
  def __set_head_rectangle(self,
        letter_start: str, letter_end: str,
        line_format: BorderLine2) -> None:

    # Define the cell range for rows and columns
    # Top, Bottom (max row), Left, Right
    a_t = 2
    a_b = 2
    a_l = self._column_letter_to_index(letter_start)
    a_r = self._column_letter_to_index(letter_end)

self._format_cell_rectangle(a_t, a_b, a_l, a_r, line_format)Note: The row number is hardcoded to two.
Supporting Helper: Head Range
This helper is also used exclusively within __apply_head_border().
It retrieves the cell range for the specified columns.
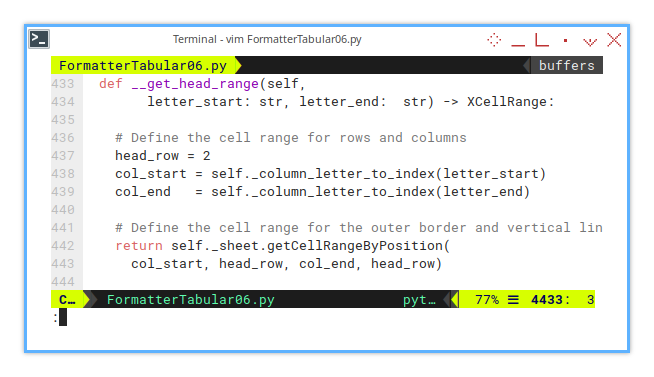
  def __get_head_range(self,
        letter_start: str, letter_end:  str) -> XCellRange:

    # Define the cell range for rows and columns
    head_row = 2
    col_start = self._column_letter_to_index(letter_start)
    col_end   = self._column_letter_to_index(letter_end)

    # Define the cell range for the outer border and vertical lines
    return self._sheet.getCellRangeByPosition(
col_start, head_row, col_end, head_row)Note: The return value defines the cell range, for both the outer border and vertical lines.
Reminder: The row number is hardcoded to 2.
06: Step Six
From plain, utilitarian spreadsheets to visually striking sheets. Let’s level up the aesthetics.
Step Overview
In this section, we’ll dive into unified configuration topics, focusing on visual enhancement:
-
New Topics (Unified Configuration):
- Formatting Procedure: Formatting head borders (multiple column blocks)
-
Revisited Topics (Simple Configuration):
- Helper: Get head range, set head rectangle, apply head border
- Formatting Procedure: Format head border
- Formatting Procedure: Format head colors
Macro Source
The macro source for this step is available, in the following repository:
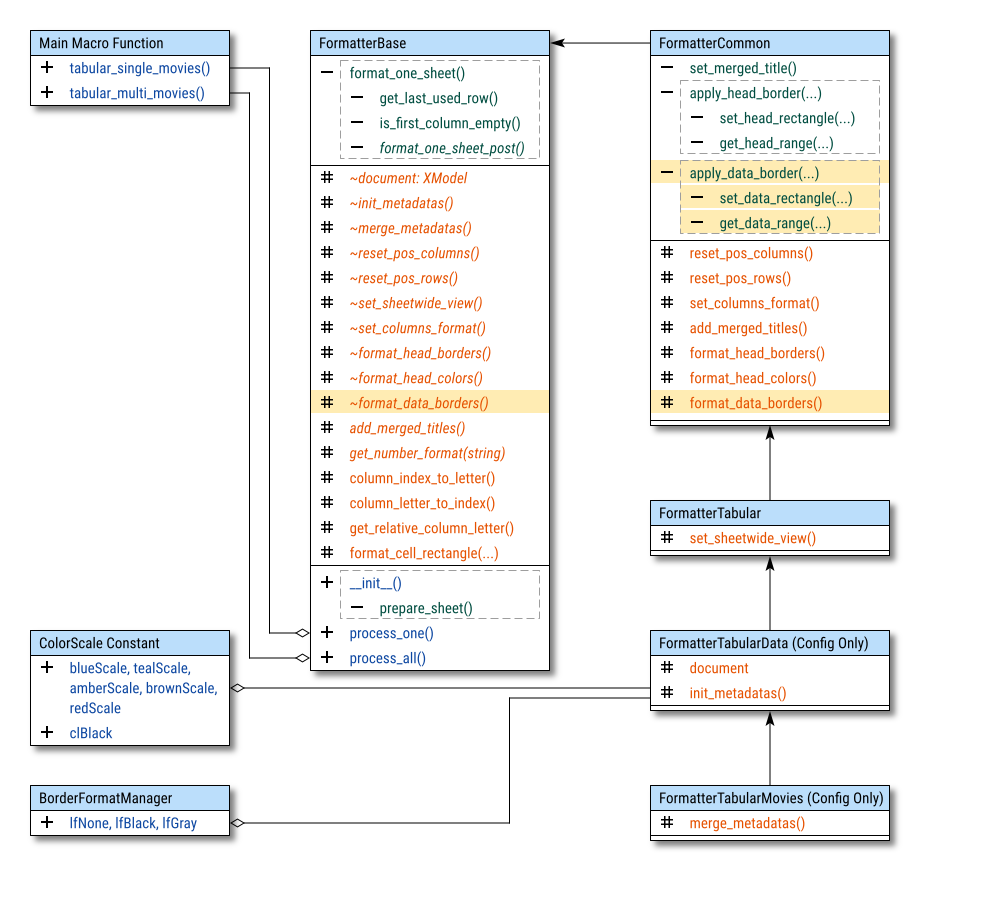
Class Diagram
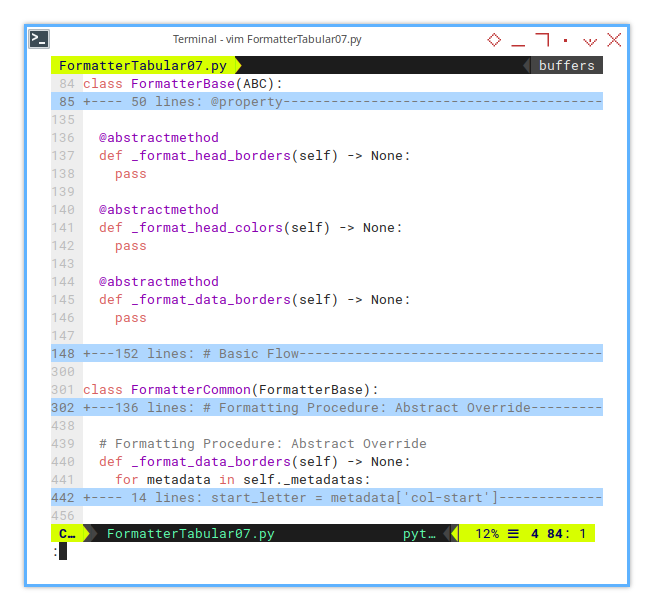
Two new abstract methods make their debut, each with specific implementations.
_format_head_borders._format_head_colors.
The _format_head_borders method relies on,
a helper function called __apply_head_borders,
which in turn depends on two other helpers:
__set_head_rectangle()__get_head_range()
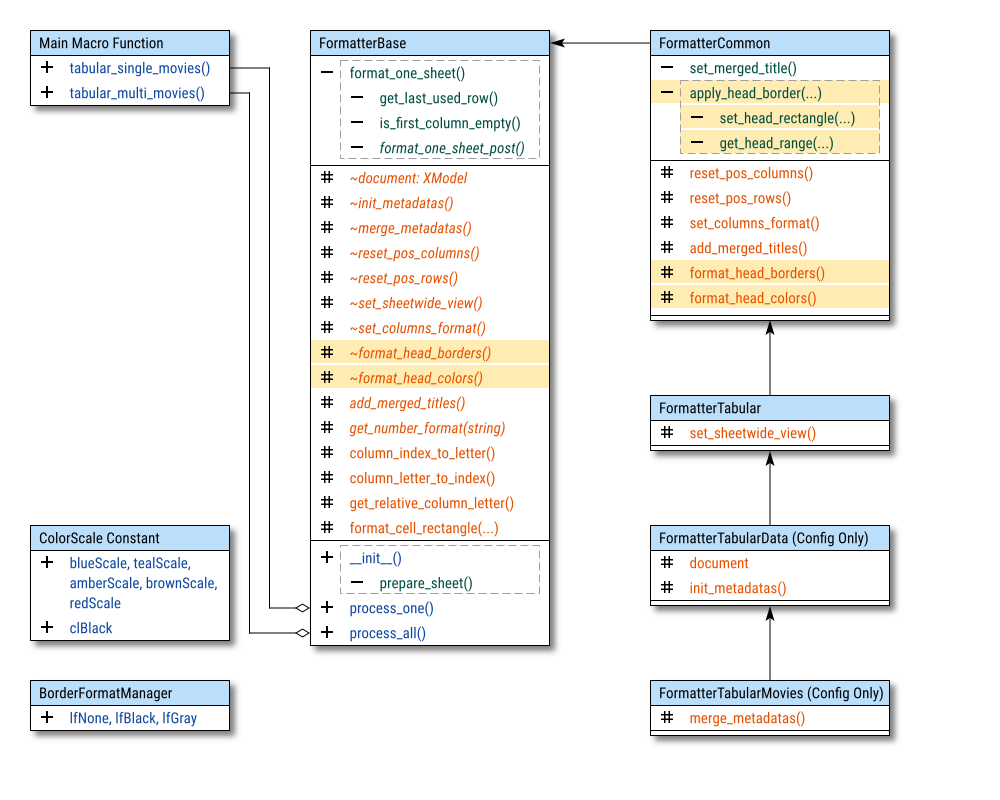
Abstract Method
What’s new?
Two fresh abstract methods are introduced, to handle formatting logic.
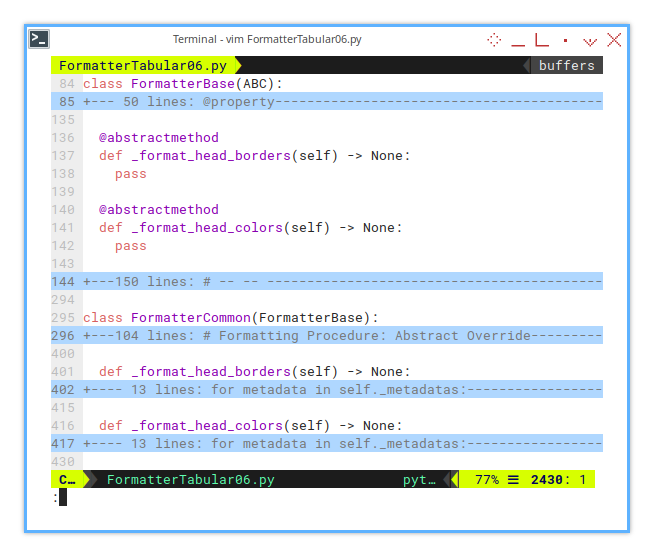
  @abstractmethod
  def _format_head_borders(self) -> None:
    pass

  @abstractmethod
  def _format_head_colors(self) -> None:
    pass
Import Statements
To handle borders and alignment,
TableBorder2 from com.sun.star must be imported.
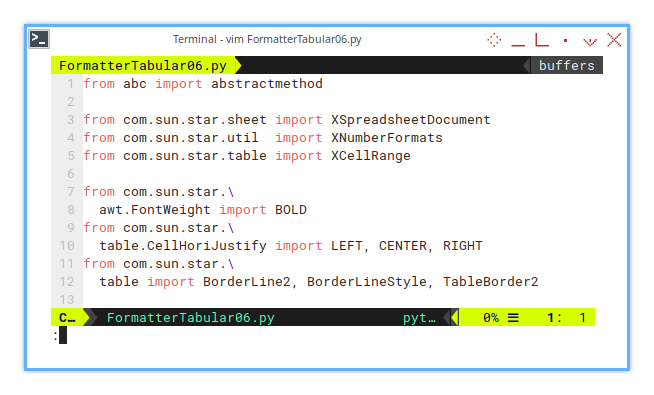
from com.sun.star.\
  awt.FontWeight import BOLD
from com.sun.star.\
  table.CellHoriJustify import LEFT, CENTER, RIGHT
from com.sun.star.\
  table import BorderLine2, BorderLineStyle, TableBorder2
Basic Flow
The basic formatting flow now extends to include
_format_head_borders() and _format_head_colors().
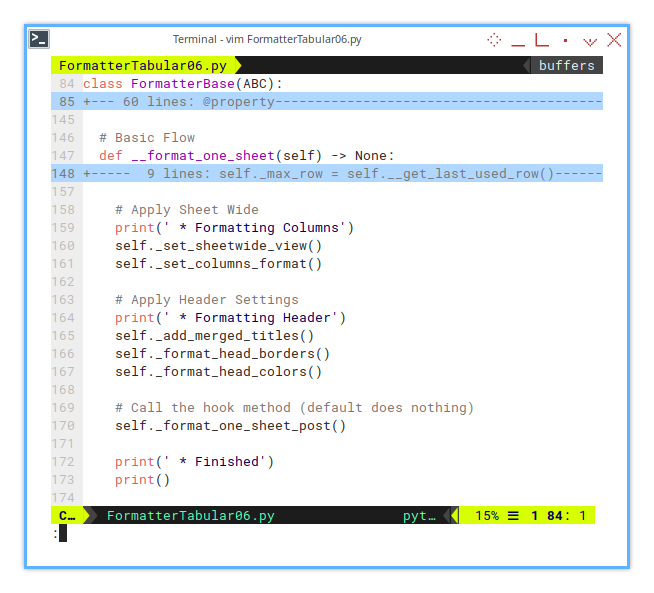
    # Apply Header Settings
    print(' * Formatting Header')
    self._add_merged_titles()
    self._format_head_borders()
    self._format_head_colors()
Configuration: Init Metadatas
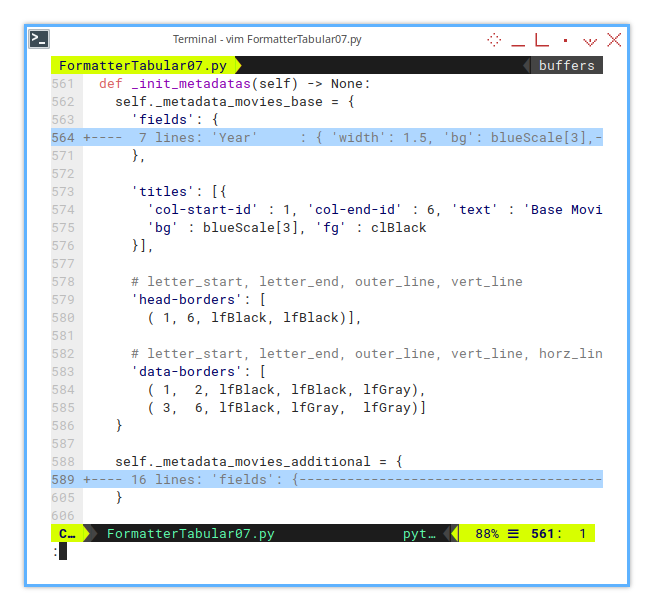
Instance Variables
A new key head-borders is introduced in the metadata configuration.
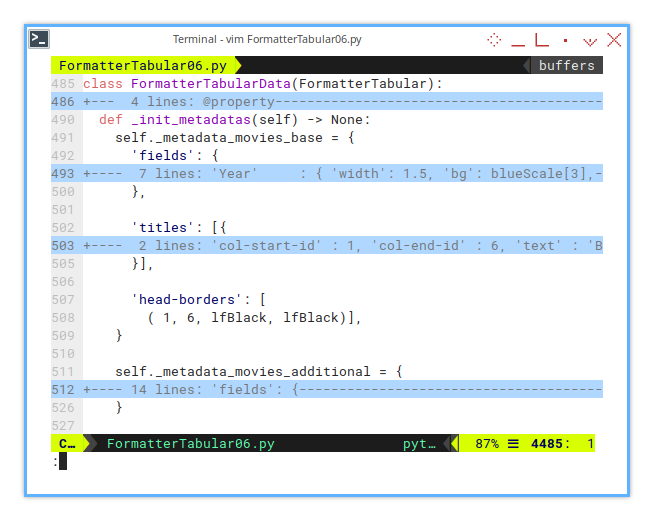
class FormatterTabularData(FormatterTabular):
  ...

  # Unified Configuration
  def _init_metadatas(self) -> None:
    self._metadata_movies_base = {
      'fields': {...},
      'titles': [{...}],
      'head-borders': [{...}]
    }

    self._metadata_movies_additional = {
      'fields': {...},
      'titles': [{...}],
      'head-borders': [{...}]
    }
Each metadata section represents a block of columns, ensuring organized formatting and alignment.
Configuration: Head Borders
Now let’s break down the supplementary extra keys.
The Basic Column Block
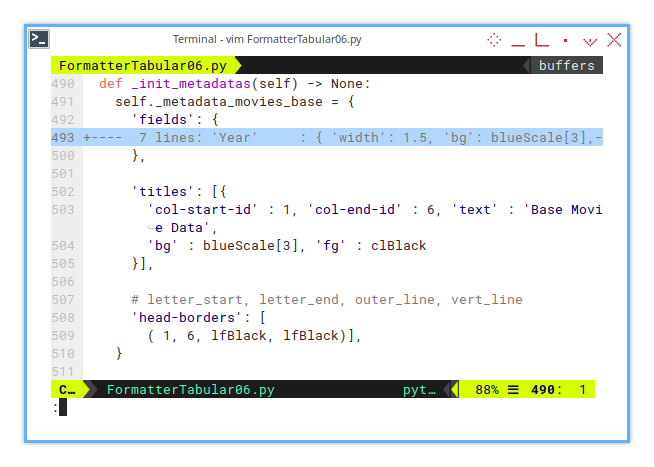
    self._metadata_movies_base = {
      'fields': {...},
      'titles': [{
        'col-start-id' : 1, 'col-end-id' : 6, 'text' : 'Base Movie Data',
        'bg' : blueScale[3], 'fg' : clBlack
      }],

      # letter_start, letter_end, outer_line, vert_line
      'head-borders': [
        ( 1, 6, lfBlack, lfBlack)],
    }
The Additional Column Block
    self._metadata_movies_additional = {
      'fields': {...},
      'titles': [{
        'col-start-id' : 1, 'col-end-id' : 3, 'text' : 'Additional Data',
        'bg' : tealScale[3], 'fg' : clBlack
      }],
      'head-borders': [
        ( 1, 3, lfBlack, lfBlack)]
    }
Configuration: Head Colors
Color scales are embedded within the fields configuration.
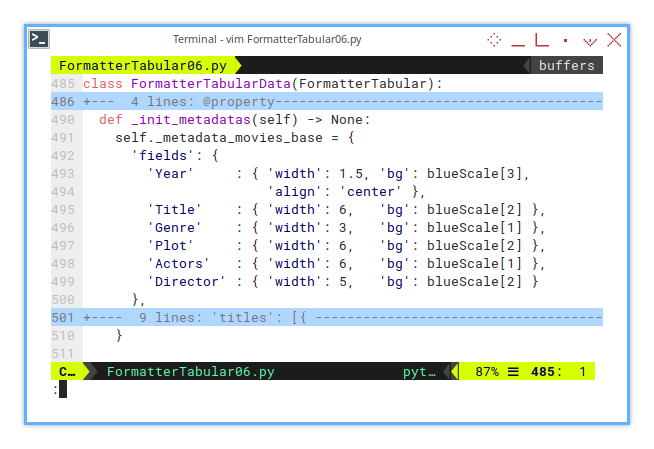
The Basic Column Block
    self._metadata_movies_base = {
      'fields': {
        'Year'     : { 'width': 1.5, 'bg': blueScale[3],
                       'align': 'center' },
        'Title'    : { 'width': 6,   'bg': blueScale[2] },
        'Genre'    : { 'width': 3,   'bg': blueScale[1] },
        'Plot'     : { 'width': 6,   'bg': blueScale[2] },
        'Actors'   : { 'width': 6,   'bg': blueScale[1] },
        'Director' : { 'width': 5,   'bg': blueScale[2] }
      },

      'titles': [{...}],
      'head-borders': [{...}]
    }
The Additional Column Block
    self._metadata_movies_additional = {
      'fields': {
        'Rated'    : { 'width': 2,   'bg': tealScale[2],
                       'align': 'center' },
        'Runtime'  : { 'width': 2.5, 'bg': tealScale[1],
                       'align': 'center' },
        'Metascore': { 'width': 2,   'bg': tealScale[2],
                       'align': 'center' }
      },
      'titles': [{...}],
      'head-borders': [{...}]
    }
Formatting: Format Head Borders
Inner Loop
How do we implement unified config for head borders?
We handle this with two loop stages:
- Outer loop: Iterates over unified metadata.
- Inner loop: Applies head borders for each metadata block.
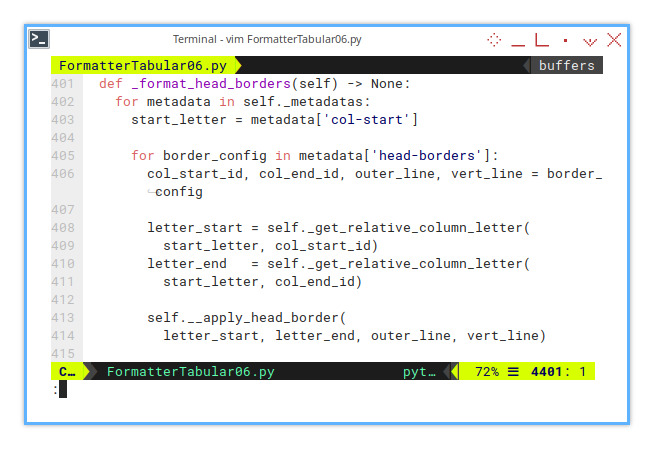
Here’s the implementation of
the protected _format_head_borders() in the descendant class:
  def _format_head_borders(self) -> None:
    for metadata in self._metadatas:
      start_letter = metadata['col-start']

      for border_config in metadata['head-borders']:
        col_start_id, col_end_id, outer_line, vert_line = border_config

        letter_start = self._get_relative_column_letter(
          start_letter, col_start_id)
        letter_end   = self._get_relative_column_letter(
          start_letter, col_end_id)

        self.__apply_head_border(
          letter_start, letter_end, outer_line, vert_line)
The outer loop processes each metadata block, and the inner loop formats the borders according to the configuration.
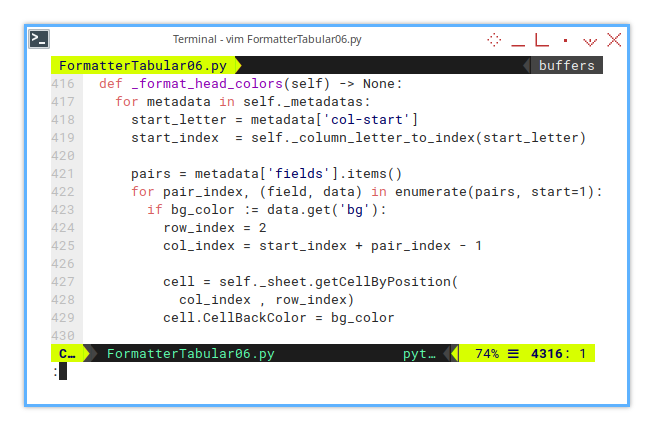
Formatting: Format Head Colors
We apply head colors in a similar two-stage loop:
- Outer loop: Iterates over unified metadata.
- Inner loop: Applies colors to the fields within each metadata block.
How does the coloring work?
Let’s take a look at _format_head_colors() method in the descendant class:
  def _format_head_colors(self) -> None:
    for metadata in self._metadatas:
      start_letter = metadata['col-start']
      start_index  = self._column_letter_to_index(start_letter)

      pairs = metadata['fields'].items()
      for pair_index, (field, data) in enumerate(pairs, start=1):
        if bg_color := data.get('bg'):
          row_index = 2
          col_index = start_index + pair_index - 1

          cell = self._sheet.getCellByPosition(
            col_index , row_index)
          cell.CellBackColor = bg_color
In the inner loop, each field is processed:
- We check if a background color exists using the walrus operator (:=).
- If it does, we apply that color to the corresponding cell.
This approach ensures clean, maintainable code that, follows the unified configuration structure.
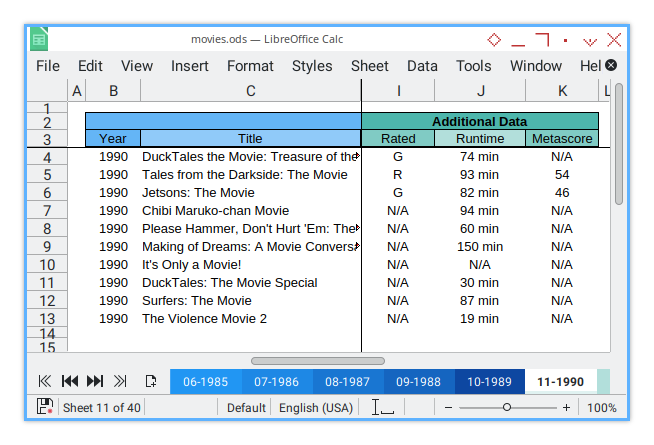
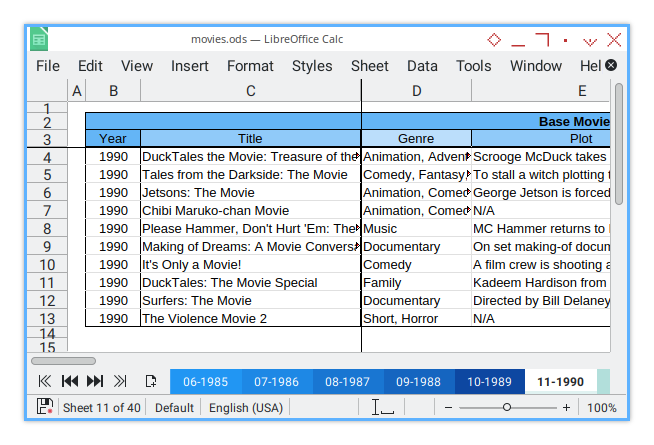
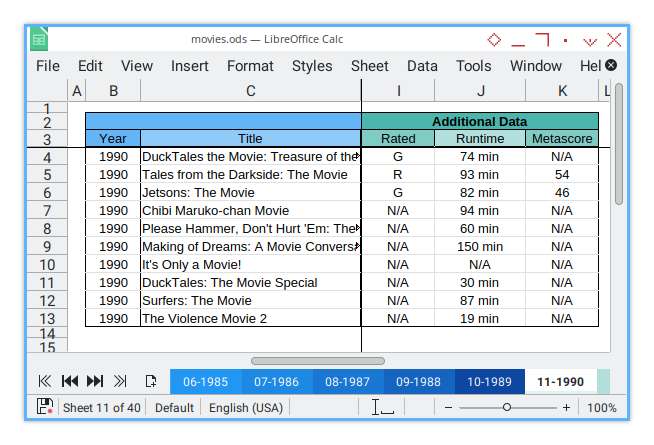
Sheet Result
Here’s the current step output:
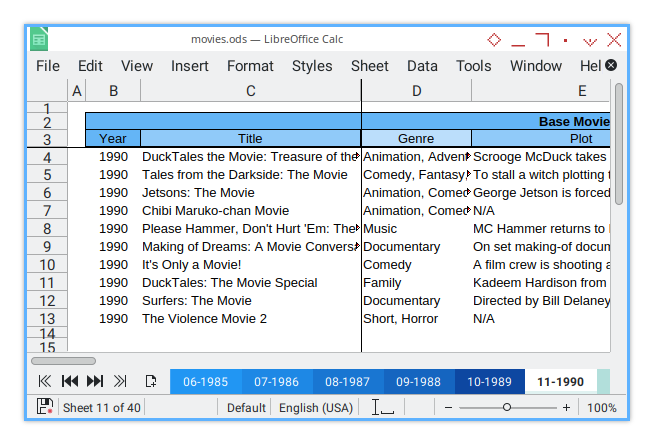
And also the rest of the columns:
Console Logging.
For this step, the result can be shown as below:
>>> tabular_single_movies()
 * Rearranging Columns
   - Insert Gap: A
   - Insert Gap: H
   - Insert Gap: L
 * Setting Rows Width
 * Formatting Columns
 * Formatting Header
 * Finished
07: Additional Helper
After enhancing the header’s visual appeal, it’s time to apply similar formatting to the data rows.
Just like the header, the data section has similar methods. All supporting helpers for this part are also marked with private visibility:
__apply_data_border().__set_data_rectangle()__get_data_range
Helper: Apply Data Border
This helper is designed to be called within _format_data_borders().
It applies two types of borders:
- Outer Border: Edges and corners
- Inner Border: Vertical and horizontal lines
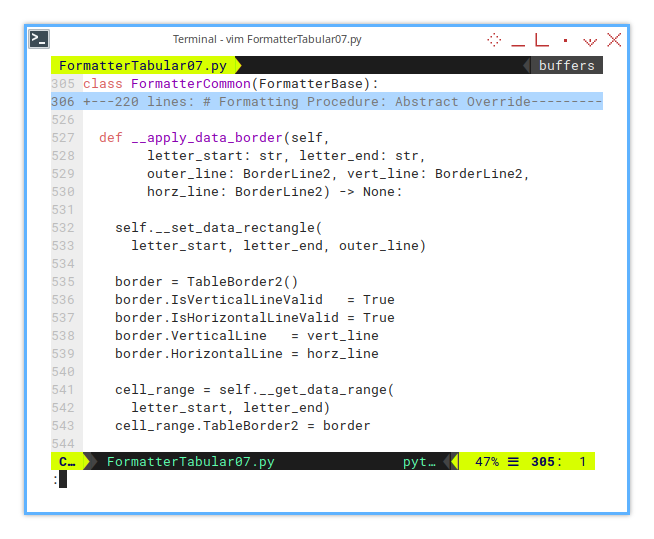
Step 1: Apply the Outer Border
  def __apply_data_border(self,
        letter_start: str, letter_end: str,
        outer_line: BorderLine2, vert_line: BorderLine2,
        horz_line: BorderLine2) -> None:

    self.__set_data_rectangle(
      letter_start, letter_end, outer_line)

    ...
Step 2: Apply the Inner Border
This applies vertical and horizontal lines within the data block.
    ...

    border = TableBorder2()
    border.IsVerticalLineValid   = True
    border.IsHorizontalLineValid = True
    border.VerticalLine   = vert_line
    border.HorizontalLine = horz_line

    cell_range = self.__get_data_range(
      letter_start, letter_end)
    cell_range.TableBorder2 = border
To complete this, two additional private methods are needed:
set_data_rectangle()get_data_range()
Supporting Helper: Data Rectangle
Outside Border: Edges and Corner
This supporting helper meant to be used only within the __apply_data_border().
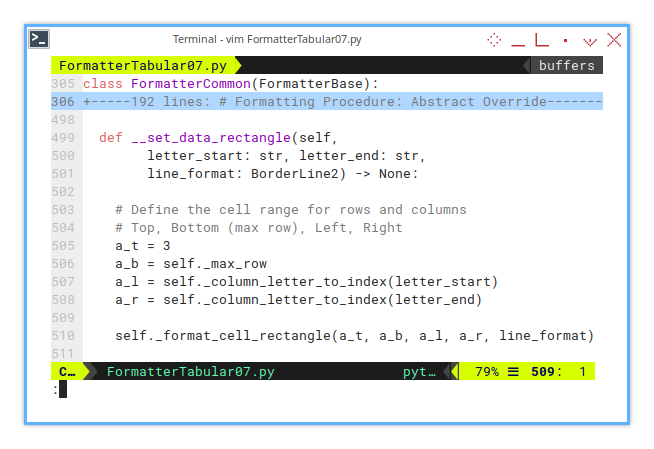
This helper defines the outer boundary for the data block. It sets the cell range covering the top, bottom (max row), left, and right edges. The focus is on entire column blocks.
  def __set_data_rectangle(self,
        letter_start: str, letter_end: str,
        line_format: BorderLine2) -> None:

    a_t = 3
    a_b = self._max_row
    a_l = self._column_letter_to_index(letter_start)
    a_r = self._column_letter_to_index(letter_end)

    self._format_cell_rectangle(a_t, a_b, a_l, a_r, line_format)
Supporting Helper: Data Range
Inner Border: Vertical and Horizontal Lines
This supporting helper meant to be used only within the __apply_data_border().

This helper retrieves the cell range, for applying vertical and horizontal lines within the data block. It focuses on rows from the third row (start_row) to the maximum row (end_row).
  def __get_data_range(self,
        letter_start: str, letter_end:  str) -> XCellRange:

    # Define the cell range for rows and columns
    start_row = 3
    end_row = self._max_row
    col_start = self._column_letter_to_index(letter_start)
    col_end   = self._column_letter_to_index(letter_end)

    # Define the cell range for the outer border and vertical lines
    return self._sheet.getCellRangeByPosition(
      col_start, start_row, col_end, end_row)
This method returns a cell range object, that can be directly modified to apply the inner borders.
07: Step Seven
After enhancing the visual appeal of the header, we can apply similar formatting to the data section. Much like the header, the data formatting follows similar methods.
Step Overview
In this section, we cover the topics related to unified configuration:
-
New Topics (Unified Configuration):
- Formatting Procedure: Format data borders (multiple block of columns)
-
Revisited Topics (Simple Configuration):
- Helper: Get data range, set data rectangle, apply data border
- Formatting Procedure: Format data border
Macro Source
You can obtain the macro source from this repository:
The macro dialog for this step will look like this:
Class Diagram
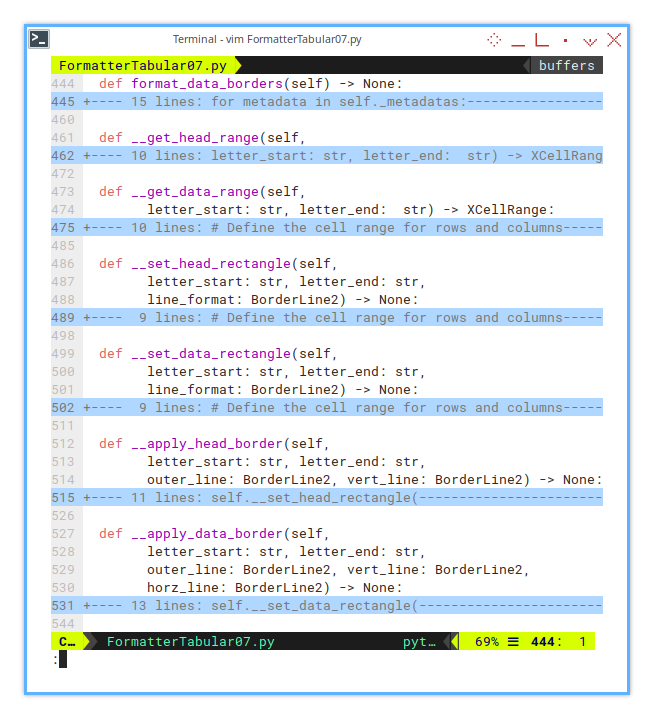
What’s new?
In this step, we introduce the highlighted abstract method
_format_data_borders() with a protected visibility specifier.
The structure for data borders is very similar to the header borders,
with a supporting method named __apply_data_borders().
This method requires two helpers:
__set_data_rectangle()and,__get_data_range()
All with private visibility specifiers.
Abstract Method
Similar to the _format_head_borders() method,
the _format_data_borders() method in the base class,
is defined as an abstract method with a protected visibility specifier.
  @abstractmethod
  def _format_data_borders(self) -> None:
    pass
Basic Flow
Next, we extend the basic flow,
by adding the _format_data_borders() method.

  def format_one_sheet(self) -> None:
    ...

    # Apply borders to the specified range
    print(' * Formatting Border')
    self._format_data_borders()
Configuration: Init Metadatas
Managing Instance Variables
A new key, data-borders,
has been added to the metadata configuration.
class FormatterTabularData(FormatterTabular):
  ...

  # Unified Configuration
  def _init_metadatas(self) -> None:
    self._metadata_movies_base = {
      'fields': {...},
      'titles': [{...}],
      'head-borders': [{...}],
      'data-borders': [{...}]
    }

    self._metadata_movies_additional = {
      'fields': {...},
      'titles': [{...}],
      'head-borders': [{...}],
      'data-borders': [{...}]
    }
Each part of the metadata corresponds to a column block.
Formatting: Format Data Borders
Inner Loop
As with previous steps, we use two loop stages:
- Outer loop: Iterates through unified metadata
- Inner loop: Iterates over
data-bordersfor each metadata entry

Let’s now examine the implementation of the protected
_format_data_borders() method in the descendant class.
  def _format_data_borders(self) -> None:
    for metadata in self._metadatas:
      start_letter = metadata['col-start']

      for border_config in metadata['data-borders']:
        col_start_id, col_end_id, \
        outer_line, vert_line, horz_line = border_config

        letter_start = self._get_relative_column_letter(
          start_letter, col_start_id)
        letter_end   = self._get_relative_column_letter(
          start_letter, col_end_id)

        self.__apply_data_border(
          letter_start, letter_end,
          outer_line, vert_line, horz_line)
Sheet Result
The output in the spreadsheet would look like this:
And here’s the rest of the columns:
This concludes the core functionality. However, I’d like to provide some additional material. You can integrate hooks into the basic flow, allowing for custom modifications. For example, you could add functionality, to color rows based on specific values.
Console Logging.
For this step, the result can be displayed in the console as follows:
>>> tabular_single_movies()
 * Rearranging Columns
   - Insert Gap: A
   - Insert Gap: H
   - Insert Gap: L
 * Setting Rows Width
 * Formatting Columns
 * Formatting Header
 * Formatting Border
 * Finished

>>>
This approach is much more efficient,
than constantly checking htop,
to monitor a single CPU core maxing out at 100%.
What is Next 🤔?
We’re almost there! Next, we’ll learn how to extend this class structure. For example, to add a data coloring procedure. Finally, we’ll separate the macro, making it reusable for multiple projects that use the same library.
Consider continuing with [ Formatter - Unified Config - Four ].