Preface
Goal: Separate formatting code and configuration. Example class using simple configuration.
Now we can automate sheet formatting. Let’s begin with a simple class for rearranging columns. The basic flow will cover formatting both single and multiple sheets.
Without Automation
A Spreadsheet Tragedy
Without automation, I was already tired of manual formatting by the time I started to analyze the content.
I had had a clear mind before I formatted the spreadsheet, but by the time the spreadsheet was fully formatted, my mind had become dull.
Without coffee, I will have become a zombie by noon.
Why Separate Config?
We often work with different types of source and result data, but we want to avoid modifying the code every time. Here’s a basic principle to follow:
- Keep the code static.
- Make the configuration flexible.
However, don’t take this rule to extremes. In many cases, it’s faster to directly alter the code to get the result. What we really need is a stable core, with macro code that can be adjusted as needed.
Example Sheet
You can download the example ODS source here:
And the example XLSX result here:
This workbook contains 40 worksheets.
Class Diagram
To provide a clear illustration of the overall structure, the main macro is depicted in a class diagram. While this is not a standard UML representation, adjustments have been made for clarity.
The class diagram is created using multiple pages in Inkscape. You can access the source here and adapt it for your own needs.
We will begin with a simple diagram, and build it up step by step until we reach the complete example.
About
This simple configuration represents my code before a heavy refactoring.
Let’s treat this simple configuration as the first version.
As you might expect, the first version can be messy. Every writer knows that good writing requires revision, and the same goes for code. It often needs refactoring.
01: Step One
Step Overview
This section covers the following topics:
- Class: FormatterBase, TabularFormatterCommon
- Basic Flow: Working with multiple sheets
- Formatting Procedure: Inserting column gaps
Macro Source
You can access the macro source in this repository:
Class Diagram
Why separate the base and tabular?
We begin with this simple class diagram. While it may look complex, let’s break down how it works.
The diagram focuses on visibility specifiers, rather than attributes or operations. To improve clarity, I’ve divided each class into three regions: private, protected, and public.
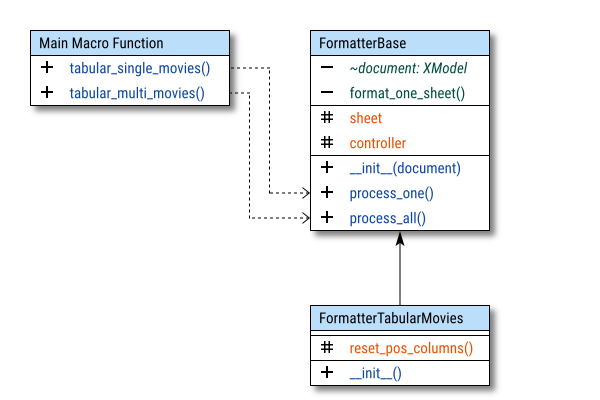
The diagram consists of three basic parts:
- Formatter Base: Basic Flow
- Formatter Tabular Movies: Formatting Procedure
- Macro Call: Represents the class in the macro
But why separate base and tabular? In real world scenarios, I work with various types of views. For instance, tabular/expand views may require, different implementations than pivot/summary views. I also handle numerous configurations for tabular data and summaries.
By keeping the core functionality in the base class intact, I can ensure flexibility in the descendant classes, allowing them to be customized for specific use cases.
XSCRIPTCONTEXT
Initialization
Since we now have two classes, and more coming later. It’s important to carefully handle the initialization process.
The core of the initialization is straightforward, and consists of the following:
class FormatterBase:
  def __init__(self, document) -> None:
    self.document   = XSCRIPTCONTEXT.getDocument()
    self.controller = self.document.getCurrentController()
However, the complete macro spans nearly 700 lines of code.
As usual, I break down long code into chunks across different files.
The catch is that XSCRIPTCONTEXT isn’t part of any external library.
It only exists within LibreOffice macro files.
This creates a challenge when separating code into multiple files.
Handling XSCRIPTCONTEXT
To work around this, we need to trick the system. Here are two approaches:
- Pass it as a function argument
- Use a property getter
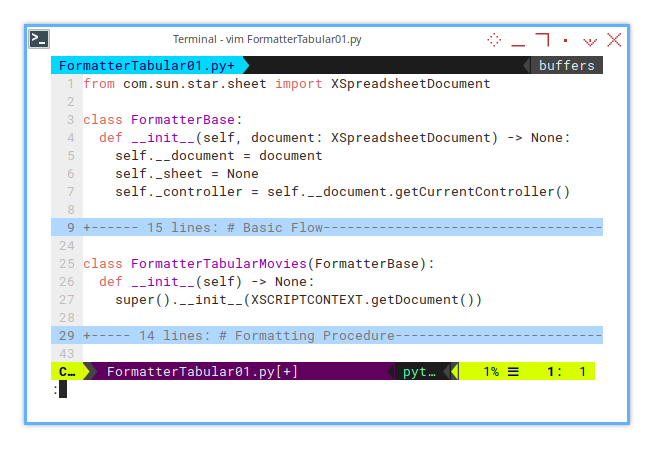
In this example, I opt for the first approach. Passing XSCRIPTCONTEXT as an argument, to the base class during initialization.
class FormatterBase:
  def __init__(self, document) -> None:
    self.document   = document
    self.controller = self.document.getCurrentController()
In the main macro file,
the subclass passes the XSCRIPTCONTEXT during instantiation.
All we really need is the document object,
so as long as XSCRIPTCONTEXT is accessible in the correct macro file,
everything works smoothly.
class FormatterTabularMovies(FormatterBase):
  def __init__(self) -> None:
    super().__init__(XSCRIPTCONTEXT.getDocument())
Initialization
The complete initialization process is shown in the following code:
from com.sun.star.sheet import XSpreadsheetDocument

class FormatterBase:
  def __init__(self, document: XSpreadsheetDocument) -> None:
    self.__document = document
    self._sheet = None
    self._controller = self.__document.getCurrentController()
For clarity and better encapsulation, I apply visibility specifiers to methods and instance variables:
_for protected (accessible within the class and subclasses)__for private (accessible only within the class)
Document in Diagram
In the diagram above,
the document property is marked as private (-),
and shown in italic with a tilde (~).
- The tilde typically indicates abstract methods or properties.
- Abstract properties are rarely private, as they are meant to be overridden by subclasses.
- Italics signify either abstract or dynamic properties.
In this context, the property is more like an uninitialized placeholder.
XModel is part of the LibreOffice API.
For simplicity, I use XModel in the diagram,
even though the actual service name is SpreadsheetDocument.
XModel is part of libreoffice API.
For simplicity, I intentionally use XModel in the diagram,
although the actual service name is SpreadsheetDocument.
You can check the actual type using:
If you need to verify the exact type, you can run the following code:
getImplementationName()Internal Diagram
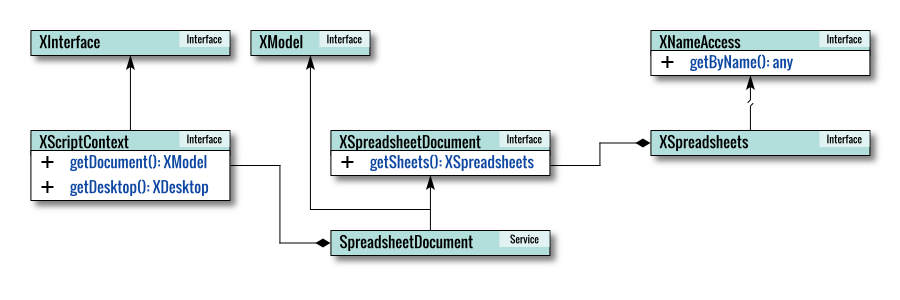
To deepen your understanding of how the LibreOffice API operates internally, let’s visualize the class structure.
This diagram represents the LibreOffice API’s internal architecture. It’s designed to provide clarity rather than strictly follow UML standards.
As usual, the focus is on illustrating conceptual relationships rather than producing a by-the-book UML representation.
Macro Call
Represent the Class in Macro
Since macros can only be called by functions directly, we instantiate the class within the function.
There are two types of processes in this macro:
- Single-sheet processing
- Multi-sheet processing
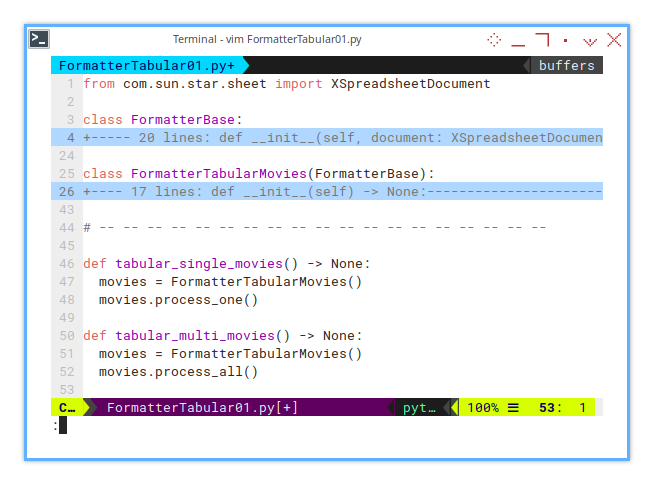
Process the active sheet only:
def tabular_single_movies() -> None:
  movies = FormatterTabularMovies()
  movies.process_one()
Process all sheets in the workbook:
def tabular_multi_movies() -> None:
  movies = FormatterTabularMovies()
  movies.process_all()
Looks simple right?
Single and Multiple
In the Macro Dialog, it looks like this:
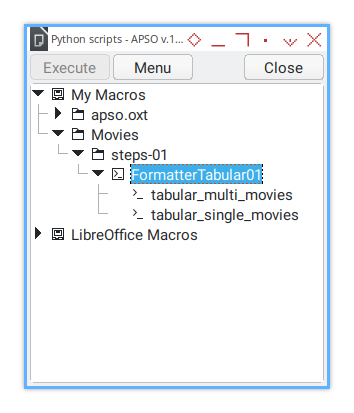
In practice, I have numerous functions, such as:
-
FormatterSummary
- summary_multi_movies
- summary_single_movies
- summary_multi_songs
- summary_single_songs
- summary_multi_movies_analytic
- summary_single_movies_analytic
-
FormatterTabular
- tabular_multi_movies
- tabular_single_movies
- tabular_multi_songs
- tabular_single_songs
- tabular_multi_movies_filtered
- tabular_single_movies_filtered
Each function corresponds to a configuration. All that’s needed is to adjust the configuration to match the column structure of the source sheet.
Having multiple configurations isn’t a problem. Since they’re usually short and straightforward.
In the APSO console, methods can be invoked by name:

>>> tabular_single_movies()
>>>
Formatter Base Class
Basic Flow
All core logic resides here.
At this stage, the focus is on format_one_sheet().
Its sole responsibility is resetting column positions.
The initial flow is minimal, a single one-liner of code:
  def __format_one_sheet(self) -> None:
    self._reset_pos_columns()
This method is triggered by either of the following:
process_one()process_all()
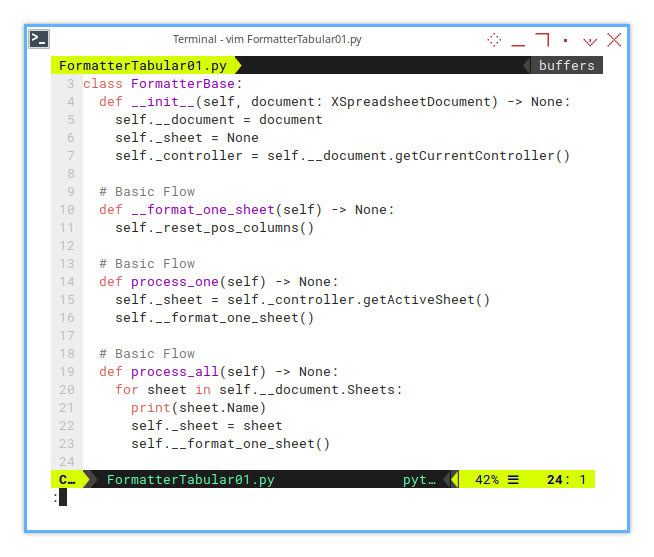
process_one() operates on the active sheet:
  def process_one(self) -> None:
    self._sheet = self._controller.getActiveSheet()
    self.__format_one_sheet()
process_all() iterates through all sheets in the workbook:
  def process_all(self) -> None:
    for sheet in self.__document.Sheets:
      print(sheet.Name)
      self._sheet = sheet
      self.__format_one_sheet()
To enable tracing, each step is printed to the console. For a workbook with 40 sheets, the output will resemble:
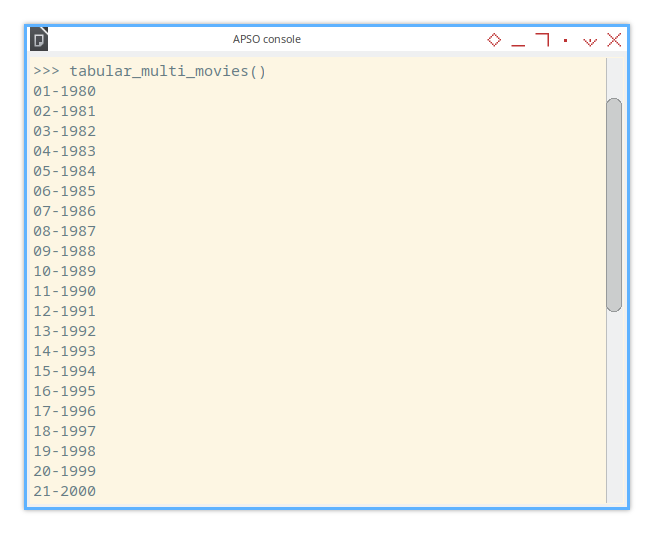
>>> tabular_multi_movies()
01-1980
02-1981
...
39-2018
40-2019
>>>
At this stage, only sheet names appear in the console. Detailed reports will come later as the code expands.
Formatter Tabular Movies Class
Formatting Procedure
This class handles specific configurations and methods, such as formatting a movie table.
You’ve already seen the initialization. Now let’s highlight the key method that handles column adjustments:
class FormatterTabularMovies(FormatterBase):
  def __init__(self) -> None:
    super().__init__(XSCRIPTCONTEXT.getDocument())

  def _reset_pos_columns(self) -> None:
    ...
The _reset_pos_columns() method is where the magic happens.
Responsible for rearranging columns according to the desired layout.
We’ll dive into its implementation next.
Arranging column
What does it do exactly?
Let’s break down the column resetting process.
It’s easier to visualize with examples. Here’s the initial input, plain columns without any modifications:
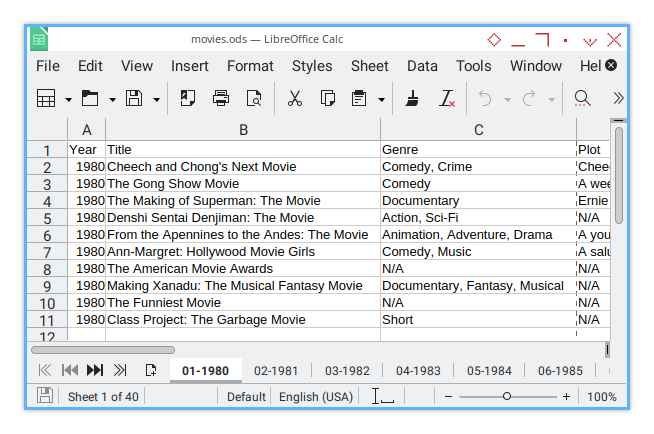
First, I add a 0.5 cm gap before all columns (column A). The result looks like this:
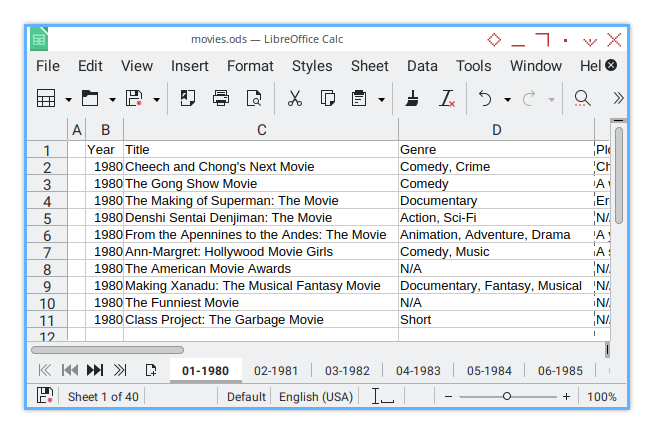
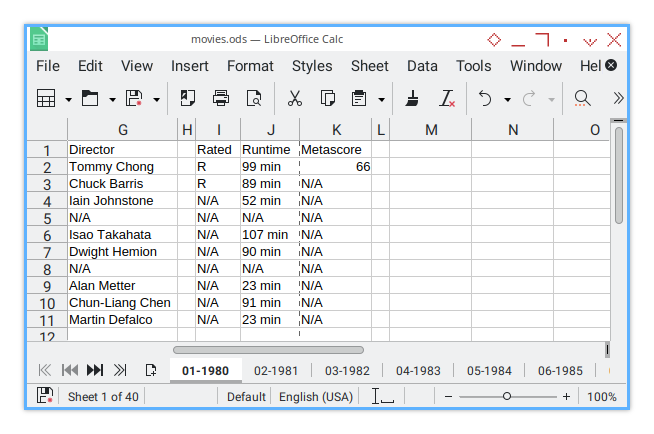
Next, I insert another 0.5 cm gap as, a divider between column blocks (column H). Finally, I add one last 0.5 cm gap after all columns (column L). Here’s the final result:
Implementation
Hardcoded for Now
For now, this process is hardcoded:
- Gap size: 0.5 cm
- Scaling factor: Locale-dependent (LibreOffice uses 1/100 mm units)
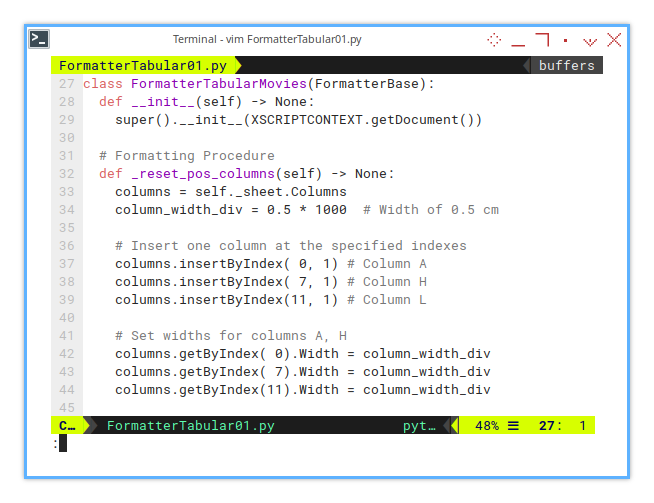
  def _reset_pos_columns(self) -> None:
    columns = self._sheet.Columns
    column_width_div = 0.5 * 1000  # Width of 0.5 cm

    # Insert one column at the specified indexes
    columns.insertByIndex( 0, 1) # Column A
    columns.insertByIndex( 7, 1) # Column H
    columns.insertByIndex(11, 1) # Column L

    # Set widths for columns A, H
    columns.getByIndex( 0).Width = column_width_div
    columns.getByIndex( 7).Width = column_width_div
    columns.getByIndex(11).Width = column_width_div
We’ll turn this hardcoded gap into a configurable parameter later. For now, the goal is to implement formatting step by step.
Complete Formatting Procedure
Basic Flow
The final version of format_one_sheet()
involves multiple steps, as shown below:
  def __format_one_sheet(self) -> None:
    self._max_row = self.__get_last_used_row()

    if not self.__is_first_column_empty():
      # Rearranging Columns
      print(' * Rearranging Columns')
      self._reset_pos_columns()
      self.__reset_pos_rows()
      self._max_row += 1
Next, the process continues with additional formatting:
    # Apply Sheet Wide
    print(' * Formatting Columns')
    self._set_sheetwide_view()
    self.__set_columns_format()

    # Apply Header Settings
    print(' * Formatting Header')
    self._add_merged_title()
    self._format_head_borders()
    self._format_head_colors()

    # Apply borders to the specified range
    print(' * Formatting Border')
    self._format_data_borders()
We’ll break down each procedure in the following sections.
02: Step Two
After configuring the columns, we will now focus on setting up the rows.
Step Overview
The topics covered in this section include:
- Helper: Last Row
- Helper: Prevent Reinsertion of Columns
- Formatting Procedure: Insert Row Gaps, Set Row Heights
Macro Source
You can find the macro source code in the following repository:
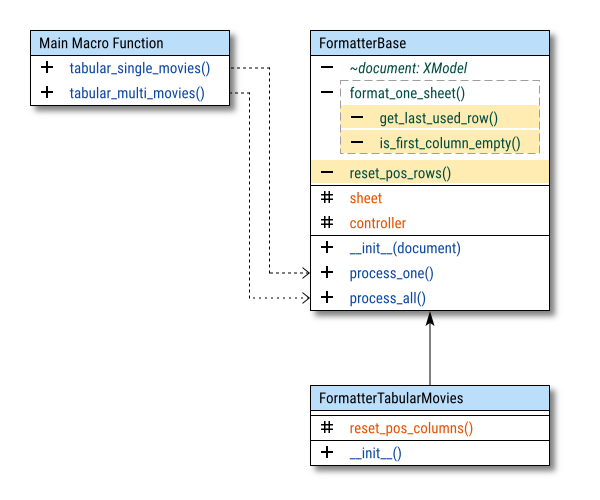
Class Diagram
In each step, I will highlight new additions such as constants, properties, or methods. This way, you can easily track the changes in the code.
Basic Flow
After rearranging the columns, we can proceed to insert row gaps and format the rows.
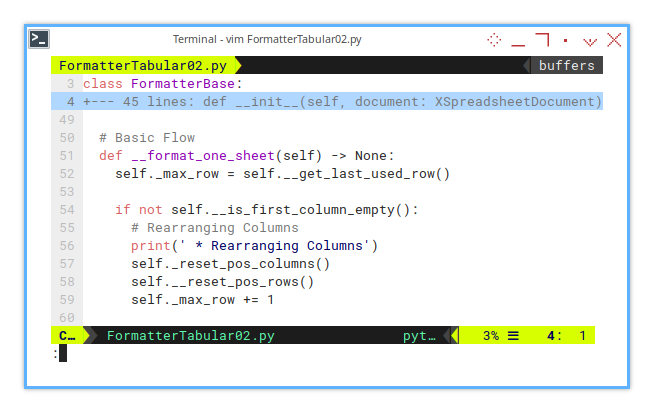
  def __format_one_sheet(self) -> None:
    self._max_row = self.__get_last_used_row()

    if not self.__is_first_column_empty():
      # Rearranging Columns
      print(' * Rearranging Columns')
      self._reset_pos_columns()
      self.__reset_pos_rows()
      self._max_row += 1
In this flow, the focus is on handling row formatting, in addition to column formatting.
Helper: Prevent Column Rearrangement
The goal of this step is to ensure, that the column and row gap insertion is only performed once, preventing any further changes, that might disrupt the order of columns or rows.
You can freely run the formatting macro multiple times, and the result will generally remain the same, such as modifying properties like color, borders, fonts, or alignment. However, this is not the case when adding gaps. The gap arrangement must be done only once. Any additional attempts to rearrange columns or rows, could alter the intended layout.
To achieve this, we use the function __is_first_column_empty(),
to check if the first column has already been occupied by a gap.
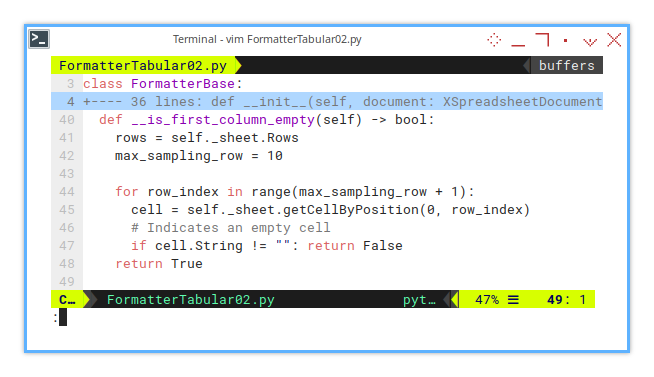
If the column is already filled with an empty cell, it indicates that the gap has already been inserted. We only need to check for this once, and further attempts to adjust the columns should be blocked.
For example, we can check the first few rows (e.g., row 10), to verify if the column has already been modified. Sampling a few rows should be sufficient.
  def __is_first_column_empty(self) -> bool:
    rows = self._sheet.Rows
    max_sampling_row = 10

    for row_index in range(max_sampling_row + 1):
      cell = self._sheet.getCellByPosition(0, row_index)
      # Indicates an empty cell
      if cell.String != "": return False
    return True
This function ensures that the macro doesn’t inadvertently re-insert gaps, preserving the order of the columns and rows after the initial setup.
Helper: Maximum Rows
Getting the end of the rows
The method __get_last_used_row() is commonly used in LibreOffice macros,
to determine the last row that contains data,
which is important for ensuring that we apply formatting,
only to the relevant rows.
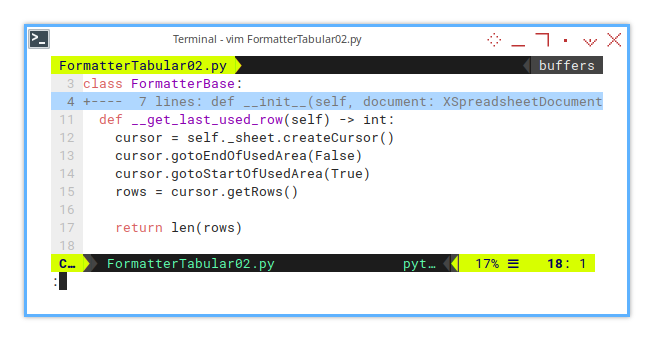
  def __get_last_used_row(self) -> int:
    cursor = self._sheet.createCursor()
    cursor.gotoEndOfUsedArea(False)
    cursor.gotoStartOfUsedArea(True)
    rows = cursor.getRows()

    return len(rows)
This method uses a cursor to navigate through the used area of the sheet.
By calling gotoEndOfUsedArea(False) and gotoStartOfUsedArea(True),
the cursor identifies the actual range of data.
We then retrieve the rows within that range and return their count,
effectively determining the last used row.
With this, we can now know the exact range of rows to format, while the column range will be set manually in the code.
This method is essential when you’re working with dynamic data in LibreOffice, as it ensures the macro adapts to any changes in the sheet’s data range.
Formatting: Row Position
In this step, we first insert two rows to create a column group heading.
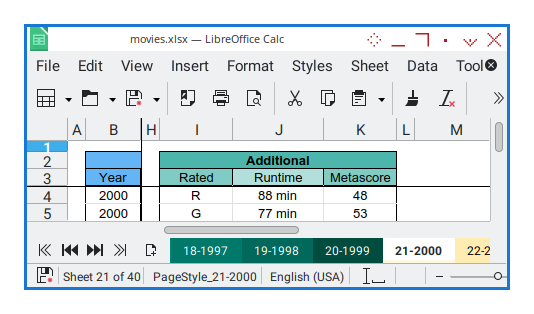
Then, we ensure the height of all rows is consistent, setting it to 0.5 cm (the multiplier factor may vary depending on the locale).
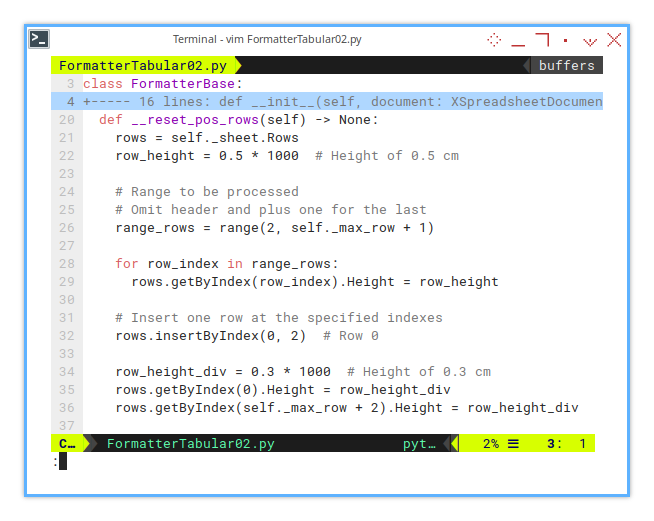
  def __reset_pos_rows(self) -> None:
    rows = self._sheet.Rows
    row_height = 0.5 * 1000  # Height of 0.5 cm

    # Range to be processed
    # Omit header and plus one for the last
    range_rows = range(2, self._max_row + 1)

    for row_index in range_rows:
      rows.getByIndex(row_index).Height = row_height

    # Insert one row at the specified indexes
    rows.insertByIndex(0, 2)  # Row 0

    row_height_div = 0.3 * 1000  # Height of 0.3 cm
    rows.getByIndex(0).Height = row_height_div
    rows.getByIndex(self._max_row + 2).Height = row_height_div
Breakdown
-
Row Height Adjustment: We set the height of each row (from row 2 to the last row) to 0.5 cm. This ensures uniformity across the rows.
-
Inserting Gap Rows: We insert two rows at the top (index 0) and apply a 0.3 cm gap to the first and after last rows. These gap rows are intended to visually separate the table from any other content that might be above or below it.
-
Maintaining Simple Formatting: The row formatting is kept simple for this example. You can adjust the row heights further if needed, but for now, the formatting uses consistent 0.5 cm and 0.3 cm values for the rows.
This approach keeps your sheet well-organized, adding necessary gaps and making sure that all rows have the same height, while also ensuring the header and footer are appropriately spaced.
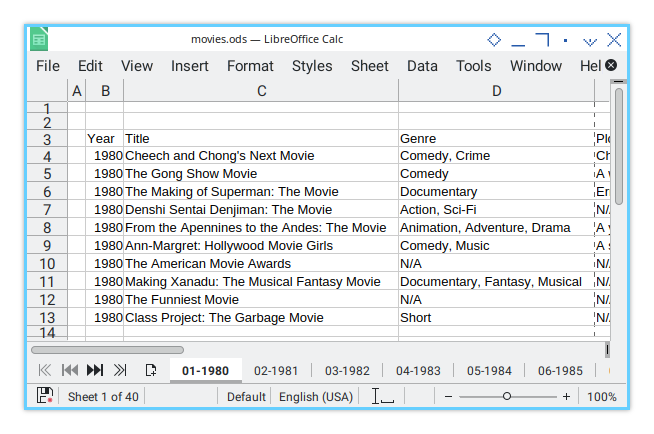
Sheet Result
The final result after applying the row and column formatting should look like this:
Console Logging.
To provide feedback during the execution of the script, I use simple print statements for informational logging. These messages help with status updates, debugging, and traceability of the code’s execution. The messages are displayed in the APSO Console.
For this step, the output in the APSO Console would look like:
>>> tabular_single_movies()
 * Rearranging Columns
>>>
This logging approach helps track the script’s flow, and ensures you can monitor the status of each operation, making debugging and tracking easier.
We will get into this later.
03: Step Three
In addition to formatting individual cells, it’s also important to adjust the sheet’s overall view settings, such as freezing rows and columns, and toggling gridlines. While gridlines are helpful during data entry, they can clutter the presentation when generating reports. Let’s combine these sheet-wide settings in one script for a cleaner look.
Step Overview
This section covers the following topics:
- Abstract Method
- Formatting Procedure: Show grid, Freeze.
Macro Source
You can obtain the macro source code from the repository:
Class Diagram
Think slow, and plan your work.
In this diagram, you’ll notice
a new highlighted method called set_sheetwide_view().
Additionally, there are two new abstract methods,
marked with italic and tilde (~): reset_pos_columns() and set_sheetwide_view().
These denote that they are abstract methods, to be implemented in the derived classes.
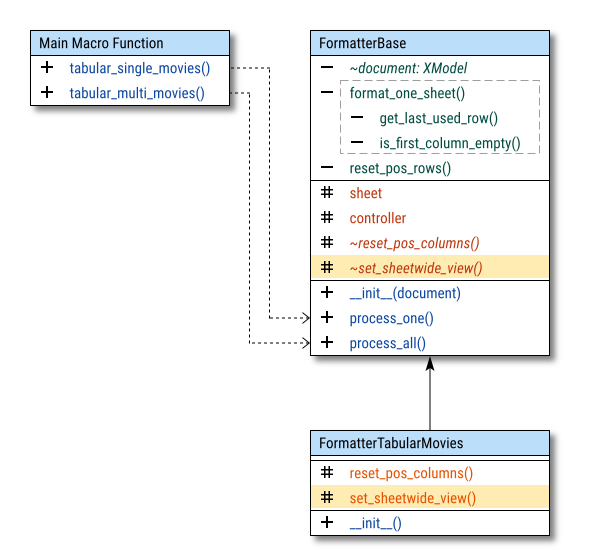
In UML, the abstract methods are denoted by the sharp symbol (#).
Abstract Method
To create an abstract class in Python,
we need to use the ABC (Abstract Base Class) library.
The abstract methods are defined with the @abstractmethod decorator,
signaling that they must be implemented by any subclass of FormatterBase.
These methods will not have any implementation in the base class itself,
as their purpose is to define a contract that the subclasses need to follow.
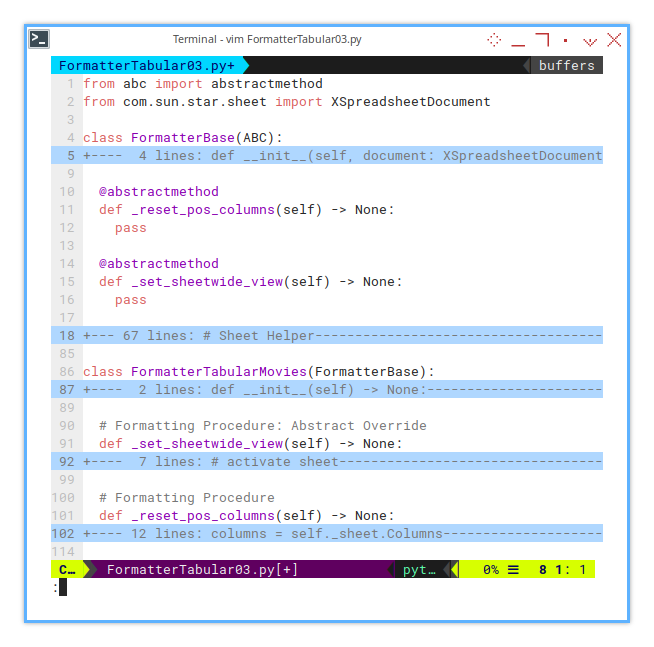
Here’s how the abstract methods are defined in the FormatterBase class:
from abc import abstractmethod

class FormatterBase(ABC):
  ...

  @abstractmethod
  def _reset_pos_columns(self) -> None:
    pass

  @abstractmethod
  def _set_sheetwide_view(self) -> None:
    pass
This structure ensures that any subclass of FormatterBase,
will be required to implement the _reset_pos_columns() and _set_sheetwide_view() methods.
Omitting ABC
If you write:
class FormatterBase():instead of:
class FormatterBase(ABC):It will still work perfectly in Python, because this class will not be an abstract base class, meaning it doesn’t have any special restrictions, or functionality associated with abstract classes.
You can instantiate FormatterBase() directly,
and it will behave as a normal class,
without enforcing that its methods be overridden.
Basic Flow
Now we can call the function correctly in the basic flow.
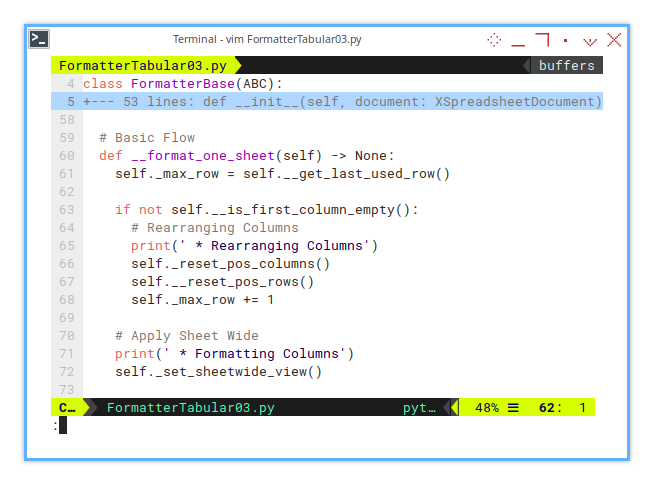
  def __format_one_sheet(self) -> None:
    self._max_row = self.__get_last_used_row()

    if not self.__is_first_column_empty():
      # Rearranging Columns
      print(' * Rearranging Columns')
      self._reset_pos_columns()
      self.__reset_pos_rows()
      self._max_row += 1

    # Apply Sheet Wide
    print(' * Formatting Columns')
    self._set_sheetwide_view()
Then, you implement the required functionality in the descendant class:
class FormatterTabularMovies(FormatterBase):
  ...

  def _set_sheetwide_view(self) -> None:
    ...

  def _reset_pos_columns(self) -> None:
    ...
This structure provides flexibility, ensuring that general formatting logic is kept in the base class, while allowing customization in subclasses.
Formatting: Sheetwide View
The set_sheetwide_view() method is responsible,
for configuring two key features:
-
Hiding Gridlines: Gridlines are useful for data entry but can make reports look cluttered, so we hide them in the final output.
-
Freezing Panes: Freezing helps keep the header rows and columns visible, while scrolling through large datasets.
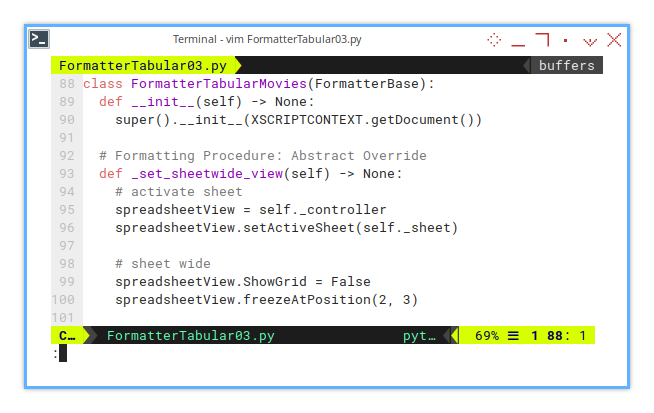
In the FormatterTabularMovies class,
the set_sheetwide_view() method overrides,
the abstract method from the FormatterBase class.
class FormatterTabularMovies(FormatterBase):
  def __init__(self) -> None:
    super().__init__(XSCRIPTCONTEXT.getDocument())

  def _set_sheetwide_view(self) -> None:
    # activate sheet
    spreadsheetView = self._controller
    spreadsheetView.setActiveSheet(self._sheet)

    # sheet wide
    spreadsheetView.ShowGrid = False
    spreadsheetView.freezeAtPosition(2, 3)
Customizing Freeze Position
Note that the freeze position (in this case, (2, 3)), can vary depending on the specific project or sheet layout. This position can either be configured dynamically later, or you can keep this method in the descendant class with hardcoded positions. The choice depends on your project requirements.
For now, let’s proceed with this simple implementation, and we can revisit the customization of this feature as needed.
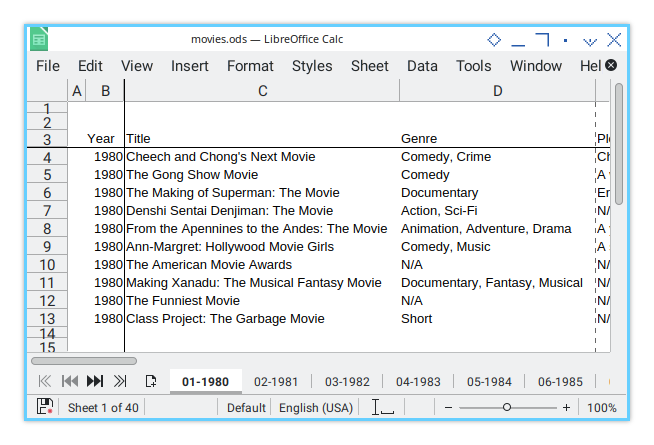
Sheet Result
The resulting sheet will look as shown below:
Console Logging.
During execution, the following console logs, will be printed to indicate the script’s progress:
>>> tabular_single_movies()
 * Rearranging Columns
 * Formatting Columns
>>>
What is Next 🤔?
After completing the basic macro, the next step is to implement the simple configuration. We’ll explore how far we can take the formatting process, incorporating more customization and refinements along the way.
Additionally, we’ll apply design patterns. Specifically the abstract method pattern, to make the code more modular, extensible, and easier to maintain.
To continue with this approach, you can read more in the next section: [ Formatter - Simple Config- Two ].